Monday, January 31, 2022

[Incredibly] Ridiculously Easy Snickerdoodle Scones

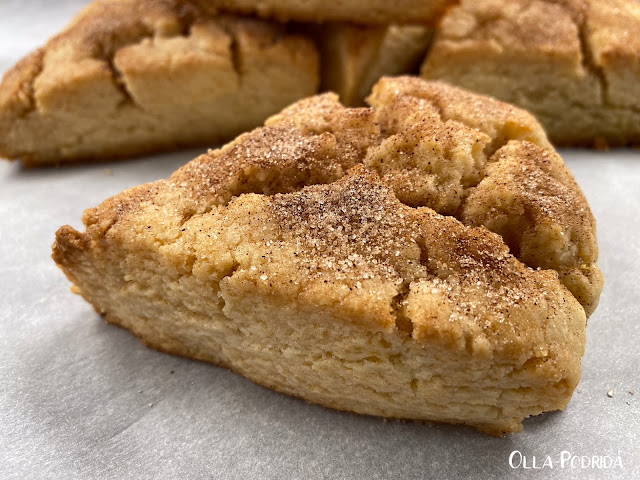
It has been ages since I last made scones, so when I spotted this recipe on the Té Café Sucré Farina blog I decided to give it a try. Her name for them were Ridiculously Easy Snickerdoodle Scones, employing the use of a freezer method that does make these easier than cutting the butter and dry ingredients together with a pastry cutter. It still seemed like trouble to me when I compared it to my incredibly ridiculously easy version [of any kind of scones] using a food processor -- the food processor cuts butter and dough together like nobody’s business -- it makes short work out of any scone recipe, and it worked beautifully here.


The glaze and cinnamon sugar topping are what make these extra special. Do give them a try. If you don’t have a food processor and want to use Chris’s method, click here and head to her blog.

Ridiculously Easy Snickerdoodle Scones

 For the scones:

1 large egg

¾ c. heavy cream (approximately)

1 stick (8 T.) butter

2 c. plus 2 T. all-purpose flour

⅓ c. sugar

1 T. baking powder

1 t. cream of tartar

½ t. salt

 For the glaze and cinnamon-sugar sprinkle:

¾ c. powdered sugar

¼ c. water

1 t. vanilla extract

2 T. granulated sugar

1 t. ground cinnamon

 For the scones:

 Preheat the oven to 400°F. Line a cookie sheet or jellyroll pan with a Silpat or parchment paper.

 Add the egg to a liquid measuring cup. Add enough heavy cream to equal 1 cup. Place the egg/cream mixture in the freezer for 15-20 minutes while proceeding with the recipe.

 Place flour, sugar, baking powder, cream of tartar, and salt into the work bowl of a food processor. Pulse until the mixture looks like heavy sand. Add heavy cream and pulse again until all flour is incorporated and the dough pulls away from the sides of the bowl.

 Turn dough out onto a lightly floured surface. Pat dough into a circle, and cut into wedges. Bake for 14-18 minutes or until nicely light golden brown.

 Transfer to a cooling rack, brush two at a time generously with the glaze. Grab a nice pinch of the cinnamon-sugar mixture and sprinkle over the wet glaze.

Serve warm or at room temperature with butter, if desired.

For the glaze and cinnamon-sugar sprinkle:

 While the scones are baking, mix up the glaze by combining the powdered sugar, water, and vanilla. Whisk until any small lumps disappear. Set aside.

Combine the cinnamon and sugar in a small bowl.

 *You can also scoop the dough up with a retractable 4 tablespoon ice cream scoop.


 As an Amazon Associate I earn from qualifying purchases.

Wednesday, January 19, 2022

Oven-Dried Black-Olive Seasoning

 
Did you all know that there were dried olives? I did not know that. It wasn’t until I read a posting in Judee Algazi's Gluten Free A-Z blog that I learned of them. That sent me googling to learn more, and that’s when I came across this recipe from Martha Stewart. I was immediately intrigued, had a jar of Kalamata olives on hand, and so gave it a try. This stuff is wonderful! Frankly, I could eat it by the spoonful. I found it added sophistication and lots of flavor to deviled eggs, pasta dishes, when sprinkled on top of soups, or tossed into salads. This is a unique and versatile seasoning. Try it!

Oven-Dried Black-Olive Seasoning

Slightly adapted from Martha Stewart

2 c. pitted Kalamata olives

sesame seeds, toasted

dried chili flakes

 Preheat oven to 250°F. Arrange olives on a parchment-lined, rimmed baking sheet. Cook until dried and crispy, about 3 hours. Remove from oven and allow to cool completely.

 Place olives into the work bowl of a high speed mini chopper and pulse until almost powdery. Stir in sesame seeds and chili flakes.

 Seasoning can be stored at room temperature up to 2 weeks.

Makes 1¼ cups.


 As an Amazon Associate I earn from qualifying purchases.


Tuesday, January 18, 2022

Old Fashioned Butter Cookies

Back when I was in college (when dinosaurs roamed the earth), I discovered a little bakery a couple of miles from my house that made the absolute best butter cookies. They were about 4 inches wide, and packed with buttery goodness. As often happens, no sooner than I found it, the owner retired, and it closed. Since that time, I have been trying to find a recipe that replicated the sweet buttery goodness of those cookies. My search is over!

I recently found this recipe on the Tasting Table website. I made them yesterday, and they are phenomenal! There is a downside, however. Despite the recipe’s insistence that it makes 24, I only ended up with a dozen 3-inch wide cookies. It also takes brute strength to pipe this dough, at least using the Wilton piping bags that I had on hand. Perhaps there are larger ones specifically designed for pastry, but I was at a loss. I found the cookies were better the second day, than they were the first, always a bonus, I think. If you like butter cookies as much as I do, try this recipe. Phenomenal!


Old Fashioned Butter Cookies

Adapted from The Tasting Table

 1 c. butter, softened to room temperature

½ c. sugar

2 egg yolks

2 t. vanilla extract

Pinch kosher salt

1½ c. flour

 In a large bowl cream softened butter and sugar until light and fluffy.

 Mix in the egg yolks and vanilla extract until well combined.

Add salt, and then slowly add the flour while mixing until well incorporated and the dough comes together.

 Place the dough into a piping bag, and use a large star tip to pipe out circles of cookie dough onto a Silpat or nonstick baking sheet. (For an easier version, use a cookie scoop to drop cookie dough onto nonstick baking sheets.)

 Place the baking sheets into the fridge, and chill for at least 30 minutes.

 Preheat the oven to 350°F.

Bake the cookies for 12 to 15 minutes until the edges are just golden brown.

 Let the cookies cool for 5 minutes, and then transfer them to a wire rack to cool completely.


 As an Amazon Associate I earn from qualifying purchases.


Friday, January 14, 2022

Winter White Tablescape

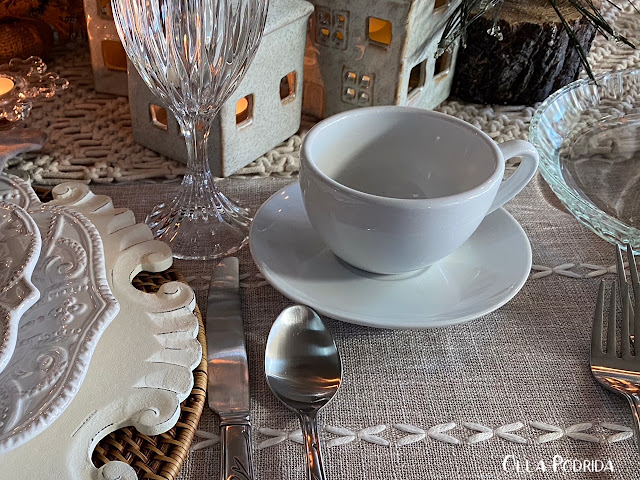
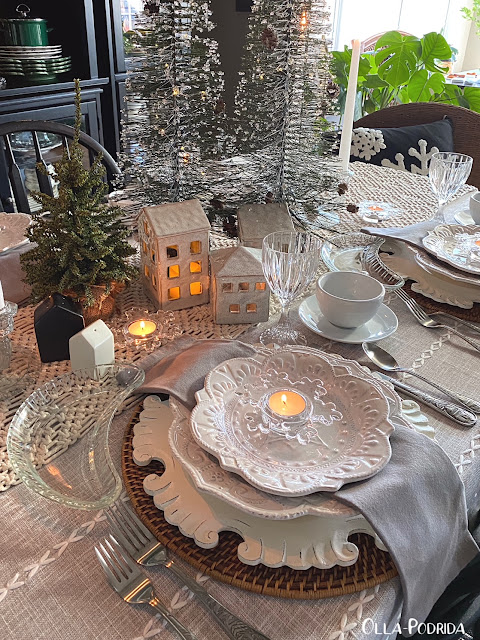
I always find the first tablescape of the New Year to be particularly challenging. I don’t mind the month of January, but it tends to be rather bleak and uninspiring. I chose to pull a few elements from a recent holiday table, mix it with whites representing the dusting of snow that we have on the ground at the moment, and pair this with crystal and candles. I like the look.

 
 The centerpiece of this table consists of two of my favorite pine trees, now strung with tiny lights. At the base of them are three ceramic houses, each illuminated with a tea light candle. You can find something similar here

At either end are a pair of crystal candle holders that my husband bought me years ago, each holding a pair of 10 inch white taper candles.


Snowflake candle holders that I got from Crate and Barrel years ago provide a bit of sparkle and light at the center of the table, and at each place setting.

The darling house salt and pepper shakers are by Magnolia Home and were purchased a couple of years ago from Target.

The scalloped, chippy, wooden chargers are from Pier One, and undoubtedly you have seen these before, on my blog, and the blogs of many others. My only regret about this purchase is that I only bought four of them. 

They are topped with Maison Versailles Blanc Amelie dinner plates and appetizer plates, separated by a simple gray napkin from Pottery Barn.

The "cabin" flatware is from one of my favorite places (as you all well know), Cabela's!

Half moon, pressed glass salad plates add a bit of frostiness alongside the plates, and are perfect for serving salad.

Marquis lead crystal wine glasses and simple white cappuccino cups finish out the place settings, all of which rest on top of a beige tablecloth with a macramé runner.


Comfortable, delightful, and wintry, this table is certain to be appreciated by your guests.

 This post is linked to: Tablescape Thursday

 As an Amazon Associate I earn from qualifying purchases.


Tuesday, January 11, 2022

Cheesy Garlic Bread

  If you are having salad as a main dish, it needs something on the side (unless, of course you are piling it high with meat and cheese). I started something new this year in making salads early in the week, vacuum sealing them, and pulling one out every day to enjoy with a half a sandwich, a cup of soup, or a roll. I love the convenience of it all. The other day I wanted something different with my salad and the thought of cheese garlic bread popped into my head. I found a recipe on The Feed Feed that looked interesting because the garlic was roasted. I adapted that recipe to include a topping of grated mozzarella cheese, and it is phenomenal! It was so good, in fact, that I spread the mixture on a slice of rustic bread and had it for breakfast the next day, topped with slices of avocado. Delish! 

Cheesy Garlic Bread

Adapted from thefeedfeed.com

 1 bulb garlic
1 T. olive oil

Pinch sea salt

½ c. butter, room temperature
2 T. fresh parsley, finely chopped
 ½ t.
red pepper flakes
½ c. grated Parmesan
Pinch of kosher salt
Few gratings freshly ground black pepper
1 c. grated mozzarella cheese
One baguette

Preheat oven to 400° F.

Drizzle the garlic bulb with olive oil and sprinkle sea salt on top. Wrap tightly in foil and roast in the oven for 30 minutes. Set aside to cool.

Put the softened butter into a bowl and add the parsley, olive oil, red pepper flakes, Parmesan, and generous pinches of salt and pepper. Beat everything together. Squeeze the roasted garlic out of the bulb and beat it into the butter.

Slice a baguette in half lengthwise and cut each half into three pieces. Spread a generous amount of garlic butter on each side.  Sprinkle top with grated mozzarella.

Bake the garlic bread for 12 to 14 minutes until edges are golden and the cheese has melted.


As an Amazon Associate I earn from qualifying purhases.


Friday, January 7, 2022

Creole Potato Salad

  I don’t know about the rest of you, but while I don’t make New Year's resolutions, I do try to set certain goals for myself. One of my goals for this year was to get rid of all of that questionable food in the freezer. So many things I will package, label, and put into the freezer with the best of intentions, and end up doing nothing with, only to have it get freezer burnt, or dried up and turned into little clumps of frozen dust.


The other day I decided to put my last two frozen pork steaks into the crockpot, rub them with
Smokehouse Maple Seasoning, top them with oodles of barbecue sauce, and then just let them simmer on low all day. I had coleslaw from the previous night, but needed another side dish so decided to try a new recipe that I had seen in Louisiana Cookin’ magazine. This is phenomenal! I made a few adjustments to suit what I like, and I think this is my new favorite. It has a bit of a kick, thanks to the Creole mustard and Creole seasoning, but if you aren’t a fan of any kind of heat, don’t put the Creole seasoning on top, replace it with paprika.

Creole Potato Salad

Slightly adapted from Louisiana Cookin’

 3 lbs. Melissa’s organic red potatoes, quartered

2 T. plus ¼ t. kosher salt

1 c. Duke’s mayonnaise

3 hard-cooked eggs, peeled and chopped

3 T. apple cider vinegar

½ c. sweet pickle relish

1½ t. sweet pickle juice

1½ t. yellow mustard

1½ t. Creole mustard

½ c. chopped Melissa’s shallots

¼ c. chopped parsley

½ t. freshly ground black pepper

¼ t.  Creole Seasoning

In a 3-quart saucepan, add potatoes and 2 tablespoons salt; cover with cold water by 2 inches. Bring to a boil over high heat; reduce heat, and simmer, uncovered, until just tender, 15 to 25 minutes. Drain, and let cool slightly. In a large bowl, combine mayonnaise, remaining ¼ teaspoon salt, and remaining ingredients. Add potatoes, and gently combine. Sprinkle with additional Creole seasoning, if desired. Serve at room temperature or chilled.


As an Amazon Associate I earn from qualifying purchases.
 

Thursday, January 6, 2022

Slow Cooker Creamy Chicken Noodle Soup

 Jeepers! It is cold here! I think it probably feels colder because we had such a warm December. Yesterday I had a fire going in the fireplace trying to warm up, and spent a good bit of time in the kitchen. There is something about busying myself in the kitchen, with the oven going, that just seems so warm and cozy. Another thing that makes me feel warm and cozy is soup, particularly one as comforting as this creamy chicken noodle soup with wonderfully thick noodles.

Slow Cooker Creamy Chicken Noodle Soup

1 large skinless, boneless chicken breast
7 c.
homemade chicken stock
2 ribs celery, chopped
1 carrot, chopped
3 scallions, chopped
1 t. dried parsley
1 t. seasoned salt
1/4 t. freshly ground black pepper
2 10.5-oz. cans
condensed cream of chicken soup
1 c. sour cream

6 oz. wide egg noodles

Place chicken, stock, celery, carrot, scallions, parsley, seasoned salt, and pepper into the bottom of a
5-quart slow cooker. Cover and cook on low until chicken is no longer pink, 5 to 6 hours.

Remove chicken, shred or dice it, and return it to the pot. Stir in soup and egg noodles. Continue to cook until noodles are tender, 30 to 35 minutes. Stir in sour cream, and taste for additional seasoning.


As an Amazon Associate I earn from qualifying purchases.


Tuesday, January 4, 2022

Sordid Tale

Fans of Bridgerton recently learned that season two will become a reality on March 25th of this year. If you happen to be such a fan, the wait will no doubt seem interminable. To ease the pain, let me introduce you to this delightful companion book, The Regency Book of Drinks, Quaffs, Quips, Tipples, and Tales from Grosvenor Square by Lady Thornwood a.k.a. author Amy Finley. It is a charming and beautifully illustrated book on proper cocktails, all with a Bridgerton leaning.

I chose to make the cocktail known as “Sordid Tale,” and was not disappointed. It’s a pimped out Bloody Mary made extra special via the addition of olive juice. I employed the use of alcohol in mine. Yum! Yum!

Sordid Tale
For 2

16 oz. tomato juice
2 oz. hot sauce
1 oz. Worcestershire sauce
1 - 2 t. prepared horseradish
1 - 2 oz.
tamari
1 - 2 oz. green olive or capers brine

Mix in a small pitcher, adjusting ingredients to taste. Serve over 1-inch ice cubes in
highball glasses, garnished with a lemon wedge and several green olives impaled on a skewer. If one’s m’lady is grieved to the point that spirits are required, add 2 ounces gin to each glass.

Disclaimer: I received a complimentary copy of The Regency Book of Drinks from Abrams Books as a part of the Abrams Dinner Party Program for 2021-22.

As an Amazon Associate I earn from qualifying purchases.

Saturday, January 1, 2022

Peppermint Milk Shake


Is it just me, or does every month seem to have its own flavor? The autumn months seem to be apple and pumpkin flavored; December and February always taste like chocolate to me. May tastes like strawberries, June and July like fresh tomatoes, but January, that’s reserved for peppermint. As we start off the New Year (and here’s hoping it’s heaps better than the last two), I’m going to do so with a Peppermint Milk Shake. This is a recipe that I found online and is supposed to be a copycat recipe from Chick-fil-A. Having never been to Chick-fil-A, I can’t say how close it is, but I will say it is incredibly delicious. For an adult version, add a splash (or more) of peppermint schnapps. Heaven!

Peppermint Milk Shake

Slightly adapted from ohsodelicioso.com

 8 candy canes

¼ c. shaved semisweet chocolate

1 c. whole milk

4 c. vanilla ice cream (about 8 scoops)

½-1 t. peppermint extract

 Shave chocolate bar using a microplane grater.

Crush candy canes into pebble-sized pieces by pulsing them in a blender.

 Place some milk, ice cream, extract, crushed peppermint and chocolate into a malt mixer or high-speed blender. Blend until thick and creamy. Pour into glasses and top with whipping cream and a stemmed cherry.

 Makes 4 shakes.

 Happy New Year, everybody!


 As an Amazon Associate I earn from qualifying purchases.