Friday, February 28, 2020

Olive Parmesan Tart

This post contains affiliate links.
Those of you who read last week’s post on the Brandied Mushroom Steak Tarts know that I had a bit of trouble getting a jar of olives open. Finally, after carting that jar all around town, I stopped by the house of a friend who’s currently employing the use of a builder that I used to create my deck. If anyone could get that jar of olives open, I knew that Joe could. As with every man I encountered on this journey, he tried to unscrew the lid right off the bat assuming, no doubt, that I was too weak to do so. Now, I’m not saying that I’m not too weak, but having tried everything and everyone, that was not the place to start.
What did work was using a paint can opener to break the seal where the lid met the jar, and then it unscrewed with no problem. Had this not worked, my plan was to get out my concrete drill bit, and drill straight down through the top. I wanted those olives!

The recipe below is the reason why. I spotted this in a current issue of Sweet Paul magazine. I love everything that he makes, and this recipe was no different. It is so easy to put together, and so delectable, you’ll feel as if you are dining in some high end, wood-fired pizza place. It works equally well as appetizers, you just need to cut it into smaller squares. It’s a great party dish because it tastes good hot from the oven, or at room temperature.

Olive Parmesan Tart
Sweet Paul

All-purpose flour
1 sheet of puff pastry
1 c.
cured olives, coarsely chopped
½ c. grated Parmesan
1 small red onion, thinly sliced
½ t. dried thyme

Freshly ground black pepper
Olive oil

Preheat oven to 425ºF.

Sprinkle work surface with a little flour, and roll out the puff pastry to double its size. Transfer to a baking tray covered with parchment paper.

Top with olives, Parmesan, red onion, thyme, and pepper.
Finish off with a drizzle of olive oil.

Bake until golden, about 18–20 minutes. Serve with another little drizzle of oil.


Wednesday, February 26, 2020

Twin Peaks Pie, anyone?

This post contains affiliate links.
 You have often heard me speak about the belly of the beast where chaos reigns. But when my number two son, his wife, and their two cats lived with me for six weeks awaiting the completion of their new home, it positively ran amok! Boxes were everywhere, as well as various pieces of furniture and decorative items they’d moved out of the guest room, and its associated closet, in order to give themselves more space. Additionally, it was the Christmas shopping season, so more boxes were arriving daily — many of them for my house guests — and they got added to the already obscenely big pile. They had boxes, I had boxes, and there were still boxes from my late mother, father, and husband, all in this area.
The other day, I was rummaging around, like I do, and ran across two unopened boxes with my son’s name on them. He couldn’t imagine what they might be, so when he came for his Friday visit with his old mom, he opened them. It was like Christmas! In fact, it was Christmas; there was a gift in there for me that he had completely forgotten he’d ordered. Here it is, my new Twin Peaks ceramic pie dish. Now to decide upon an appropriate pie!


Monday, February 24, 2020

Italian Glop, I mean Goulash

This post contains affiliate links.
Isn’t it funny how if you put the word “Italian” in front of almost anything that makes it seem so much better? Italian food, Italian wine, Italian cheese, Italian men…you get the picture. The reason I mention this is because earlier today a friend called me to ask me what I was having for dinner. It was one of those “clean out the fridge” days wherein I was trying to get rid of little bits of all kinds of things that were taking up space. So my answer, though honest, was not what she’d expected to hear.

“Some kind of glop,” I told her.

She thought for a while and then asked, “Is it Italian glop?”

I thought about this for a while, and said, “Yes, I think it is.”

“Oooh,” she said, enthusiastically. “Sounds good!”

As it turned out, it really was. It was a perfect chilly evening comfort food to enjoy straight from a pasta bowl with a crusty slice of bread. The kids will like this, particularly if, like me, you use mini wheel pasta. I love the various shapes of pastas, so I’m constantly mixing things up where noodles are concerned. 
Italian Glop, I mean Goulash

8 oz. pasta of your choice
1 lb. ground chuck
1 Melissa’s shallot, finely chopped
2 cloves garlic, minced
½ T. Worcestershire sauce
1 (15-oz.) can tomato sauce
1 (14.5 oz.) can petite diced tomatoes
½ c. diced black olives
¼ c. chopped fresh parsley
1 t. salt
½ t. freshly ground black pepper
One large handful fresh baby spinach*
1 c. cheddar cheese, shredded

Preheat oven to 350ºF.

Bring a large pot of water to boil. Cook pasta for 3 minutes less than the box directions.  Drain, reserving ¼ c. pasta water.

Heat a large skillet over high heat.  Brown ground chuck, crumbling meat as you do, 6-7 minutes.  Add shallots to pan and cook until translucent. Add garlic and cook for 1 minute until fragrant; drain on paper-towel lined plate, and then return mixture to the pan.

Stir in Worcestershire sauce, tomato sauce, diced tomatoes, olives, and parsley; mix until combined.

Stir in Italian seasoning, salt, and pepper. Taste and adjust seasonings to taste. Add spinach and let it wilt down into the sauce. Stir in reserved pasta water.

Fold in cooked pasta and cheddar cheese. Transfer to a casserole dish sprayed with PAM, and bake for 20-25 minutes until bubbly and cheese is melted.

Enjoy! Freezes beautifully, or keeps easily in the fridge for three days if, like me, you don’t want to cook for a while and are gleeful at seeing leftovers.

*Chop it up if you want to hide it from the kids


Sunday, February 23, 2020

Organizing Cloth Napkins

This post contains affiliate links.
Ever since the first of the year I have been on a real disorganized organization tear. What I mean by this is that I am determined to get as many areas of the house as organized as possible, but instead of focusing on one at a time, I flit from one, to the next, to the next, to the next, because I am easily distracted (like a lovable puppy). The late Mr. O-P used to refer to me as “The Bee” because I would fly from one thing to the other. That is probably the most apt description with which I have ever been labeled.
Today I am popping in to tell you about one of my favorites. In the same way in which I organized my fabric, I have also organized my cloth napkins. Previously I had them in drawers, boxes, baskets, you name it, all over the house. Using this method, I could not be happier. Having them all lined up in a file drawer is a great way to store them all so that I can see what I have, and easily match them to whatever dinnerware I have chosen to use. I have a lot of cloth napkins, so I will be starting on my second drawer this afternoon.

If you’d like to do the same, clear out a file drawer, and grab yourself a handful of those
hanging file folders. Line the file folders up in the drawer, and drape collections of napkins over them. Now get cracking!


Wednesday, February 19, 2020

Brandied Mushroom Steak Tarts

This post contains affiliate links.
My plan for dinner this evening was to make an olive tart. Over the Christmas holidays I purchased the most beautiful jar of mixed olives that I was saving for a special recipe. The olive tart, spotted in a recent issue of Sweet Paul magazine, seemed to be it. There was only one problem; I couldn’t get the jar of olives open. Generally, I’m pretty good at getting jars open, but not this one.
So, I took it outside (it was a lovely day for taking a jar of olives for a walk), and started going around the neighborhood seeing if any of the big, strong men could help me. Nope. Not a one. I had to go to CVS and the library, so I put the jar of olives in my car and took them with me. A slight, but wiry-looking pharmacist greeted me at the drive-up, so I handed the jar of olives to him. He couldn’t get it open either. Then I went to the drive-up window at the library, fully expecting a woman, but no, a big, burly guy greeted me. So, I handed him the olives. I thought he was going to pop a vein, but he couldn’t get the jar open either.

  An olive tart without olives wouldn’t quite be the same, so I went in an entirely different direction, cooked a steak, made a delicious mushroom sauce, and ended up with these easy and elegant steak tarts. Super delicious, easy to prepare despite what appear to be lengthy and complicated instructions, and certainly company worthy.
Brandied Mushroom Steak Tarts
Serves 2

2 (8 oz.) filet mignon steaks (1-1½" thick)
Freshly ground black pepper
1 T. unsalted butter
1 T. olive oil
1 sheet puff pastry, thawed
1 slice lean bacon
1 medium clove garlic, finely minced
1 T. unsalted butter
6-8 large button mushrooms, sliced
Freshly ground black pepper, to taste
2 T. Brandy*
2 T. water
2 t. freshly squeezed lemon juice
1 t. Worcestershire sauce
½ c. heavy cream
1 T. fresh parsley, finely minced

Preheat oven to 400° F. Cut one sheet of puff pastry in 2 6” x 5” pieces. Score ½” from the edge around the perimeter; do not cut through the pastry. Slide pastry onto a
parchment-lined baking sheet, and bake for 12-15 minutes until puffed and golden. Remove from oven and cool 10 minutes. With the back of a spoon, depress center of puff pastry, inside the score lines, to make a well for the steak.

While pastry is baking, press ground pepper into both sides of each of the fillets. Place butter and olive oil into an oven safe 9-inch sauté pan, melt over medium high heat until hot but not smoking. Carefully place fillets into hot pan and sear for 1-1/2 to 2 minutes on each side. Remove from heat and place immediately into the oven to bake for 8 minutes.

Remove steak from oven and place on a plate. Allow to rest for 10 minutes before slicing into thin slices. This will yield a medium steak. Bake a couple minutes longer for a steak more well done.

In the same pan in which you cooked the steaks, cook bacon until crispy.  Remove bacon, crumble, and set aside.

Add butter and garlic to skillet with drippings.  Sauté for one minute, stirring constantly to prevent the garlic from burning.

Add mushrooms and pepper, and simmer until mushroom liquid begins to evaporate.  Add brandy to deglaze pan, and continue simmering until almost evaporated.  Stir in water, lemon juice, Worcestershire, and soup base, and boil until thickened slightly.  Pour in cream and stir to blend.  Add reserved bacon and parsley.

Place slices of steak on top of prepared puff pastry and spoon mushroom sauce overall. Garnish with additional chopped parsley, if desired.

*If you don’t have brandy, use red wine. If you don't have wine, use strong, black coffee.


Monday, February 17, 2020

Air-Fried Crab Rangoon

This post contains affiliate links.
I told myself that I was going to make something special to eat on Valentine’s Day, but kept vacillating between an Olive Tart, Beef Wellington Tart, and homemade Crab Rangoon. Because I'd made the Crab Rangoon filling the day before, it seemed the easiest option.

Nothing could be simpler than this. Put the filling together ahead of time -- it will keep in the fridge for 1 to 2 days -- and then just assemble when the mood hits. 

As Santa had brought me a combination convection/toaster oven/air fryer for Christmas (this one), I thought I would air fry them. They were crispy on the outside like homemade potato chips, and wonderfully creamy on the inside. I imagine they would work out just as well in the oven. Either way, you need to make these. Now!
Air-Fried Crab Rangoon

1 8-oz. pkg. cream cheese
2 scallions, cut into 1-inch slices
1 6-oz. can
lump crab meat
½ t. Worcestershire sauce
¼ to ½ t. garlic salt
¼ t. freshly ground black pepper
2 to 4 drops hot sauce
1 pkg.
Melissa’s Wonton Wrappers

Place all ingredients into the work bowl of a food processor and pulse until creamy. Place wonton wrappers onto a flat surface, and dampen all four sides with a bit of water (you can use your finger or a pastry brush for this). Fold up all four sides to the top, and pinch closed. Spray with olive oil cooking spray, and bake at 350°F for five minutes.

 Makes two dozen


Friday, February 14, 2020

Pickled Eggs

This post contains affiliate links.
When I mentioned, on my personal Facebook page, that I had an interest in making pickled eggs, there was a huge uproar. You’d have thought that I’d said I was bagging up puppies, and leaving them on the side of the highway, people were so appalled. I have to admit, they are a bit colorful, perhaps a trifle on the gaudy side, but they are really good! You may think that you wouldn’t like them, but if you like deviled eggs, you would like pickled eggs, because they taste pretty much the same. The only difference is, pickled eggs are so much easier to make. Make them if you dare!
Pickled Eggs
As seen in Sweet Paul Magazine

12 hard-boiled eggs
1½ c. cider vinegar
½ c. water
1 T.
fine sea salt
1½ t. sugar
2
cardamom pods
1 t. crushed black peppercorns
½ t.
allspice berries
½ t. ground turmeric
½ t. celery seeds
1 medium
Melissa’s red beet, sliced
2 shallots, thinly sliced

Poke eggs with a pickle fork, through the white and down to the yolk, about 6 times.

Put the eggs in a tall jar, such as a quart canning jar. Put the remaining ingredients in a saucepan and bring to a boil.
Cover and simmer about 15 minutes, then allow liquid to cool.

Remove the beets and enjoy separately.

Pour the liquid and remaining solids over the eggs.
Refrigerate and let the eggs sit for a day and up to several weeks.

Note that after 1 day, the pink color will penetrate all the way to the yolk. However, the flavor will be best after about a week.

Serve eggs on their own, as an accompaniment to salads and grain dishes, or cut them in half and mix the yolks with mayonnaise, mustard, horseradish, and chives for bright Deviled Eggs.

If you think making and peeling hard-boiled eggs is a pain, get yourself one of these. Perfect eggs every time. Brilliant!


Tuesday, February 11, 2020

Lemony Chicken and Orzo Soup

This post contains affiliate links.
We have had a week of gray days with intermittent sleet, snow, and freezing rain. Nothing much has come of any of it, so I really don’t mind, but the continuing grayness is starting to get me down. Because this old body tends to react adversely to changes in weather, I make sure I have plenty of chicken soup on hand, consuming it regularly, to ward off any ills that may be planning attack. After a while, however, even my favorite chicken soup becomes a bit dull, so I decided to try a new one.

Using both lemon juice and dill in chicken soup was new to me, but I absolutely loved both! The dill provided a wonderful spring-like taste; the lemon juice a brightness that made this a joy to consume. Orzo in place of the usual noodle was welcome as well, and I ate this soup three days running.

Give it a try, and be sure to use plenty of fresh dill, and squeeze the juice of an entire lemon into your bowl before eating. You won’t regret either. I was so impressed with this soup that I have decided to grow dill in my deck garden this year. I want to make certain I have plenty so that I can make this again and again.
Lemony Chicken and Orzo Soup
Slightly adapted from Bon Appetite

1 T. olive oil
1 lg. Melissa’s leek, white and pale-green parts only, halved lengthwise, sliced crosswise ½” thick
1 celery stalk, sliced crosswise ½” thick
12 oz. skinless, boneless chicken thighs
6 c. chicken broth
Kosher salt, freshly ground pepper
½ c. orzo
¼ c. chopped fresh dill
Lemon halves (for serving)

Heat oil in a large heavy pot over medium heat. Add leek and celery and cook, stirring often, until vegetables are soft, 5-8 minutes. Add chicken and broth; season with salt and pepper. Bring to a boil, cover, reduce heat, and simmer until chicken is cooked through, 15-20 minutes. Transfer chicken to a plate. Let cool, then shred chicken into bite-size pieces. Meanwhile, return broth to a boil. Add orzo and cook until al dente, 8-10 minutes. Remove pot from heat. Stir in chicken and dill. Serve with lemon halves for squeezing over.


Monday, February 10, 2020

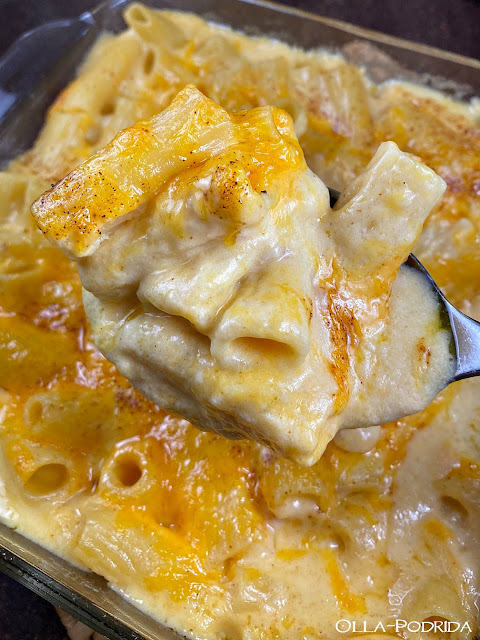
Perfect Creamy Macaroni and Cheese

This post contains affiliate links.
I hate to grocery shop, I really do. The late Mr. O-P used to love it, so he was the one who bought all of the groceries. That is but one of the things I miss ever since he passed away. As a consequence, I tend to order a lot of pantry staples online. It’s quick, it’s convenient, and I don’t have to leave the house. It is not without its issues, however. I tend to order more quickly than I should, scanning, rather than thoroughly reading the descriptions, when I do. I needed spaghetti and rigatoni. What I didn’t need was eight packages of spaghetti and four of rigatoni. I managed to fob off a number of them to my son, and now I am planning quite a few pasta dishes in the coming months. Fortunately, pasta is very versatile, and used in any number of cuisines, so I don’t have to worry about getting tired of it.

This recipe, from the Canadian blog
Seasons and Suppers, calls for elbow pasta. Because I had only a small amount of that, and oodles of rigatoni, I made the substitution. Frankly, I think I like it better. 
Perfect Creamy Macaroni and Cheese

8 oz. dry rigatoni

Cheese Sauce:
¼ c. butter
1/3 c. flour
3 c. whole milk
7 oz. aged white crumbly cheddar, crumbled
3 oz. orange sharp cheddar, crumbled
½ t. kosher salt
¼ t. regular chili powder
1/8 t. garlic powder

Topping:
½ oz. aged cheddar, grated

Add water and a bit of salt to a large pot and place over high heat for the pasta. While it's heating, prepare the cheese sauce.

For the cheese sauce: In a large saucepan, melt the butter over medium heat. Whisk in flour and continue to whisk and cook for about 2 minutes.

Very slowly add the milk, a little at a time, whisking constantly. Once all the milk has been added, cook, stirring frequently, until the sauce thickens, about 10 minutes.

Remove the saucepan from the heat. Add the cheese, salt, chili powder, and garlic powder. Stir until the cheese is melted and all the ingredients are incorporated, about 3 minutes. Set aside for a minute.

Preheat oven to 350ºF with rack in the center of the oven. Oil or butter an 8-inch square baking dish.

When the pasta water is boiling, add the macaroni and cook for 2 minutes less than the package directions indicate. When the pasta is cooked, drain and immediately rinse well with cold water.

Add the cooked pasta to the cheese sauce and mix gently, but thoroughly. Spoon or ladle the mixture into prepared baking dish. Sprinkle the top with a bit of additional grated sharp cheddar cheese; sprinkle with chipotle chili powder.

Bake, uncovered, for 20 to 25 minutes, until the sauce has bubbled up around the edges and the top has a nice golden crust.

Let stand for a few minutes before serving.


Wednesday, February 5, 2020

Deep, Dark, Decadent Brownies

This post contains affiliate links.
I don’t know what possessed me to make these brownies, because ordinarily I am not a brownie person. But something told me that this would be an excellent dessert to accompany a pasta dish that I had made for supper (recipe coming later in the week). I know, I know, pasta does not really call for chocolate, but that day, for me, it did. 

I cannot tell you how good these brownies are. Coming from a non-brownie lover like me, that is significant. These are eyes-roll-back-in-your-head sensational! I literally made yummy sounds while I was eating these; pigs in truffles do not make noises like I did while consuming one. 

I found the recipe unusual in that it called for putting them in the freezer right after baking, and then wrapping them individually in plastic wrap and freezing them, but I totally get that now. Had I not frozen them, I would have eaten the entire pan. 

Make these! I’m not just kidding around. They are so easy, don’t call for a lot of equipment, and are certainly worthy to serve company if any remain. You can dust them with powdered sugar, top them with ganache, or just enjoy them, like I did, as is. Magnificent!
Deep, Dark, Decadent Brownies
Adapted from a recipe on Thibeault’s Table

1 c. unsalted butter
20 oz.
dark (60% cacao) chocolate chips
1½ c. sugar
4 large eggs
Pinch of salt
1 c. all-purpose flour
½ t. vanilla extract
½ t.
espresso powder
1 c. toasted pecan halves

Preheat oven to 350° F. Line a
9” x 9” x 2” pan with foil, leaving two inches on each end to hang over the edges of the pan, and grease with butter; set aside.

In a large saucepan, over medium heat, melt butter and sugar together, whisking occasionally, until the butter has melted and the mixture is smooth. Add the chocolate and stir until chocolate melts. Continuing stirring until the mixture is smooth.

Add one egg at a time, mixing well before each addition. Remove from heat and stir in vanilla and espresso powder.

Stir in flour and salt, and mix well. Stir in the pecans and pour into prepared pan. Bake in preheated oven for approximately 35 minutes. Do not over bake. Brownies should be set in the middle but still slightly soft. Place immediately in the freezer. When cold, remove and cut into bars. Wrap each bar in plastic wrap and store in the freezer.