Thursday, June 30, 2022

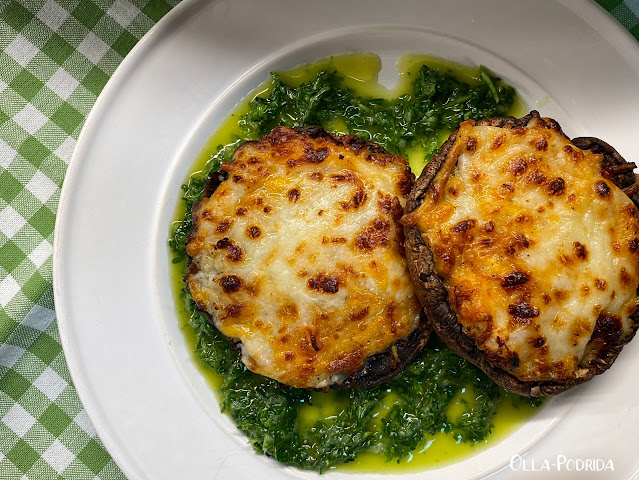
Grilled Cheese Mushrooms

Lately I have been trying to lower the intake of carbs in my diet. I am not particularly a sweet eater; my downfall tends to be bread and pasta. So when I found this recipe by London chef Antonina Parker on Instagram for a bread-less version of grilled cheese, I knew that I had to try it. I did not miss the bread one bit in these deliciously hearty open-faced, knife-and-fork, grilled cheese sandwiches.

Most definitely company worthy, these would make a wonderful dish at a brunch, lunch, or a nice starter for a sit down dinner.

Grilled Cheese Mushrooms
Adapted from Antonia Parker

4
Melissa’s portobello mushrooms, gills and stems removed
4 T. olive oil
½ c. grated cheddar
½ c. grated Parmesan
2 small garlic cloves, minced
Salt and freshly ground black pepper, to taste

Persillade Sauce
¼ c. flat leaf parsley
Zest of one lemon and the juice of half
½ small clove garlic, minced
2 T. extra-virgin olive oil

Preheat oven to 400°F.

Place mushrooms on a foil-lined baking tray and drizzle each with about a teaspoon of olive oil and scatter with salt and pepper. Roast, stem side up, for 6 minutes.

In a small bowl mix together the two cheeses, grated garlic, and lots of pepper. Remove mushrooms from oven and divide cheese mixture between them, mounding on top. Bake for another 5 minutes until cheese is melted and bubbling.

While they are cooking, place all of the persillade ingredients into a blender and mix until smooth. Plate the mushrooms with the sauce drizzled around them.


Tuesday, June 28, 2022

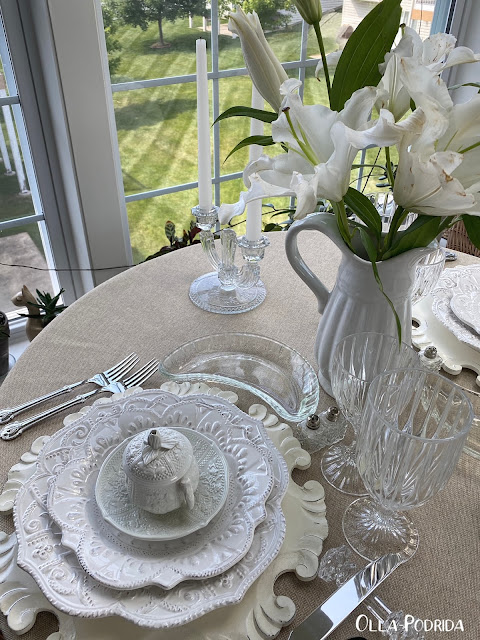
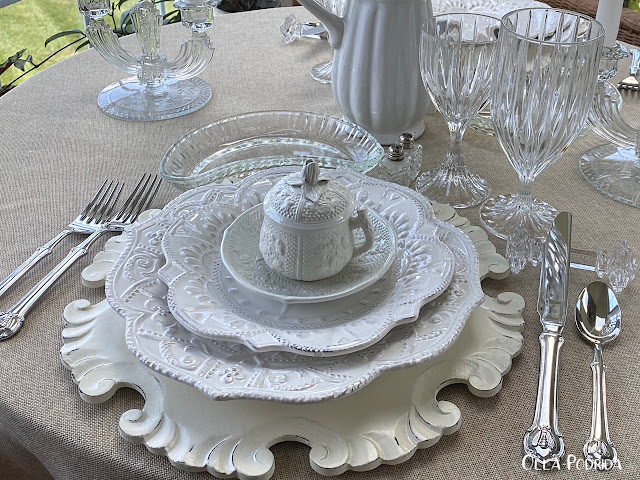
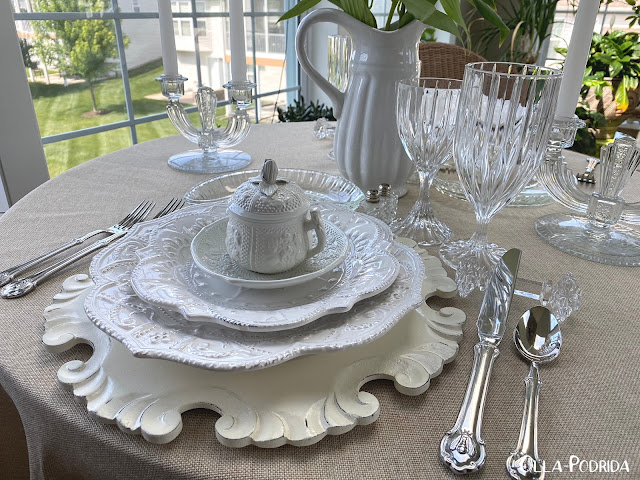
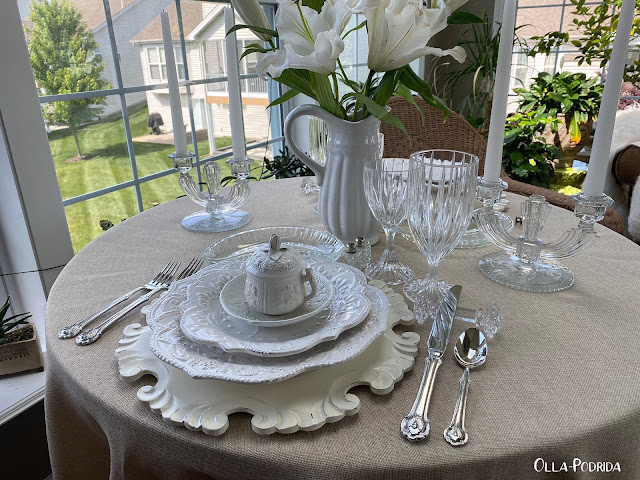
White Hot Summer Table for Two

Is it hot where you are, because good gravy, Marie, it is hot here! I am talking dog days of August hot, and it’s only June. I keep looking at the weather forecast, hoping for a reprieve, but we are going to be in the upper 90°s/100°s for the next 10 days to two weeks. It’s not often that the weather provides fodder for a table setting, but this heat sure did.


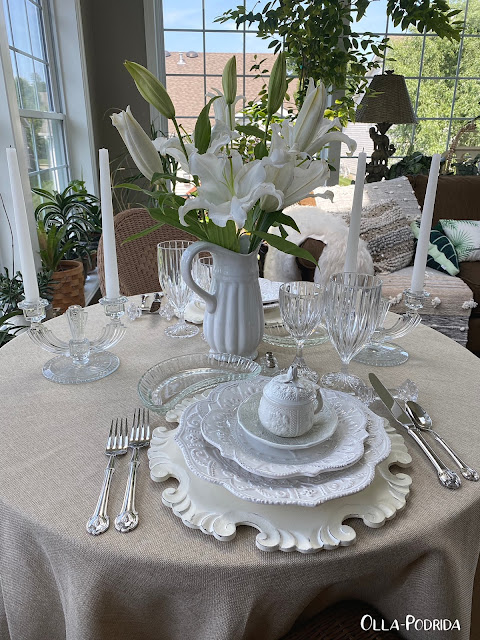
 This is the first time that I have ever decorated a table in all white, and I really love it! It started with a bouquet of white lilies that I picked up at the grocery store. I love lilies and their fragrance (I know that not everyone does), and the entire house smells wonderful! I trimmed them down to fit this white vase, and put it at the center of my table on top of a round tablecloth in burlap that I have used previously.

Chippy white chargers, as everyone knows, are from Pier 1. They are topped with dinner plates and salad plates in the Blanc Amelie pattern from Maison Versailles.

 On top of that I have put one of my absolutely favorite pieces, a Mottahedda pots de creme.

Because of all the white, I felt it needed sparkle, so yet again, used Mikasa Parklane stemware. 

I also decided to get out my crescent-shaped salad plates that I don’t use nearly as often enough.

Because I was looking for a lot of sparkle, I thought it was time to get out my mother’s crystal knife rests. She bought these in her brother’s gift shop in Las Vegas back in the ‘70s. Aren’t they beautiful! And such a good idea to keep the tablecloth from getting soiled. Honestly, I don’t know why there aren’t more of these around.

 If you look closely you will see little mini salt and pepper shakers at each place setting. These are small, but always hold enough to get the diner quite easily through a dinner.  I find that guests really appreciate these so that they don’t have to ask to have salt and pepper shakers passed. The flatware is by Wallace and it is in their Napoleon Bee pattern.

The candlestick holders were an anniversary gift from the late Mr. OP years ago. I found them in a local antique shop, fell in love, and he gifted them to me shortly there after.

Stay cool this summer with an all white table setting.

 As an Amazon Associate I earn from qualifying purchases.

 This post is linked to: Tablescape Thursday

Monday, June 27, 2022

Grilled Cauliflower

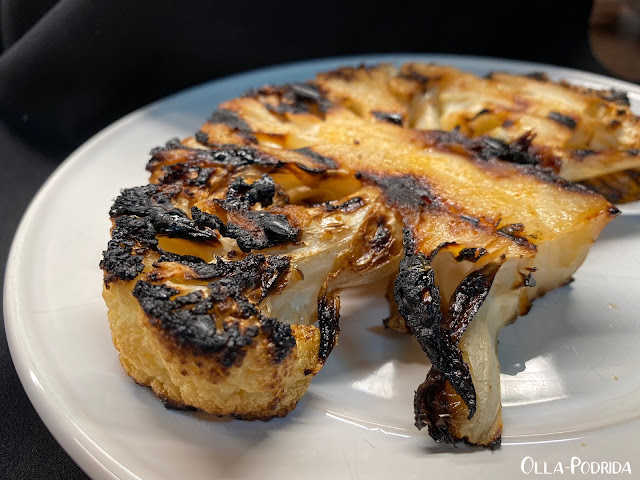
I am one of those people who love cauliflower, and always have done ever since I was a child. I will eat it cooked, I will eat it raw, and I will eat it crumbled into a salad. Whatever way that you would like to serve it to me, I will happily consume it. (Unless, of course, cauliflower is used in a way in which nature did not intend. Cauliflower, for example, is not rice, nor is it pizza crust. I’m just saying.) One way that I had not tried, however, was on the grill.

After two years of sitting idle, this year I decided to clean and fire up my grill, and on days when it isn’t so blisteringly hot (UGH!), I am having a marvelous time! Yesterday I grilled a couple of
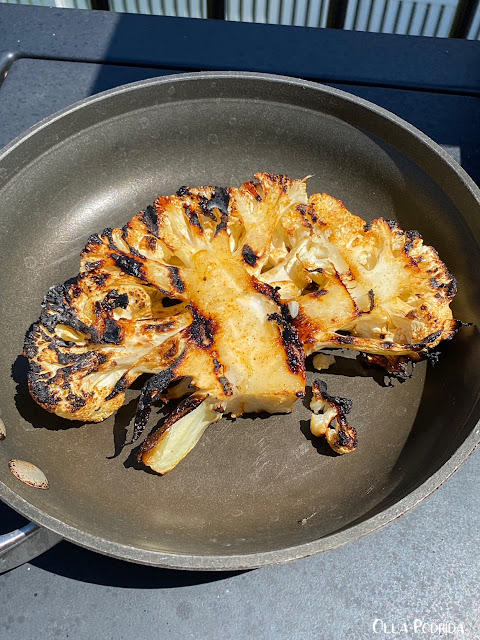
burgers (beefy perfection!), and decided that I would do a cauliflower steak at the same time. There is absolutely nothing to making these, and I found it to be a wonderfully enjoyable way to eat cauliflower.

 Grilled Cauliflower
As seen on allrecipes.com

1 head cauliflower, cut into thick slices*
1 T. olive oil
1 T. brown sugar
2 t.
seasoned salt

Preheat an outdoor grill for medium high heat and spray the grate with PAM olive oil cooking spray (or the grill spray of your choice).

Sprinkle cauliflower slices on both sides with olive oil, brown sugar, and seasoned salt.

Cook cauliflower steaks on the grill until char marks appear, 2 to 3 minutes per side. Transfer to a
grill safe pan with a lid (I covered mine with foil), cover, and continue cooking on the grill until tender, about 20 minutes.


As an Amazon Associate I earn from qualifying purchases.


Friday, June 24, 2022

Tropical Chicken Salad

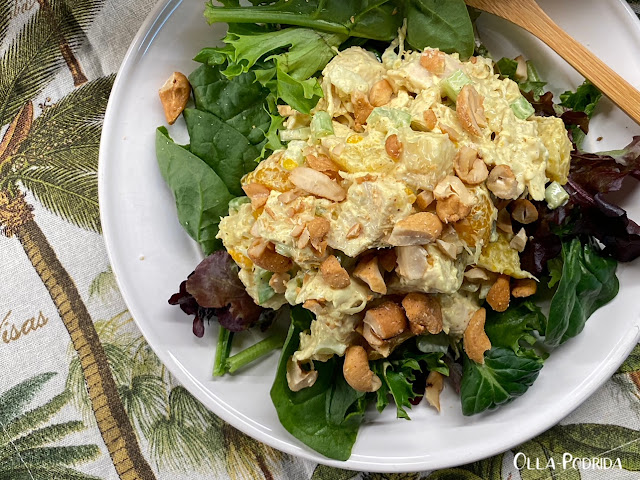
I mentioned in this post that I had once had chicken salad that had bananas in it. I received a lot of responses from people who had never heard of such a thing, but they don’t call me “the memory machine” for nothing, so I immediately started to dig. I went through piles of my mother’s recipes, cookbooks I had inherited from a friend, cookbooks that I inherited from my grandmother, and piles of recipes that I had accumulated on my own ever since setting up housekeeping back when dinosaurs roamed the earth; eventually I found it. I have no idea as to the source other than to say it’s from “family friend Lorraine.” Personally, I think this chicken salad is magnificent. It is so different from the kind of chicken salad that is routinely served. It is indeed tropical and refreshing; light yet complex, and fruity with just the right amount of spice, making this version uniquely delicious.

 Tropical Chicken Salad

2 c. cubed cooked chicken*

1 c. chopped celery

¾-1 c. Duke’s mayonnaise

1-1½ t. curry powder

Seasoned salt, to taste

White pepper, to taste

1 c. Melissa’s organic pineapple, cubed, drained**

1 large firm banana, sliced (I cubed mine)

1 14-oz. can mandarin oranges, drained**

½ c. sweetened shredded coconut

¾ c. cashew halves or macadamias

 Place cooked and cubed chicken and celery into a large bowl. In a separate, smaller bowl, combine mayonnaise and curry powder; add to chicken mixture and mix well. Cover and chill for at least 30 minutes.

 Just before serving, fold in the pineapple, bananas, oranges and coconut; toss gently. Serve on salad greens, if desired. Sprinkle with nuts.

*Preheat oven to 350° F. Place breasts of chicken on a low-sided baking pan (read: jelly roll pan), rub with olive oil and sprinkle generously with salt and pepper.  Bake for 35 to 55 minutes until chicken is done and juices run clear. The reason for the wide range of roasting times is because the length of cooking depends upon the thickness of your chicken breast. Remove chicken from the oven, allow to cool, remove skin and cut chicken into neat little cubes; set aside.

**Drain! Drain! Drain! Put them in a salad spinner if need be. Too much moisture will make the dish watery.

As an Amazon Associate I earn from qualifying purchases.


Thursday, June 23, 2022

Buttered Popcorn Cupcakes

I’ve said it more than once, I am not a baker. Still, occasionally I will run across a recipe in a cookbook or website that intrigues me enough to give it a try. Such was the case with this recipe that I found at sprinklebakes.com. Prior to this I had never heard of buttered popcorn flavoring, nor had I seen the cute little collars that dress up plain cupcake papers. I’m not going to lie, these took me a while. Not the cupcake itself, that was a breeze, but the frosting is a bit of work. Still, they make a wonderful presentation, are unique, tasty and surprising, and the frosting pipes like a dream, even for a non-baker like me. These would be perfect for your next movie night.

Buttered Popcorn Cupcakes

As seen on sprinklebakes.com

 ½ c. unsalted butter softened

¾ c. granulated sugar

2 large eggs, room temperature

1 dram bottle LorAnn Buttered Popcorn Flavor.125 oz

1¼ c. flour

1¼ t. baking powder

½ t. fine grain sea salt

½ c. buttermilk, room temperature

Buttered Popcorn Swiss Meringue Buttercream 

 4 large egg whites

1 c. granulated sugar

1½ c. salted butter, room temperature

1 dram bottle LorAnn Buttered Popcorn Flavor .125 oz.

Yellow gel food color

Orange gel food color

 Preheat the oven to 350°F. Line a cupcake pan with 12 paper liners.

In the bowl of an electric mixer, combine the butter and sugar and medium speed until fluffy and lightened in color. Beat in the eggs one at a time. Beat in the buttered popcorn flavor. Scrape down the bowl and mix to incorporate once more.

 In a medium mixing bowl, combine the flour, baking powder, and salt. Whisk to combine.

 Add the flour mixture and buttermilk alternately to the creamed mixture. Begin and end with flour, and mix on low speed until just combined. Scrape down the bowl and fold together any bits of remaining butter or flour by hand.

Using an ice cream scoop, or a 1/4-cup measure, divide the batter evenly between the muffin cups.

 Bake the cupcakes for 20 minutes or until they spring back when pressed in their centers. Allow them to cool in the pan for 3 -5 minutes, then transfer to a wire rack to cool completely.

Buttered Popcorn Swiss Meringue Buttercream

 Place a saucepan filled 1/3 full of water over medium heat. Bring to a simmer.

 a large stainless-steel bowl, combine the egg whites and sugar. Set the bowl over the simmering water and cook while whisking intermittently. Cook until the mixture is hot (110°F) and you can no longer feel sugar granules when the mixture is rubbed between your finger and thumb. Transfer the hot mixture to the bowl of a stand mixer fitted with the whisk attachment. Beat on high speed for 10 minutes or until a thick, shiny meringue forms that holds stiff peaks. The bowl should feel cool to the touch. If it doesn’t, refrigerate the meringue in the bowl for 10 minutes. Return the bowl to the mixer and swap the whisk attachment for the paddle attachment.

 Beat the room temperature butter into the meringue one cube at a time on medium-low speed, waiting to add the next cube when the previous cube disappears. The batter will deflate with the butter addition, and may even look curdled (if the butter was the slightest bit cold this happens), but this is normal. When all of the butter is added, beat the mixture on high speed until light in color and fluffy, about 5 minutes. Beat in the buttered popcorn flavor. Add drops of yellow gel food color until a bright yellow hue is achieved. Add 1 or 2 drops of orange food color to bring the hue closer to the color of theatre style buttery popcorn. Scrape down the bowl and beat on high speed until fluffy and the color is consistent.

 Place the buttercream in a large pastry bag fitted with a large French piping tip. Pipe a large double swirl of buttercream on top of each cupcake.

 Dress up your cupcakes with these darling “Popcorn” collars.

 Optional step: While the cupcakes are still slightly warm, brush their tops with a little melted salted butter. This adds an extra layer of buttery flavor. About 2 tablespoons will be more than enough.


As an Amazon Associate I earn from qualifying purchases.


Tuesday, June 21, 2022

"The Music Man" Tablescape

June 26 would have been my dad‘s birthday, and I miss him mightily. As a consequence, I decided to create a table for two in his honor. My dad was many things, among them an avid trumpet player, music arranger, and member of a variety of bands and ensembles. Because of this, I decided to call this table “The Music Man.”

I wanted the table to be masculine in a similar way to the Hemingway-inspired table that I did last week. This time I used a chocolate brown table covering, and topped the tables with original pieces of sheet music that belonged to my dad. As you can see, this music, yellowed and crumbling with age, goes back to the 40s. My dad played this music.

At the center of the table is a figure playing a trumpet. This used to be a part of an arrangement in my parents' living room and is now a part of my own home, and a cherished part at that.

The piccolo trumpet in the case was one that Jim and I bought my dad for his birthday. It was more ornamental than anything, but he did enjoy having it. It was a nice addition to his collection of trumpets, cornets, and a flugelhorn.  We bought this at the Portobello Market when we were living in London, and carried it back with us.

The candles with the music on the side I bought years ago from Pottery Barn. I had always intended to use them in a centerpiece when we hosted one of my dad’s birthday dinners, but for whatever reason I kept losing them. It’s only through a stroke of luck that I found them in time to use with this table.

Because my dad was a brass player, I decided to use brassy gold chargers. These are topped with cinnamon colored, nubby-edged plates from Pier One.

On top of this I used my much loved, immensely versatile, clear
Duralex plates under which I placed a picture of my dad, printed on coffee-dyed paper, taken when he was in college, all dressed up in a white tux and holding his trumpet, ready to perform in a concert at Yale. Doesn’t he look Hollywood handsome? (I had previously used these plates on a “Bee” tablescape.)

 
I struggled with the napkins, so chose to go with these rather subdued black and cream plaid ones from Pottery Barn.

 To complement the brassy chargers, I chose gold flatware.

Glassware is Mikasa’s Park Lane, a versatile choice, because these can be dressed up or down depending upon the occasion.

If you are still fortunate enough to have your dad in your life, give him a hug for me, and tell him how very much he is appreciated.

As an Amazon Associate I earn from qualifying purchases.

  This post is linked to: Tablescape Thursday


Monday, June 20, 2022

Slow Cooker Taco Meat


I love the versatility of taco meat. You can use it in, of course, tacos, but in addition to that, it makes an excellent filling for enchiladas or burritos, and can turn a lackluster mound of lettuce into a delicious taco salad. Lately, I have been enjoying the wonders of lettuce leaf tacos and really enjoying them; it seems like such a summery meal. I like to top mine with fresh guacamole and a drizzle of queso, the recipe of which is forthcoming. Because I love slow cooker recipes that I can leave alone and let them do their thing while I do mine, I came up with this little gem that I think you will enjoy. Keep your kitchen cool and free up your day while making a meal that the family will thoroughly enjoy. 

Slow Cooker Taco Meat

2 lbs. ground chuck
2 1.4-oz. pkgs.
taco seasoning
1 T. instant minced onion
½ t. garlic powder
1 24-oz. jar salsa

Place everything into a
5-6 quart slow cooker in the order listed. Cook on low for 6 to 8 hours. Drain before using.


 As an Amazon Associate I earn from qualifying purchases.

Friday, June 17, 2022

Pineapple Fried Rice

A friend of mine and I try to get together for lunch once a month. Every month we like to try a different restaurant, but often return to one of our favorites, a restaurant offering Vietnamese and Thai cuisine. We both tend to order the same thing because we know what we like and hate the thought of disappointment, but I have recently become intrigued by their Pineapple Fried Rice. At the restaurant it contains curry powder, pineapple, chicken, and raisins. Interesting combination to be sure, and one that I think I would like, but I hated to take the chance.

It was quite by happenstance that I made jasmine rice to accompany a dish, and behold, on the back of the Mahatma Jasmine Rice package, was a recipe for pineapple fried rice. Today I decided to give that recipe a try, and I really enjoyed it.  I substituted pickled jalapeños for the red chili pepper, added more garlic, a pinch of curry powder (next time I will add more), and some red pepper flakes. The only thing I would do differently is to cut the pineapple tidbits in half because with rice and shrimp on the fork, they were quite a mouthful.

Pineapple Fried Rice
Adapted from Mahatma

1 c.
Mahatma jasmine rice
1 20-oz. can pineapple tidbits, drained and halved
4 scallions, chopped
1-2
Melissa’s pickled jalapeños, seeded and finely minced
¼ c. coarsely chopped cilantro
1/8 t. curry powder
2 c. fresh medium shrimp, cleaned and deveined
3 T. oil, divided
3 cloves garlic, minced
2 T.
fish sauce
2 T. soy sauce
1 t. sugar

Prepare rice according to package directions and set aside. In a medium bowl, combine pineapple, onions, jalapeño, cilantro, and curry powder; mix and set aside. (At this point it can be refrigerated for later.)

Heat 1 tablespoon oil in skillet and sauté shrimp until done. Remove shrimp from skillet. In same skillet, over medium heat, add remaining oil. Sauté garlic until golden brown. Add cooked rice and stir. Add fish sauce, soy sauce, and sugar. Stir and heat through. Fold in pineapple mixture and shrimp. Heat through. Garnish with additional cilantro, chopped scallions, and pickled jalapeño.

Serves 4-6

As an Amazon Associate I earn from qualifying purchases.
  

Thursday, June 16, 2022

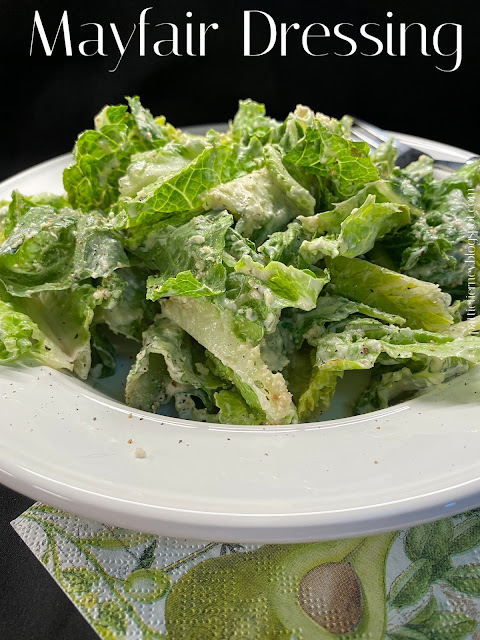
Mayfair Salad Dressing

Saint Louis magazine recently published an article by St. Louis Food guru, Helen Fletcher, about the legendary Mayfair Salad and Dressing, the creation of the original Mayfair Hotel in St. Louis. It was one of the original recipes from the 1904 St. Louis World’s Fair Exhibition.

The hotel used to sell the dressing by the pint. I well remember my mother, and members of her gourmet group, making the trek to the city in order to stock up. When the recipe was finally published, my mother started making her own. In my estimation, this is one of the best salad dressings around. I tend to vary slightly from the original because I am not a particular fan of anchovies. To me, replacing them with a small amount of anchovy paste makes this dressing absolute perfection.

 The recipe for both my version of the dressing and salad are below. A Mayfair Salad is truly delicious and makes a wonderful light meal. My favorite way to enjoy the dressing, however, is tossed with a bowl of freshly torn, crisp leaves of Romaine lettuce, wedges of hard-boiled egg, and about 2 tablespoons of Italian breadcrumbs. Delicious!

 Mayfair Salad Dressing

  ½ c. coarsely chopped celery

1 small clove garlic

1 small coarsely chopped Melissa’s shallot

½ - 1 t. anchovy paste

½ t. freshly ground black pepper

1 T. fresh lemon juice

 Place all ingredients into a mini food processor or mini ninja blender. Using the processor gives some texture, using the blender will make it perfectly smooth. It’s your choice. Process to purée. Refrigerate for one hour before using. This makes a little bit less than 2 cups; the recipe can be doubled.

Original Mayfair Salad

 Romaine lettuce

Ham, julienne

Swiss Cheese, julienne

Croutons

Mayfair Dressing

 There are no amounts. Use as much or little as desired. 


As an Amazon Associate I earn from qualifying purchases.