Monday, December 31, 2018

Easy Frito Pie Casserole


This is a little post-holiday gift for you, to combat all of the gooey sweetness than seems to pummel us at this time of the year. It is a stupidly easy, 10-minute-to-prepare casserole, that is comforting, satisfying, delicious, and a very pleasant break from all of the season’s rich foods. You probably have the ingredients on hand, namely a can of chili, a bag of corn chips or taco chips, and cheese. I call this a Frito Pie because I make it in a pie pan, and use Fritos as the base, but you could just as easily call it Tortilla Pie by using tortilla chips for the base (or a combination of both).

I used a can of
Wolf Chili with Meat, but you can make this vegetarian by adding chili without meat. You can go crazy with the toppings, or leave it simple. Want more vegetables? Shred some lettuce, mound it on top, and sprinkle on some chunks of tomato. You can use cheddar cheese, or whatever you happen to have on hand, or a combination of everything that you have on hand. Seriously, nothing can be easier, and it is so good!
Easy Frito Pie Casserole

5 cups
Fritos corn chips
1 15-oz. can chili with or without meat, your choice
1 cup shredded Cheddar cheese
1 2.25-oz. can
sliced black olives
1/2 cup salsa (I used Paul Newman’s Black Bean)
1/4 cup sour cream

Preheat the oven to 350°.

Place chips in the bottom of a 9-inch deep dish pie plate. Pour chili straight from the can over the chips. Sprinkle shredded cheese over all, and then top with black olives. Bake for 20 to 25 minutes until chili is bubbling. Top with
lettuce, tomato, avocado, sour cream, salsa, or anything else you can think of, and serve.

If you have any leftover Fritos, you may want to try this recipe for Fritos Brittle. Super yum!

 
This post contains affiliate links.

Sunday, December 30, 2018

Meal Plan Monday Week #4

It’s the end of the year, I am tired of cooking, and I really need to clean out the freezer, so I have deemed this to be “Eat Out of the Freezer Week.” That doesn’t mean I won’t be making a dish or two, but not many. 
Here is what I’m planning.

Sunday — Smoked Gouda Bean with Bacon Soup

Monday — Order empanadas from new Argentinean recipe restaurant using my $10 off GrubHub coupon. Woo hoo!

Tuesday —
Spicy Mustard Ham Salad, finishing up the holiday ham.

Wednesday — Fish & Chips (Note: make
tartar sauce)

Thursday —
Pasta e Fagioli and Everything Rolls

Friday —
Millie’s Meatballs, Salad

Saturday — Pizza

Are you taking a culinary break? Let me know what’s going on in your kitchen.

Here is my place setting of the week; you can see more of this table
here.

 Happy New Year!


This post contains affiliate links.

Saturday, December 29, 2018

Top Ten Posts of 2018


It's time for my year-end wrap-up featuring the 10 most popular posts of 2018. It's a tasty assortment I think, nicely varied, and it tells me a couple of things. First of all, that you loved my Olive Cheese Spread. That recipe knocked the others right out of the park, moving into the number two spot of the most viewed of ALL posts (and, to date, there are 1683 of them). For the first time ever, no tablescapes made it into the top ten spot. Hmmm, I’m not sure what that means, but I do have plans for more in the upcoming year.

Thanks to all of you who visit my blog, I really appreciate having you here. To see the blog post and recipe associated with each of these pictures (shown in descending order of popularity), click on the title below the photo and it will take you directly to the post.

Happy viewing, and have a wonderful New Year!


To view previous Top Ten Lists click one or more of the follow links:

This post contains affiliate links.

Monday, December 24, 2018

Meal Plan Monday Week #3


Do I have a meal plan for this very busy week? Yes I do! This morning, as you’re reading this, I am on my way over to do my dad's taking a sizable brunch. The rest of the week may involve ordering in (I just downloaded the Grubhub app and received a $10 off coupon on my first order of $15, so hooray for that), eating leftovers, and pretty much taking it easy. Still, I have a plan. 
Here is what I’m eating this week.

Monday - Brunch at Dad’s: Ham,
Cheese Peta, Blueberry French Toast, Eggsquisite Egg Casserole, French Country Potato Bake

Tuesday -
 Open-Faced Ham Sandwiches (using leftover ham)

Wednesday - Number 1 son and family deliver food to their old mom

Thursday - Dinner out with friends

Friday -
Split Pea Soup using ham bone from above

Sunday - Frito Pie Casserole

Here is my place setting of the week. To see more of this table, click here.

 Merry Christmas Eve!

Sunday, December 23, 2018

Tablescape Fun


Here is a little eye candy to inspire your holiday table this season. These photos were taken at one of my favorite local shops, The White Hare. They always have such beautiful things, cleverly displayed, and so inviting, that I routinely leave that place with a bag in my hand whether I need anything or not.
One time when I went solely to look at the decorated tables. I took a friend along, and she commented on how impractical these tables were, adding that it would be impossible to actually dine at one of them. That’s true, but that’s not the point. For me, my decorated table is as much a part of my holiday decor as is the lighted garland, figures of Santa, rows of holiday cards, and Christmas tree.
When it comes time to serve a meal, a number of these things are removed. I just like having a pretty table to look at all season long because it cheers me and puts me in the holiday spirit.
Perhaps one of these table settings will do the same for you. If nothing else, they are certainly holiday eye candy. 
Merry Christmas Eve Eve!

Saturday, December 22, 2018

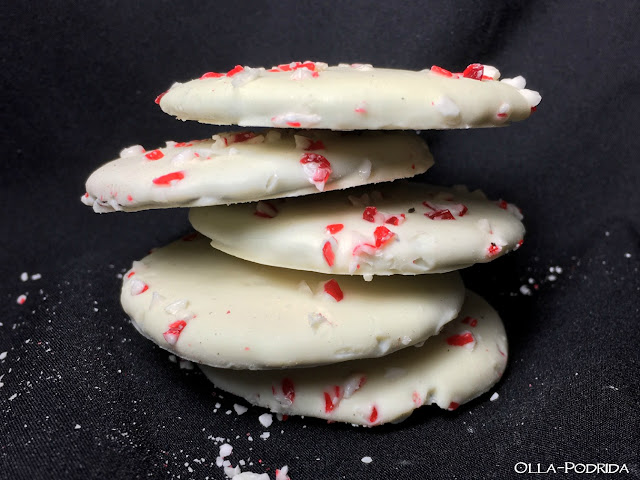
Quick & Easy Peppermint Crunch Cookies

The holiday season just calls for peppermint, doesn’t it? Of course, the holiday season also calls for chocolate, but then pretty much every season calls for chocolate. At any rate, if you love the combination of peppermint and chocolate as much as I do, you are going to love these Quick and Easy Peppermint Crunch Cookies. Baking cookies, as much as I would like to do it, is really rather tedious and time-consuming. This is an easy way to get fabulous results with a minimal amount of work. Try these at home, slip them onto your cookie tray, and wait for the compliments.
Quick & Easy Peppermint Crunch Cookies

1 9-oz. pkg.
Famous Chocolate Wafers
1 11-12 oz. pkg. white chocolate chips
2 - 4 drops oil of peppermint, more or less, to taste
Crushed peppermint candies, if desired

In a microwave safe bowl, melt white chocolate chips, at 30-second intervals, until smooth and creamy. Stir in oil of peppermint. Dip chocolate wafers into white chocolate and place onto a parchment-lined baking sheet. Sprinkle immediately with crushed peppermint candies, if desired. Allow to harden at room temperature, or slide them into the fridge for 15-20 minutes.

If you prefer dark to milk chocolate in your peppermint cookies, you will love these Thin Mint Clones!


This post contains affiliate links.

Friday, December 21, 2018

Here Comes Santa Claus Tablescape


Despite the direction in which I take it, no matter how I decorate my table at Christmas time, Santa always plays a part. It may not be a big part, but if you look close enough he’s always there.


In this table he takes center stage amidst silver houses, reindeer, "snow," and a darling little red truck cookie jar with lid removed, toting a miniature pine tree.


It’s festive, it’s fun, and young and old will both enjoy it.


Sources:
Tablecloth & Plaid Plates – Williams-Sonoma
Red plates, napkins & Truck Cookie Jar – Pier One
Leaf Chargers – Gift
Santa cups – Fitz & Floyd
Reindeer – Pottery Barn
Green glasses – Villeroy & Bach


 Sharing with:

This post contains affiliate links.

Wednesday, December 19, 2018

Spinach Artichoke Crescent Rolls


One of the first things Jim made for me back in the day was Spinach Artichoke Dip. Boy, do I love that stuff. I really never needed anything to dip into it, I could spoon it right from the bowl directly into my mouth. It was very popular in the ‘90s and around the turn-of-the-century (don’t you just love saying “turn of the century?”), and often shows up in non-dip forms such as main dishes and quiches. Dips, as you are aware (as well as the above mentioned main dishes and quiches), are not very portable, so I decided that I was going to find a way to make my favorite dip portable.

Enter that ubiquitous convenience food, the crescent roll, gifted to us by the Pillsbury Company back in the 1960’s. Good on its own, the crescent roll also acts as a nice vehicle to transport both sweet and savory goodness from the pan right into our mouths without the need for dinnerware or cutlery. After a bit of experimentation, I managed to create a dip sturdy enough to hold its own in a crescent roll, yet creamy enough to be melt-in-your mouth good.
Wonderful on their own, these pair nicely with soups, stews, and salads.  Delight your friends and family this holiday season with these delicious rolls.
Spinach Artichoke Crescent Rolls

1 8-oz. pkg. Crescent rolls
4 oz. cream cheese, softened
 1 Tablespoon mayonnaise
1/4 cup grated Parmesan
1/3 cup shredded cheddar cheese
2 scallions, chopped
2 tablespoons fresh chopped spinach
1/4 teaspoon garlic salt

Preheat oven to 375° F. Lightly spray a baking sheet with PAM, or line with a Silpat or parchment paper; set aside.

Unroll the crescent rolls and separate each triangle. In a medium mixing bowl, with an electric mixer, beat together remaining ingredients until well blended. Divide mixture among crescent rolls, spreading nearly to edges.

Roll up crescents, starting from widest end. Place on prepared baking sheet and bake for 12-14 minutes until lightly browned. Serve warm.

This Spinach Cheesy Bread, though less than portable, is always a family favorite.


This post contains affiliate links.

Monday, December 17, 2018

Bacon-Wrapped Tater Tots

Normally I am not one to sing the praises of convenience foods, but recently I have begun to embrace Tater Tots. I never thought I would find myself saying this because I was scarred as a child when my mother served me a vile casserole of smoked sausage and tots. I’m sure there were other things in this ‘70s hot dish that was prevalent at the time, but even though I liked smoked sausage and Tater Tots individually, the combination always reminded me of what I’d turn into my dog’s food bowl in the evening, so for a long time I was put off of both.

Recently a coupon for a free bag drew me back to them and one evening, too tired to do anything else, I warmed some up to go with a rotisserie chicken. I was quite pleasantly surprised! I loved the crunchy exterior along with the creamy potato interior. I have to admit, they are back in my favor. So when I saw this recipe scattered all over Pinterest, I knew I had to give it a try. I altered the recipe a bit for ease. The original version required small cubes of cheese that I found a bit cumbersome to wrap in bacon. I just used slices of cheddar from the deli that I cut in half, and then into strips, and I found they rolled quite nicely with the bacon. While you may be tempted, don’t go overboard with the brown sugar. Trust me when I tell you this. I decided that more would be better, when in this case it wasn’t. I ended up having to throw out my
Silpat because that stuff cooked and burned, and made one heck of a mess.

These would be wonderful as a snack, or a nice addition to a brunch buffet. I imagine they would be tasty dipped into ranch, marinara, or any of your favorite dipping sauces. Me? I just ate them as is and enjoyed every delicious mouthful.
Bacon-Wrapped Tater Tots

2 cups frozen Tater Tots, thawed
4-5 slices sharp cheddar cheese, halved, cut into strips
4 slices bacon, quartered
1/4 cup brown sugar, packed
Chopped parsley, for garnish, if desired (I didn’t desire it.)

Preheat oven to 400° F. Line a
baking sheet with parchment paper or a silicone baking mat; set aside.

Wrap each tater tot and cheese slice in a piece of bacon. Dredge each tater tot in the brown sugar, pressing to coat.
Place tots, seam side down, onto the prepared baking sheet. Bake for 20-25 minutes.

Serve immediately, garnished with parsley, if desired.

If you prefer meat wrapped with meat, you will love this recipe!


This post contains affiliate links.