Tuesday, August 31, 2021

Red & White Sauce Lasagna

This post contains affiliate links.

It was a banner week, culinarily speaking. I made my first ever, and by this I mean in my entire life, lasagna, made it without ricotta, and for first time ever used those “no boil” noodles, and boy am I sold! Mr. O-P used to be the lasagna maker in the family. It took him two days to make lasagna, one of which he spent working on the sauce. Watching his efforts caused me to shy away from ever wanting to make it. But, when I spotted this recipe on the Land O Lakes website, I thought I would give it a try. Making lasagna without ricotta was something with which I was unfamiliar. I have found ricotta to be a bit of a drying agent in the lasagnas that I’ve eaten, so I loved the idea of making one without it. I’m not going to say this isn’t some work, because it is. I will say that it is well worth it, the béchamel is a magnificent addition, and those “no boil” noodles are surely the greatest invention of the last century.


Red & White Sauce Lasagna

Adapted from landolakes.com

Red Meat Sauce

8 oz. ground chuck

8 oz. Italian sausage

½ c. Melissa’s shallots, chopped

8 oz. fresh mushrooms, chopped

2 cloves garlic, minced

1 (14.5-oz.) can diced tomatoes, undrained

1 (15-oz.) can tomato sauce

¼ c. tomato paste

2 t. dried Italian seasoning

½ t. Kosher salt

¼ t. freshly ground black pepper


White Béchamel Sauce

 3¾ c. whole milk

6 T. butter

½ c. flour

¾ t. kosher salt

1/8 t. freshly ground nutmeg

¾ c. shredded Parmesan cheese

Lasagna

12 no-boil lasagna noodles

2 c. (8 oz.) shredded mozzarella cheese

¾ c. shredded Parmesan cheese

 Brown ground beef and Italian sausage in Dutch oven; drain if necessary. Add all remaining meat sauce ingredients. Bring to a boil; reduce heat to low. Simmer, uncovered, 30 minutes. Cover; continue simmering 30 minutes.

 Heat oven to 350°F. Spray 13x9-inch glass baking dish with no-stick cooking spray; set aside.

 Meanwhile, microwave milk in large glass measuring cup 2 minutes. Melt butter in medium saucepan. Whisk flour, salt and nutmeg into butter. Cook, whisking occasionally, until mixture is smooth and bubbly. Gradually add milk; cook, stirring constantly, until mixture boils and thickens. Stir in 3/4 cup Parmesan cheese.

 Spread one-third meat sauce into prepared dish. Arrange layer of 4 noodles on top of sauce. Repeat with one-third red sauce, 1 cup white sauce and 4 more noodles. Repeat once more.  Spread remaining white sauce over top layer of noodles. Top with mozzarella cheese; sprinkle with 1/2 cup Parmesan cheese.

 Cover dish with aluminum foil. Bake 40 minutes. Remove foil; bake additional 10 minutes or until cheese on top has browned slightly. Remove from oven; cool 10 minutes before serving.


Friday, August 27, 2021

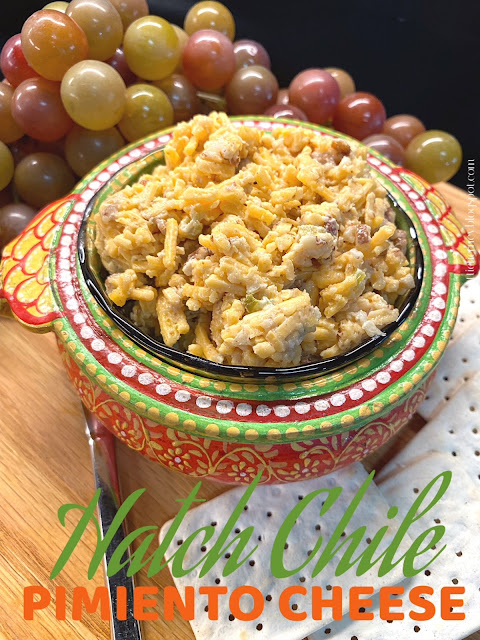
Hatch Chile Pimiento Cheese

This post contains affiliate links.

I love Lisa Fain. Her cookbooks (The Homesick Texan Cookbook and The Homesick Texan’s Family Table) are always at the forefront of my collection, Queso! being one of my absolute faves. As a follower of her blog, she got my rapt attention with a recent recipe for pimiento cheese. If you’ve read this blog for any length of time, you know that I am obsessed with pimiento cheese! Considering this is hatch chile season, her incorporation of them into pimiento cheese, replacing standard red peppers was intriguing. The addition of pecans did, indeed, take this over the top. I won’t say that it’s my new favorite, but I will say that it’s right up there. Because the pecans, I felt, made this a little dry, I altered her recipe slightly. Excellent!

 Hatch Chile Pimiento Cheese
Adapted from Lisa Fain

2 c. sharp cheddar cheese, shredded
1 t. grated yellow onion
1 clove garlic, minced
½ c. diced, roasted,
Melissa’s hatch chiles (about 1½, give or take)
½ c. chopped pecans
¼ t.
cumin
Pinch cayenne
1/3 c. Duke's mayonnaise
1 t. lemon juice
½ t. Worcestershire sauce
Salt and freshly ground black pepper, to taste

In a medium bowl, combine all above ingredients. Refrigerate, covered, for at least an hour before serving.


Tuesday, August 24, 2021

Pumpkin Morning Glory Muffins

This post contains affiliate links.

I don’t know about you, but I can never wait for fall to drag out the pumpkin and start baking. Truth be told (and this is just between you and me), I made these in July. What can I tell you? I just had a hankering for pumpkin spice. These are chock-full of all kinds of goodness with pumpkin, dried fruit, warm spices, and everything that will make your breakfast, lunch, or dinner special. These are not overly sweet, so work well with soup and salad as much as they do for meals earlier in the day. I’ll tell you what, I am going to be making more of these.

Pumpkin Morning Glory Muffins

1 3-oz. pkg.
Melissa's dried apricots, chopped
1/3 c. raisins
1 stick butter, melted
½ c. whole milk
2/3 c. dark brown sugar, packed
2 large eggs
½ c. pumpkin purée
2 T. vanilla extract
½ t.
rum flavoring
2 c. flour
1 T. pumpkin pie spice*
¼ t. cinnamon
1 t. baking powder
½ t. baking soda
1 teaspoon kosher salt
2 medium carrots, grated
1 Granny Smith apple, graded and squeezed dry
½ c. shredded coconut
1 c. chopped pecans

Preheat oven to 350° F. Spray a 12-cup muffin tin (or 6-cup jumbo muffin tin) with
Baker’s Joy, or use muffin liners. (I like these.)

Soak the apricots and raisins in hot water while you prep the other ingredients.

In the work bowl of a stand mixer, place butter, milk, brown sugar, eggs, pumpkin, vanilla, and rum flavoring. Beat on medium speed until well combined. Add flour, pumpkin pie spice, cinnamon, baking powder, baking soda, and salt, and mix on lowest setting just to combine.

Add carrots, apple, coconut, and nuts. Drain water from apricots and raisins and add them to the bowl. Stir just to combine.

Divide batter evenly among muffin cups. Sprinkle with
Demerara sugar. Bake for 20 to 25 minutes until a toothpick inserted in the center of the muffin comes out clean. Remove from oven and let cool on a rack for 10 minutes before removing from muffin tin. Enjoy.

 *Don’t have any on hand? You can make your own, recipe here.


Friday, August 20, 2021

Peach Crumble

This post contains affiliate links.

One of the best parts of summer is fresh produce. Peaches are one of my favorite fruits, and I cannot get enough of them. Is it just me, or do they seem better than ever this year? When I’m not eating them out of hand, I’m cooking and baking with them. I rustled up this peach crumble last night, and it was magnificent! The next day I had some for breakfast, reasoning that fruit and oats make a more than adequate breakfast. Am I wrong?

Peach Crumble

Filling

2 lbs. fresh peaches
1 T. flour
½ c. sugar
2 T. freshly squeezed lemon juice
¼ t. lemon zest
½ t. cinnamon
¼ t.
allspice

Topping

1 c.
rolled oats (not quick oats)
1 c. flour
1 c.
dark brown sugar (loosely packed)
½ t. baking powder
1 t. cinnamon
½ c. butter, melted
Pinch of salt

Preheat oven to 350° F. Peel peaches* and cut into thick slices. Place peaches in a medium bowl. Sprinkle with flour, sugar, and cinnamon, and toss. Add lemon juice and zest, and toss again until well coated. Spread peach mixture evenly in the bottom of a
1.5 quart baking dish.

Place topping ingredients in a medium bowl. Mix until clumps form, and mixture has the appearance of wet sand. Scatter topping over peaches, crumbling with fingers as you go. Bake for 40 to 45 minutes or until golden brown. Allow to stand 10 to 15 minutes before serving with a scoop of ice cream or a dollop of whipped cream.

*To peel peaches: Submerge peaches in boiling water, return water to the boil, and blanch for 1-2 minutes. Remove to a bowl of ice water to flash cool. The skins will rub right off.


Wednesday, August 18, 2021

Antipasto Wraps

This post contains affiliate links.


How gorgeous is this sandwich?! Let me tell you something, it is as delicious as it is beautiful. A part of its magnificence is the pesto cream cheese made with your own homemade pesto. If you can’t do that, or don’t want to go to the trouble (PLEASE go to the trouble), do add chopped fresh basil leaves to the cream cheese in order to give it A wonderful, complex, Italian. Add a shake of Italian seasonings as well.

If you love antipasto plates as much as I do, this is a wonderful way to have one on the go. All of your favorite antipasto goodies, wrapped up in one magnificent meal, and a meal it is! This is one hearty sandwich. It is sure to please the biggest eaters in your family, while a half of a wrap will satisfy the lighter ones. If a half of a wrap is still too big for you, cut it into fourths. If you are looking to turn lunch into something memorable, make this. Now!

Antipasto Wraps

Adapted from food.com

 8 0z. cream cheese, softened

¼ c. homemade pesto

6 8” sun-dried tomato tortillas

6 romaine lettuce leaves

4 oz. salami, cut in julienne strips

4 oz. ham, cut in julienne strips

¾ c. shredded mozzarella cheese,

½ c. pitted ripe olives, sliced

½ c. Melissa’s Fire Roasted Red Peppers, diced

½ c. Melissa’s steamed artichoke hearts, chopped

 Mix cream cheese with the pesto until smooth and creamy. Spread 2 T. on each tortilla, taking it to within ¼” of the edge. Layer with romaine, salami, ham, and cheese.

 Next, layer on the olives, roasted red peppers, and artichoke hearts. Tightly roll up the tortilla and slice in half on the diagonal.


Monday, August 16, 2021

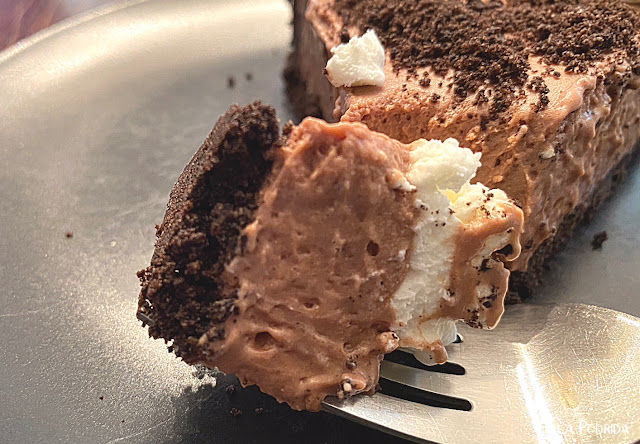
Chocolate Marshmallow Pie

This post contains affiliate links.


Number one son had a birthday on Wednesday of last week. In order to accommodate busy schedules, we planned our celebration for Friday the 13th (a mutually favorite day). I offered to bring dessert, and thought this would be cool, easy, and something that would please the kids. Did it ever! It certainly met my expectations, and more. The beauty of a dessert like this is not only its fabulous appearance, but also that it can be made ahead, requires no baking (so I didn’t have to heat up the kitchen on the 99° day), is light, and super delicious. Everyone will enjoy this one.


Chocolate Marshmallow Pie
Adapted from cookiesandcups.com

CRUST

27 chocolate sandwich cookies*
¼ c. butter, melted


FILLING

 ¾ c. milk
3 c. mini marshmallows*
1 11.5-oz. bag milk chocolate chips
½ t. espresso powder
1½ c. cold heavy cream

Finely crush the chocolate cookies in a food processor or blender. With the motor running, slowly drizzle butter in through the feed tube until incorporated. Press the mixture into the bottoms and up the sides of a
9” Springform pan evenly and firmly. (A tart tamper is the best and easiest way to do this.) Chill the crust for at least 30 minutes.

Meanwhile, over a double boiler, melt the marshmallows and the milk together, stirring frequently. Once the marshmallows are all melted remove the bowl from the double boiler and stir in chocolate chips until melted and smooth. Allow the chocolate mixture to cool to room temperature, stirring occasionally.

Once the chocolate is cooled, place the heavy cream in the bowl of your stand mixer fitted with the whisk attachment. Beat the cream on medium high speed for 1-2 minutes until stiff peaks form. Fold the whipped cream into the cooled chocolate until it’s evenly combined.

Pour the mixture into the chilled crust.

Cover and chill the pie for at least 2 hours.

When you’re ready to serve it you can garnish it with stabilized whipped cream, if desired. 


*Reserve some for garnish


Thursday, August 12, 2021

Broccoli and Hearts of Palm Dip

This post contains affiliate links.


Last week I shared a recipe for Broccoli Pesto. I am still experimenting with broccoli (boy, did I buy a lot of broccoli), and came up with this delicious, you-won’t-believe-it’s-broccoli, dip. It is complex and wonderfully flavorful, and works well with crackers, toasted bread strips, or, enjoy it as I do, on a slice of toast and run under the broiler. It’s a tasty and effortless way to effortlessly consume a daily portion of vegetables.

Broccoli and Hearts of Palm Dip

 1 c. broccoli florets, chopped

½ c. chopped Melissa’s hearts of palm

2 T. chopped onion

2 T. chopped Melissa’s Sweet Red Bell Peppers

1 c. shredded cheddar cheese

½ c. Duke’s mayonnaise

½ c. sour cream

¼ c. grated fresh Parmesan cheese

½ t. Melissa’s chopped garlic

Few gratings coarsely ground black pepper

2 T. Parmesan cheese

 Preheat oven to 375° F.

 Place all ingredients into a medium mixing bowl and fold it together until combined. Pour into a 1.5-quart casserole dish, and top with the remaining 2 tablespoons Parmesan cheese. Bake 20 to 25 minutes or until hot and bubbly.


Monday, August 9, 2021

Savory Gruyère Bread with Ham (and a host of other things)

This post contains affiliate links.

 Years ago there was a delightful, and highly patronized restaurant, at Lake of the Ozarks, by the name of Peace ‘n Plenty. They were known for many things, but one of the main features on their menu were their ham and cheddar rolls. Not a visit was made to this local treasure without getting one of those rolls. The recipe for them can be found here. As you might imagine, they were a bit of work, but I did love that combination so when I ran across a recipe for a ham and cheese quick bread, I had to give it a try.

I attacked this recipe with reckless abandon, adding not just the called for ham and Gruyere cheese, but also scallions, chopped Kalamata olives, and a little bit of dry mustard for good measure. This is sensational! Absolute heaven warm from the oven, it also makes incredibly good toast.


Savory Gruyère Bread with Ham (and a host of other things)
Adapted from Dinner in French by Melissa Clark

 2½ c. flour

1½ t. baking powder

1 t. fine sea salt

½ t. baking soda

½ t. garlic powder

½ t. freshly ground black pepper

1 T. dry mustard

1 c. coarsely chopped ham

3 T. thinly sliced scallions

1 T. chopped fresh thyme leaves

½ c. Kalamata olives, chopped

2 c. grated Gruyère or sharp cheddar cheese

4 T. unsalted butter, melted and cooled

2 large eggs

1 c. buttermilk

 Heat the oven to 350ºF. Spray a metal 9” × 5” loaf pan with Baker's Joy; set aside.

 In a large bowl, whisk together the flour, baking powder, salt, baking soda, garlic powder, black pepper, and dry mustard. Stir in the chopped ham, scallions, thyme, olives, and 1¾ cups of the Gruyère (reserving the rest for topping).

In a separate bowl, whisk together the melted butter, eggs, and buttermilk. Add the wet mixture to the flour mixture and stir to combine. The batter will be thick.

Transfer the batter to the prepared loaf pan and spread it out evenly, smoothing the top. Sprinkle the remaining ¼ cup cheese over the top. Bake until the top springs back when lightly pressed, and a skewer inserted in the center comes out with some moist crumbs attached, 45 to 55 minutes.

 Transfer the pan to a wire rack and let it cool for 10 minutes. Then remove the bread from the pan and let it cool completely on the wire rack.


Friday, August 6, 2021

Broccoli and Basil Pesto

This post contains affiliate links.

Over the course of our lives, we all fall victim in one way or another to a good sale. I recently fell victim to a broccoli sale. Yes, you read that right, broccoli. What can I tell you? It was a great deal. Little did I realize how far that 2-pound bag of broccoli florets would take me. You are the winners here because I did end up with some unique and wonderful recipes that I would encourage you to try, although unlike me, not in four days of succession. We won’t even go there.

The first that I’m going to share makes use of fresh seasonal basil as well as broccoli. This is so good that I was, quite literally, eating it with a spoon. Who needs pasta when you have something this tasty? Aside from a quick blanch of your florets, this goes together in a flash.

Broccoli and Basil Pesto

1½ c. broccoli florets*
1 c. packed fresh basil leaves
2 T. freshly squeezed lemon juice
1 t. lemon zest
2 large garlic cloves
¼ c. Parmesan cheese
1/3 c. extra virgin olive oil
Freshly grated black pepper, be generous

Bring a rather large pot of boiling water of water to a boil and add florets. Allow water to return to the boil, and boil for 30 seconds. Immediately empty into a strainer to drain, and then flip into a waiting pan of ice water to chill in order to stop further cooking. Drain and place in a food processor. Add remaining ingredients, and process until smooth. If it’s too thick for your liking, add a little more olive oil, if it’s too thin, add a little more Parmesan cheese.

*These don’t have to be small, mine were large. Don’t trouble yourself to break them down into tiny bits.


Wednesday, August 4, 2021

Coffee Cabinet (Rhode Island-Style Coffee Milkshake)

This post contains affiliate links. 

I must admit that I am one of those people who falls victim to those Click bait articles that profess to tell you the “best” food item in every state. It can be the best cheeseburger, BLT, fountain drink, dessert, you name it. Largely, I am disappointed in those articles because they often list places I’ve never heard of, in towns that I didn’t know existed, or when they do list my town, I am in strong disagreement with their choice. Recently an article on the favorite drink in every state was one that I couldn't resist. When I got to Rhode Island (I seldom last that long) I saw the words “Coffee Cabinet.” Now, I don’t know about you, but when I hear those two words I think of a place where I store bags of beans and coffee filters. That wasn’t the case here. Come to find out, in Rhode Island a Coffee Cabinet is a coffee milkshake. I thought that sounded pretty good, wonderful, in fact, but in viewing the recipe, I had to ask myself, Pattie, why use milk when you can use Kahlúa…so I did.

Oh, mama! Is this thing good! The coffee syrup alone makes this recipe worthwhile; it is sensational! Add it to your malt mixer, blender, or whatever you happen to use to make such beverages, along with coffee ice cream and Kahlúa and you have an adult winner. I thought of my dad today when I used his older-than-I-am Hamilton Beach malt mixer from the 50s. (You can buy a new version
here, and you must, you simply MUST!) I grew up sitting on the kitchen counter watching him make shakes, until I was too big to lift. The malt mixer and I go way back, and it still works!

Coffee Cabinet (Rhode Island-Style Coffee Milkshake)
Adapted from seriouseats.com


For the coffee syrup:
1 c. strong brewed coffee
1 c. sugar
1/4 t. vanilla extract

For the coffee cabinet:
1 pint coffee ice cream
1/4 c. Kahlúa
1/4 c. chilled brewed coffee
2 T. coffee syrup

In a medium saucepan dissolve sugar in coffee. Bring mixture to a light boil then reduce to simmer. Simmer until the mixture has reduced to form a slightly thickened syrup, about 15 minutes. Remove from heat and whisk in vanilla extract. Cover and refrigerate to cool.

Add ice cream, Kahlúa, chilled coffee, and coffee syrup to blender or
malt mixer. Blend until smooth. If you prefer a thinner shake, you can add additional Kahlúa and or chilled coffee, if desired.

 Top with a spritz of whipped cream and chocolate-covered espresso beans.


Monday, August 2, 2021

Am I Blue Pimiento Cheese

This post contains affiliate links.

I’ve said it before, I’ll say it again, I LOVE pimiento cheese. I try to make a batch up every week so that I always have some at the ready in the fridge. It has more uses than you can probably imagine. It is excellent as a spread all on its own, is wonderful when used to fill celery, is a great spread with apples, makes an excellent topping for a burger, is fabulous when added to mac & cheese, I could go on and on. I’ve even made bread out of it. One thing that I hadn’t tried — I know this is sacrilege to the purists — was to add a blue vein cheese. So today when I was mixing up my batch of the week, I decided to add some blue cheese crumbles. Winner! It provides enough pungent bite to make you wonder what makes it special, while managing to remain true to the original.

 Am I Blue Pimiento Cheese

2 oz. (or more, if you dare) (2 T.) blue cheese crumbles
8 oz. shredded sharp cheddar cheese
4 oz. cream cheese, room temperature
½ c. chopped Melissa’s Fire Roasted Red Peppers
1/3 c. Duke’s mayonnaise
¼ t. garlic powder
¼ t. onion powder
¼ t. smoked paprika
¼ t. Old Bay seasoning
Pinch cayenne

Place all ingredients into a medium to large bowl, and beat until thoroughly combined. Refrigerate for an hour or two prior to serving to allow flavors to meld.