Friday, April 28, 2023

King’s Hawaiian Lemon Cheesecake Danish

 
Last month I made Cheesecake Danish using a recipe I’d found on the web. It made use of the King's Hawaiian rolls, and it was delicious. The other day I was thinking about that recipe, and wondering how well it would translate into a lemon filling with a lemon glaze. It did, easily, and the results were outstanding! If you enjoy lemon as much as I do, you need to give these a try. They freeze beautifully, so don’t fail to make these because it results in a dozen. They’ll keep so that you can enjoy them on 12 separate, tasty occasions.
King’s Hawaiian Lemon Cheesecake Danish

 Lemon Cheesecake Rolls:

1 12-pack King's Hawaiian original sweet rolls

½ c. + 2 T. butter melted

3 T. brown sugar

2 t. ground cinnamon

¼ t. ground nutmeg

8 oz. cream cheese, softened

¼ c. granulated sugar

¼ t. lemon oil (NOT extract)

2 T.  grated lemon peel from 2 larges lemons

1 large egg, beaten

Lemon Glaze Topping:

½ cup powdered sugar

1 T. fresh lemon juice

Fresh grated lemon peel for garnish (optional)

 Preheat oven to 375°F. Melt 2 T. butter and brush evenly along the bottom and up the sides of a 10” x 10” baking dish; set aside.

 Separate the rolls and place into prepared pan. With a sharp knife (I used a fish boning knife), cut an “X” into the top of each roll about 2/3 of the way down.

Stir together the 1/2 cup butter, brown sugar, nutmeg, and cinnamon in a small bowl; pour evenly over the rolls.

Beat the softened cream cheese until smooth. Add sugar, lemon extract, lemon zest, and egg, and beat until incorporated.

Transfer cream cheese mixture into a piping bag fitted with a wide tip. Press the tip down into the “X” that you created in each roll, and pipe full. You will see the roll expand as it fills with the delicious lemony cheesecake filling.

 Bake, uncovered, for 12 to 15 minutes. In order to prevent sticking, allow rolls to cool for a couple of minutes.  Prepare glaze and drizzle over the top. Allow glaze to set for ten minutes before removing to a serving plate. Serve warm.

 As an Amazon Associate I earn from qualifying purchases.

Thursday, April 27, 2023

Dr. Pepper Pork Steaks


Pork steaks are kind of a St. Louis thing. I grew up with the aroma of these cooking on neighborhood grills, always wafting through the air. Recently they have expanded throughout the Midwest, so that more people can enjoy this taste sensation. Sometimes it is referred to as a Boston butt steak or pork blade steak being that it is cut from the shoulder of the pig. It is a tough piece of meat, so it requires a decent amount of cooking, but the rewards are great. I recently came across a rib recipe, wherein the ribs were simmered in Dr. Pepper before being grilled, and I wondered how well this would translate to pork steaks. It translated beautifully! This doesn’t mean that I’m not going to throw these on the grill during the summer, but I guarantee I’m going to simmer them in Dr. Pepper before I do.

Dr. Pepper Pork Steaks

2-4 pork steaks

1 2-litre bottle Dr Pepper (NOT DIET!)*

5 cloves garlic, smashed

3 Melissa’s shallots, halved

1 T. liquid smoke

1 t. Worcestershire sauce

1 T. Smokehouse Maple Seasoning

Barbecue Sauce**

 Place pork steaks into a large stockpot and pour Dr. Pepper over to cover.

Add garlic, shallots, liquid smoke, Worcestershire sauce, and smokehouse maple seasoning. Bring to a boil, lower to a simmer, and cook until tender. (I put mine in frozen and let them simmer for two hours, and that turned out to be perfect.)

 Using a spatula, lift pork steaks out of the pot and place into a baking pan. Pour barbecue sauce over the pork steaks to thickly cover. Bake at 350°F for 40 minutes.

 These reheat and freeze beautifully.

 *I cannot emphasize this enough. Diet soda contains chemicals that you do not want concentrated and infused into your food.

 **You can use your favorite barbecue sauce, but I would suggest using one that is more to the vinegary side rather than sweet. The Dr. Pepper is going to impart a bit of a sweetness to the meat. I used my own version of a local favorite from SugarFire Smokehouse, coffee barbecue sauce. The dark specks that you see on the meat are coffee grounds. So good. You can make a copycat here.

As an Amazon Associate I earn from qualifying purchases. 

Tuesday, April 25, 2023

Layered Taco Casserole

 
I don’t know about you, but I never get tired of Mexican food. That’s not to say that this layered casserole is Mexican, but it’s what we have Americans consider to be Mexican, so I’m just going to go with that. The beauty of a casserole is that you can change it up to suit your tastes in any way that you like. If there are ingredients that you would like to add, feel free to do so. Had I had a small can of green chilies on hand, I would have stirred them into the refried beans. Instead, I added some sliced jalapeños to the beef along with the corn. This is one of those dishes that is pure comfort. It makes a decent amount, particularly if there are just one or two of you, but it freezes beautifully. I filled individual au gratin dishes with single servings, wrapped them in plastic wrap, and put them into the freezer in Ziploc freezer bags so that I can enjoy them at some point in the future…probably with a margarita.

Layered Taco Casserole
 Adapted from aboutamom.com


1 lb. ground beef
1 1.25-oz. pkg. taco seasoning

1 c. frozen corn

¼ - ½ c. sliced Melissa’s pickled jalapeños 
1 15-oz. can refried beans
2 c. Monterey Jack cheese, divided
1 c.
salsa
2 green onions, chopped
1 2.25-oz. can
sliced black olives
1 tomato, chopped
2 cups corn chips (coarsely crushed)

 Preheat oven to 375°F. Spray the bottom of an 8” x 8” casserole dish with PAM. Place crushed corn chips into the bottom of casserole dish; set aside.

 Heat refried beans on stove until hot. Add 1 cup cheese and 1 cup salsa. Stir until combined. Spread beans over corn chips in dish.

 In a 10" skillet, brown ground beef; drain off any excess fat. Add taco seasoning and cook according to package directions. Stir in the frozen corn and jalapeños. Place beef/corn/jalapeno mixture on top of beans. Sprinkle remaining cheese over top. Sprinkle black olives and green onions over cheese.

 Bake for 15 to 20 minutes, or until the cheese is sufficiently melted.

 Remove from oven and sprinkle chopped tomatoes on top. Allow to cool a couple of minutes before serving. Nice when served over a bed of shredded lettuce with sour cream and guacamole on the side.

As an Amazon Associate I earn from qualifying purchases.


Monday, April 24, 2023

Cannellini Bean Dip with Kalamata Olives


I was feeling particularly domestic over the weekend, perhaps because it took a cold turn and I was able to use up the last of my logs for the season, perhaps it’s because I had a blank calendar for the week ahead. Whatever the reason, I whipped up a massive amount of things in the kitchen, one of which was this delicious bean dip that is so good I could have eaten it with a spoon. I did use it as a condiment on a TLT (turkey, lettuce, and tomato), and it was phenomenal!

Cannellini Bean Dip with Kalamata Olives

1 15-oz. can cannellini beans, rinsed and drained
1 t.
Melissa's minced garlic
2 - 3 T. extra-virgin olive oil
¼ t. rubbed sage
¼ t. dried thyme
¼ t. kosher salt
Few gratings freshly ground black pepper
1/8 t.
lemon pepper seasoning
4 Kalamata olives, pitted
1 T. freshly grated Parmesan

Place everything into a food processor or blender (I used a mini food processor) adding oil as needed. This recipe can be doubled or tripled. Just play around with it, tasting as you go. You honestly can’t go wrong.

As an Amazon Associate I earn from qualifying purchases.


Friday, April 21, 2023

Hoosier Pork Tenderloin Sandwich

 
I always keep buttermilk on hand because it makes an excellent marinade for chicken. What I didn’t know is that it works equally well for pork. This was a day of firsts because not only, for the first time, did I marinate pounded medallions of pork tenderloin in buttermilk, but, for the first time, used crushed saltines as a breading. Wow! What a difference that made from my usual breadcrumbs. I also, for the first time, had a breaded pork tenderloin sandwich, native to the state of Indiana.


The late Mr. O-P and I spent a lot of time on the road, largely heading east. There was a gas station (yes, you read that right), now defunct, in Gnaw Bone, Indiana by the name of Gnaw Bone Food & Fuel that was alleged to have served the definitive pork tenderloin sandwiches. Unfortunately, we’d find ourselves passing through way too early in the morning to want to consume heavy gas station food, so when I found a recipe on the Food Network website I wanted to give it a try.

This sandwich is not without a bit of advance work and preparation. Both, however, are minimal, and the rewards are great. You can slice your tomatoes, onions, and shred your lettuce well ahead of time. Then it’s just a question of setting up your breading station, and spending six minutes time frying the pork tenderloin. It really is worth it. Definitely diner-quality food, and I mean that in a good way.

  Hoosier Pork Tenderloin Sandwich

Adapted from foodnetwork.com

 1 lb. pork tenderloin

1 large egg

1 c. buttermilk

1 T. Melissa’s minced garlic

½ t. salt

½ t. pepper

¼ t. cayenne pepper

 1 sleeve saltines

¾ c. flour

 Peanut oil, for frying

 Mayonnaise

Yellow mustard

Shredded lettuce

Tomato slices

Slices of onion

Sandwich slice dill pickles

 Cut the pork crosswise into 4 equal pieces. Put each piece flat on a cutting board and slice horizontally almost in half (stop about ½-inch from the other side). Open like a book. Sprinkle each piece with water, place between 2 pieces of heavy-duty plastic wrap and pound to ¼-inch thick with a mallet or heavy skillet.

 Whisk the egg, buttermilk, garlic, salt, black pepper, and cayenne in a shallow bowl. Add the pork, cover and refrigerate at least 4 hours or overnight.

Pulse the crackers into coarse crumbs in a food processor; transfer to a shallow dish. Put the flour in another dish. Remove each piece of pork from the marinade, letting the excess drip off. Dredge both sides in the flour, dip in the buttermilk marinade again, and then coat with the cracker crumbs.

  Heat ¼” to ½” peanut oil in a large heavy-bottomed skillet over medium-high heat until a deep-fry thermometer registers 360°F. Fry the pork in batches until golden and cooked through, about 3 minutes per side. Drain on a wire rack positioned over a baking sheet to catch drips.

 Toast buns on cut sides, and spread both halves with mayonnaise (top) and mustard (bottom). Layer the lettuce, tomatoes, and onion on the bottom halves. Add a piece of pork and a few pickle slices. Cover with the bun tops.

 Makes 4 sandwiches.

As an Amazon Associate I earn from qualifying purchases. 

Thursday, April 20, 2023

Pork and Pepper Stir-Fry

 
The recipe for this tasty dish came from an Abrams Books recent release,  In Praise of Home Cooking: Reasons and Recipes by Liana Krissoff. This book is unique among cookbooks in that it is equally valuable to the novice cook as it is to the more experienced. Krissoff deconstructs difficult processes and recipes, making them exceedingly doable for anyone interested in preparing a meal.
Pork and Pepper Stir-Fry

 1½ c. sliced red bell pepper (about one small)

1½ c. fresh snow peas

4 scallions, cut into pieces

2 cloves, garlic, chopped

4 coins ginger, chopped

1 c. chicken stock, preferably unsalted

1 T. cornstarch

2 to 3 T. Chinese light or regular soy sauce

1 T. sweet soy sauce (optional; a good pinch of brown sugar works if you don’t have sweet soy sauce)

Several grinds of black pepper

2 T. vegetable oil

8 oz. pork loin or lean steak, cut into very thin slivers

Pinch of kosher salt.

Cooked rice for servings

 Cooking a stir-fry goes quickly, so set out all the ingredients before you turn on the burner: put the bell pepper, snow peas, and scallions in a bowl. Put the garlic and ginger in a little pile on the cutting board or in a small cup. In a glass measuring cup, stir together the stock, cornstarch, 2 tablespoons of the light soy sauce, the sweet soy sauce, and black pepper, and leave the spoon in the cup.

 In a large skillet or wok, heat 1 tablespoon of the oil over medium high heat. When it’s hot, add the pork, spreading it out evenly in the pan. Cook, undisturbed, for three minutes so the pork browns nicely on the bottom, then use a thin, metal spatula (or wok spatula) to turn and stir the slices. Cook for another one to two minutes or so, until no pink remains on the surface of the slices.

 Scoot the pork to one side of the pan and add the remaining 1 tablespoon oil to the empty side of the pan. Add the garlic and ginger and stir for 30 seconds, then mix it in with the pork. Pile the bell pepper, snow peas, and scallions into the pan and cook, stirring frequently, for about three minutes, until the snow peas are a brighter shade of green. Give the stock mixture a stir and pour it into the pan. Stir and turn the vegetables and pork in the pan for about two minutes until the bell pepper is just tender and the sauce is thickened and glossy. Taste and add more soy sauce if necessary. Spoon over hot rice in individual plates, and serve.

 Note: I like mushrooms, so I hydrated a 2 oz. package of Melissa’s dried portobello mushrooms, drained them, and stirred them in along with the other vegetables.

As an Amazon Associate I earn from qualifying purchases.

 Disclosure: I received a complimentary copy of this book from Abrams Books as a member of their Abrams Dinner Party 2022-2023.

Tuesday, April 18, 2023

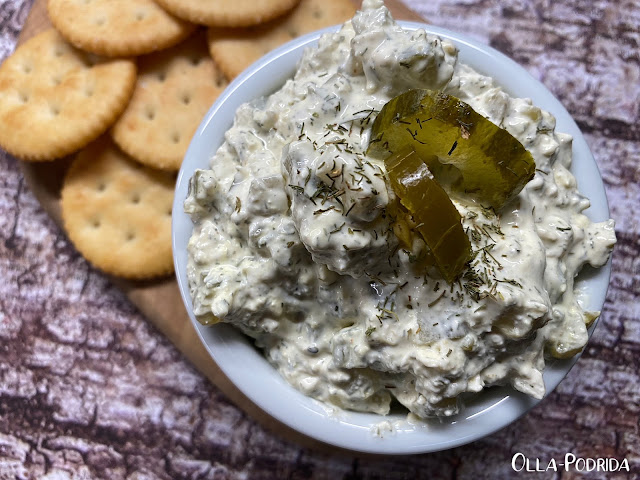
Jalapeño Dill Pickle Dip

 
If you’re unfamiliar with the name, Lisa Fain, I would advise you to get to know her immediately, particularly if you are a text max fan like I am. I reviewed her book, Queso, a number of years ago, and have gotten every one of her books since. I love absolutely of her recipes. This one is hers as well, and a wonderful, zesty addition to other dips and spreads with which you’re probably familiar. This is not overly hot despite the jalapeños, but if you have a difficult time tolerating jalapeños, cut back to 1/4 cup. Remember, as I always tell you, dips and spreads work wonderfully as sandwich fillings or condiments, so keep that in mind.

Jalapeño Dill Pickle Dip

Slightly adapted from Lisa Fain

 8-oz. cream cheese, softened

¼ c. sour cream

1 c. finely diced dill pickles

½ c. finely diced Melissa’s pickled jalapeños

2 T. grated Melissa’s shallot

2 T. dill pickle juice

1 T. jalapeño pickle juice

¼ t. Worcestershire sauce

1 T. garlic powder

1 T. dried dill weed

1 t. onion powder

Pinch cayenne

Salt

Chips, crackers, or sliced vegetables, for serving

 Mix the cream cheese, sour cream, dill pickles, jalapeno pickles, grated onion, dill pickle juice, jalapeno pickle juice, Worcestershire sauce, garlic powder, dill weed, onion powder, and cayenne until smooth and well blended. Taste and adjust seasonings, adding salt to taste.

Chill for at least an hour for the flavors to meld. Remove from the refrigerator 30 minutes before serving so it can soften. Serve with chips, crackers, and/or sliced vegetables.

As an Amazon Associate I earn from qualifying purchases. 

Monday, April 17, 2023

Sicilian Citrus Pesto

 
Tomorrow is release day for Frances Mayes’ (of Under the Tuscan Sun fame) new cookbook, released via Abrams Books, Pasta Véloce: Irresistibly Fast Recipes from Under the Tuscan Sun. There’s a lot to like about this book, but what I found particularly fascinating were all of the recipes for pesto. I love pesto so much that I could eat it with a spoon. Her book has not only the basic version, walnut and pistachio versions, but also olive pesto, and this bright and delicious citrus version. I like to add lemon juice to pesto, but it never occurred to me to add orange juice or lime juice, much less all three together. This pesto has the freshest taste of any that I’ve tried. It is bright and refreshing, and, as such, so perfect for summer.

Sicilian Citrus Pesto
Makes about 1 cup

2 c. lightly packed fresh basil leaves
2 cloves of garlic, quartered
½ t.
coarse salt
3 T. fresh orange juice
2 T. fresh lemon juice
1 T. fresh lime juice
2 T.
sliced almonds
3 T. extra-virgin olive oil
½ c. grated Parmesan Reggiano cheese

In a food processor combine the basil, garlic, salt, orange juice, lemon juice, lime juice, and almonds. Pulse four or five times. Then, with the machine on, add the olive oil, then the cheese. Scrape down the inside of the processor with a spatula. Pulse about 10 times until the pesto is coarsely chopped.

As an Amazon Associate I earn from qualifying purchases.

 Disclosure: I received a complimentary copy of this book from Abrams Books as a member of their Abrams Dinner Party 2022-2023.

Friday, April 14, 2023

Pixie Tangerine Vanilla Bean Ice Cream

 
You know that summer’s coming when I go downstairs to the belly of the beast for the sole purpose of excavating the insert for the ice cream maker, bringing it upstairs to the freezer in the kitchen. Generally, I wait until June to make ice cream, but a recipe that I found on the Melissa’s Produce website lured me in, and I had to try it. Citrus-y, creamy, and delicious, this tastes like the Creamsicles from my youth. If you enjoyed them as much as I did, this is a must make.

Pixie Tangerine Vanilla Bean Ice Cream

Slightly adapted from Melissa’s Produce

 2½ c. heavy cream

½ c. whole milk

2/3 c. granulated sugar, divided use

2 Melissa’s Vanilla Beans, split lengthwise

½ t. pure vanilla extract

2 T. Pixie Tangerine zest

4 egg yolks*

½ c. Pixie Tangerine juice

½ t. pure orange extract

 Into 3-quart saucepan, place cream, milk, and 1/3 cup of sugar.

 Scrape the seeds from the vanilla beans into the saucepan and drop in the vanilla bean pods. Stir in the vanilla extract and the tangerine zest. Heat over medium- low heat, stirring often, until small bubbles appear around the edge of the pan; remove from heat.

 In a small bowl, whisk the egg yolks with the remaining sugar until smooth, like a ribbon.

 While whisking, pour some of the scalded liquid into the egg mixture, continuing to whisk all the while. Add that back to the scalded liquid in the saucepan and cook over low heat until it is thick enough to coat the back of a spoon.

 Strain mixture into a bowl and stir in the tangerine juice and orange oil.

 Place the mixture in the refrigerator and chill completely.

 Place in an ice cream maker and freeze according to the manufacture’s directions.

 *Use the egg whites to make this White Almond Cake.

As an Amazon Associate I earn from qualifying purchases.


Thursday, April 13, 2023

Steak Fajitas

 
At the end of last year, for the first time in my life, I tried Fajitas. I liked them, probably a little too much, because I had them twice a week that entire month and into the New Year. Recently, I decided to mix things up a bit by substituting steak for the chicken. I also decided to replace the fajita seasoning that I had been using on the chicken for a spicy marinade. Wonderful!

Steak Fajitas

 1 lb. sirloin steak

3 T. fresh lime juice

3 T. olive oil

2 t. Mike’s Hot Honey

2 t. Melissa’s minced garlic

1 t. Worcestershire sauce

1 t. chili powder

1 t. ground cumin

1 t. smoked paprika

1 t. salt

1 t. black pepper

1 red, yellow, or green pepper, thinly sliced

1 yellow onion, thinly sliced

2 t. vegetable oil

Flour tortillas

Slice steaks into thin strips; set aside.

 In a medium mixing bowl whisk together lime juice, oil, honey, garlic, Worcestershire, chili powder, cumin, paprika, salt, and black pepper. Add sliced steak to marinade, toss to coat. Cover and refrigerate at least four hours and up to overnight.

 When ready to prepare, heat vegetable oil in a 10” cast-iron skillet over medium-high heat. Once oil is just smoking, using tongs, shake off excess marinade and transfer steak strips, spreading out in a single layer. Let cook for one minute and then quickly flip and sear for another 1-2 minutes until done. Transfer to a warm plate and tent with foil. Add onion and peppers to the hot skillet and cook until both sides are charred.

 Serve in warm tortillas, garnish as you see fit.

 NOTE: I cooked my steak, onions, peppers, and warmed my tortillas, all at the same time using this WONDERFUL Swedish made carbon steel griddle. I am totally in love with this item and cannot recommend it enough.

As an Amazon Associate I earn from qualifying purchases.