Friday, July 31, 2020

Breakfast al Fresco

I don’t know about the rest of you, but during the pandemic, my schedule has completely changed. I used to be one who stayed up into the wee hours of the morning, and didn’t get out of bed the next day until 9:30 AM, or even 10 AM. These days, I’m tired before midnight, and find myself awakening around 6:30. Frankly, I’m enjoying the change. During the summer, the early hours are the only ones where I can spend time out on the lanai without roasting in the heat, or melting in the humidity. As such, I now enjoy breakfast out there every morning.
Breakfast doesn’t have to be of any significance (although I will admit to ordering on occasion from First Watch and getting delivery), it can be simply toast, juice, and coffee. But, I love being around my plant friends, in a setting that is so serene.
I know I’m not alone in my love for plants. There is something so relaxing about being surrounded by them. I also get quite excited when I see a new leaf begin to unfurl. The small table that I have set up in the corner would comfortably serve two, but because I’m only serving one, the top is covered with my favorite things. I will often sit here in the evening when the sun has gone down, light the candle (there are many scattered around the area), and enjoy a cocktail.
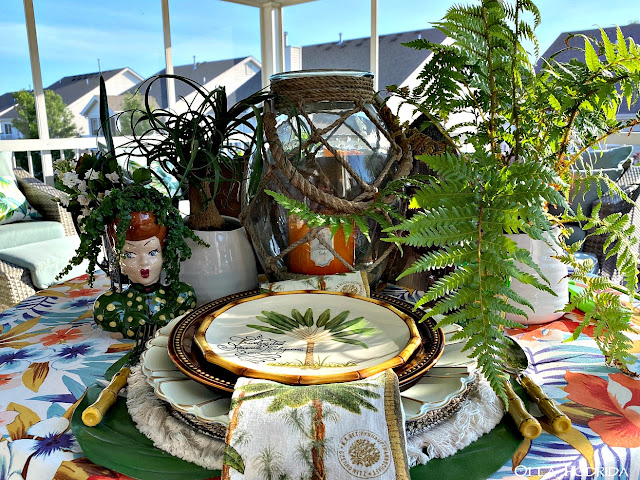
On my table I have some of my favorite plants including an Australian tree fern, and a Lucille Ball head vase with baby tears.
My place setting is largely the result of purchases from Pier One. I have layered green leaf placemats beneath round, fringed, straw placemats, and topped them with a metal charger, all from Pier One. The tablecloth (if you can see it) is Tommy Bahama.
The brown, knobby-edged plate is also from Pier One, a part of their spice collection, the banana tree plate on top is a favorite from Fitz and Floyd.
Because of the bamboo edge of the top plate, I decided that bamboo-handled flatware would be perfect here. The napkin, tropical as well, is from Pottery Barn.
The brown stemware once belonged to my mother; the Moroccan tea glass that I use for juice, is from World Market.
These are not easy times, and I know that many people are despairing. You can fight that by treating yourself exceptionally well, getting out the good dinnerware, and relaxing and appreciating all that’s good in life.

Goodbye, July!

This post is linked to:


Thursday, July 30, 2020

Lemon Meringue Cheesecake

This post contains affiliate links.
July 30 is National Cheesecake Day and while, despite having made plenty of them, I am not a particular fan of cheesecake, I am a big fan of lemon, and found this interesting combination hard to resist. It’s a bit of work, but if, like me, you divide it into thirds, spreading out the construction over a period of three days, it won’t be difficult at all. I made the lemon curd the first day, cheesecake the second day, and the third morning made the meringue. I must say, that of all of the cheesecakes I’ve ever eaten, this one is the most flavorful and unique. If you’re looking for a way to delight an audience, this cheesecake is it.
Lemon Meringue Cheesecake

To Make Cheesecake:

2 c. shortbread cookie crumbs
¼ c. melted butter
3 (8-oz.) pkgs. cream cheese, room temperature
1 c. sour cream
1 c. granulated sugar
4 large eggs
¼ c. fresh Meyer lemon juice
1 t. vanilla extract
1 Meyer lemon, zested

To Make Meringue:

4 egg whites
¼ c. granulated sugar

1½ c. Lemon Curd* (See recipe below)

Preheat oven to 325°F.

Place cookies into the work bowl of a food processor and pulse until crumbly. Add melted butter and pulse to combine. Press evenly into the bottom of a 9-inch springform pan.

Using a stand or hand-held mixer, beat together cream cheese, sour cream, and sugar until smooth and creamy. Add eggs, one at a time, beating well after each addition. Mix lemon juice, vanilla extract, and lemon zest into cream cheese mixture, scraping bottom and sides of the bowl.

Spread mixture over cookie crust in the springform pan. Bake until almost set in the center, about 1 hour. Cool to room temperature and refrigerate until completely cooled, at least 3 to 4 hours.

Preheat oven to 375°F.

Using a stand or hand-held mixer beat egg whites until soft peaks form; add sugar and cream of tartar, and beat until stiff, but not dry, peaks form.

Spread lemon curd over cheesecake. Mound whipped egg whites over the curd, sealing around all the edges.

Bake in the preheated oven until meringue is golden brown, about 10 minutes. Chill uncovered in refrigerator, about 1 hour. Run a very sharp knife around the edge of the cheesecake, and carefully remove the side of the pan.

This can be made the day before and refrigerated, uncovered. If you would like to make this for the freezer, follow directions up to the meringue, wrap, and freeze. Add meringue when ready to serve, and follow directions form there.

* If you prefer not to make your own lemon curd, feel free to purchase some to use in place of homemade.
Microwave Lemon Curd
Slightly adapted from My Baking Addiction

1 c. granulated sugar
3 large eggs
1 c. fresh Meyer lemon juice
1 T. Meyer lemon zest
½ c. unsalted butter, melted

In a large microwave-safe bowl (I used Duralex), whisk together the sugar and eggs until smooth and thoroughly combined. Whisk in lemon juice, lemon zest, and melted butter.

Cook in the microwave on full power for one-minute intervals, stirring after each minute. This process will take about 3-5 minutes depending upon the wattage of your microwave. (Three minutes worked for me.) The lemon curd is done when it coats the back of a metal spoon.

Remove from the microwave, push through a fine, mesh sieve, and pour into sterile jars or a container.

Allow to cool to room temperature, and then cover it with a lid and store it in the refrigerator for up to 2 weeks.


Tuesday, July 28, 2020

Fried Green Tomatoes

This post contains affiliate links.
I came to realize something over the weekend when I sacrificed one of my beautiful tomatoes before it turned red in order to make fried green tomatoes. I had never eaten nor made a fried green tomato in my life, and somehow, I felt I was missing something. I have been told, by someone who loves them, that this is a wonderful recipe. Indeed, the breading is crisp and crunchy, the tomato is tender, the sauce is phenomenal (and I love to toss baked shrimp in with it and serve it over rice), and yet, the love for these is lost on me. If, unlike me, you are a fan, you might want to give these a try. Set up a dipping station, and it goes very quickly. Let me know what you think.
Fried Green Tomatoes

2 green tomatoes, cut into ¼” slices
½ c.
self-rising flour
½ t. seasoned salt
¼ t. freshly ground black pepper

½ c. buttermilk

½ c. cornmeal
½ t. dried parsley
½ t. paprika
½ t.
Creole seasoning
¼ t. garlic salt
Freshly ground black pepper
Vegetable oil

Season tomato slices with salt and pepper.

Set up a “dipping station.” In the first bowl combine flour, salt, and pepper. In the second bowl pour in buttermilk. In the third bowl combine cornmeal, parsley, paprika, Creole
seasoning, garlic salt, and pepper.

Dredge each tomato slice in the flour mixture to coat, then into the buttermilk, and finish by pressing each side of the tomato into the cornmeal mixture to coat. Place tomato slices on a baking sheet and allow to rest to absorb the flavor of the coating, 10 to 15 minutes, while you heat up the oil.
Heat oil in a deep fryer or saucepan, or, as I did, a 9-inch sauté pan. Heat to 350°F.

Gently place tomato slices into the hot oil and cook until golden brown (floating if you’re using a deep fryer), 2 to 3 minutes per side. Drain on a paper towel-lined plate.

Serve with remoulade. (Recipe follows)

This recipe yields eight slices. It can be doubled to serve more.
 
Spicy Remoulade
 Feel free to cut back on the cayenne to tame this tangy sauce.

½ c. mayonnaise
2 T. coarse-grained mustard
2 T. drained prepared horseradish
2 T. chopped scallions
½ t. paprika
½ t. cayenne pepper (or less)
½ t. fresh lemon juice
Kosher salt
Freshly ground black pepper

Whisk first 7 ingredients in a small bowl. Season with salt and pepper. Makes about 2/3 cup.


Sunday, July 26, 2020

The Duke's Mayonnaise Cookbook, Reviewed

This post contains affiliate links.
When I’m standing before a packed bookshelf chock-full of the latest new release cookbooks, wondering which one to buy, I’ll tell you my secret for selecting one that is certain to satisfy; look for the cookbook in which a product is involved.
Companies want to sell their products, and when they trouble themselves to select a fine author like Ashley Strickland Freeman to write that book and promote their product, you can be assured that they are going to give you delicious, easy-to-prepare, family friendly recipes. Their goal is to sell their wares, and a bad recipe isn’t going to do it.
A prime example of that is The Duke's Mayonnaise Cookbook. There are so many wonderful recipes in this book that you won’t know where to begin. It has a colorful, retro-look, and immediately draws you in, as you’re flipping pages with reckless abandon, and book-marking more recipes than you could ever imagine.
The recipes are preceded by a brief (but not overbearing) few words by the author, are, in nearly all cases, accompanied by a mouthwatering color photo, are written in a simple, easy-to-understand style, and call for ingredients that you are either likely to have on hand, or are generally easy to come by. 
Lest you think this cookbook contains recipes you’ve seen and prepared before, it also includes more exotic offerings such as farro salad, Israeli couscous, and lamb kabobs.
 Full of delicious comfort foods to take you from breakfast all of the way through dinner, and dessert, this book will send you straight into the kitchen, foraging for ingredients, and getting out equipment, so you can immediately dig in.
Recommended!


Disclaimer: I received a complimentary copy of this book from Grand Central Publishing in exchange for an honest review.

Tuesday, July 21, 2020

Frogmore Stew

This post contains affiliate links.
If you are looking for a 30-minute meal that is going to have at least one element that everyone in the family is going to enjoy, is fun to eat, summery, makes you feel as if you’re on vacation, and has a bit of history to boot, then Frogmore Stew is the answer. Named after a small Low Country fishing community on Saint Helena Island near Hilton Head, Frogmore Stew is sometimes called Low Country Boil. I call it wonderfully good! To be truly authentic, cover your table with newspapers, drain the pot, and spread it out on the table and dig in. The kids will love it!
Frogmore Stew

2 T. salt
3 qts. water
1 12-oz. can beer
2 bay leaves
1 lemon, quartered
2 large sweet onions, cut in wedges
2 lbs. smoked sausage, cut in 2-inch lengths
8 ears corn on the cob
4 lbs. large shrimp, in shells
In an 8-quart stockpot, bring Old Bay, salt, water, beer, soup base, bay leaves, and lemon to a boil. Add potatoes and onions, and cook over high heat for 8 minutes. Add smoked sausage, and continue to cook on high for 5 minutes. Add corn to pot, and cook for 7 minutes. Add shrimp in shells*, and cook for 4 minutes. Drain cooking liquid; pour contents of pot into several large bowls or shallow pails. Sprinkle with additional Old Bay. Serve with lots of napkins.

*If you are using shrimp without shells, only cook for 2 minutes.


Monday, July 20, 2020

"Out of Africa" Table for One

Obviously, by now, you have heard that Pier One plans closure of all 540 stores around the country. I am really struggling with this one. I have been shopping at Pier 1 all of my life. Back in the day, I got my first beanbag chair there (or, rather, my parents got me my first beanbag chair), and I loved it. 
I had a bohemian spirit even in my youth, and while my parents may not have had similar spirits, they did nothing to deter mine. I can still remember my mother and I painting my bedroom red, white, and blue, to go with my new campaign furniture, and stringing the white walls with floor to ceiling-length strands of alternating red and blue beads. Truthfully, along with the dark blue shag carpet, it was quite a stunner.
As I got older, I bought many of my dishes there, in fact, up until just before the virus hit, I still did. The last purchase I made from them, which will undoubtedly be my last purchase from them was nearly everything that you see in this place setting because I cannot resist buying tableware. Thank you, Pier One, for always being great providers of my “fix.” I will miss you, after all, we grew up together.
This post is linked to:

Sunday, July 19, 2020

Happy National Ice Cream Day!

 This post contains affiliate links.
I don’t know what the weather is like where you are, but today our temperatures are going up near 100°F. Combine that with our typical high humidity, and you have HOT! So what better day to celebrate National Ice Cream Day, observed every year on the 19th July. Here are some of my favorites (including a unique and tasty gelato), to help you celebrate. Simply click on the name below the picture to go right to the recipe. Get out your favorite ice cream scoop, and dig in. Stay cool, and enjoy!


Friday, July 17, 2020

Green Goddess Salad Dressing

This post contains affiliate links.
There’s no doubt about it, it’s a crazy world. I’m not sure if it’s the current state of affairs that has caused me to become seriously nostalgic for the 70s or what, but I have found myself digging out recipes that my mother used to make, and re-creating them for me to enjoy. There’s such comfort in these old favorites; with every bite I'm transported back to the dinner table with my mom and dad, and, oh, how I miss those days.

I was in the mood for a wedge salad with Green Goddess Dressing, and found this in my mother’s recipe box. It is just as good as I remember it. If you’ve never tried it, you must. Do not eliminate the anchovy paste, that’s where it gets its flavor.
Green Goddess Salad Dressing

1/2 c. mayonnaise
3 scallions, chopped
1/2 c. fresh basil leaves, torn
2 T. fresh lemon juice
1 garlic clove, smashed
1/2 t. salt
1/4 t. freshly ground pepper
1/2 c. sour cream 

Place above ingredients into the work bowl of a blender or small food processor. Process until creamy. Use immediately,or refrigerate for up to three days.


Thursday, July 16, 2020

Plum Tart

This post contains affiliate links.
I don’t know what it’s like where you are, but here, it’s July, and that can only mean one thing, it’s stone fruit season! And I am a girl who loves her stone fruits. Because I also like fruit desserts, and flavorful cakes for breakfast, I made this adaptation of Ina Garten’s Plum Tart. I used a combination of yellow and red plums in order to get a tangy rather than overly sweet flavor from the plums. It makes a wonderful dessert when served warm topped with ice cream, but it’s equally good at breakfast or brunch alongside a nice cup of coffee.
Plum Tart
Adapted from Ina Garten

2 c. flour
¾ c. chopped pecans
¾ c. light brown sugar, packed
Pinch ground cinnamon
12 T. cold unsalted butter (1 1/2 sticks), cubed
1 egg yolk
1 lb. Melissa’s Plum Bites, pitted, quartered
1 lb. Melissa’s Honey Jade Plums, pitted, quartered

Preheat the oven to 400°F.

Combine the flour, walnuts, sugar, and cinnamon in the work bowl of a food processor; pulse to combine. Add the butter and egg yolk. Pulse until crumbly.

Press 1½ c. of the crumb mixture in an even layer into the bottom of a 9.5" springform or tart pan. Arrange the plums in the pan, skin side down, to form a flower pattern; begin at the outside and work your way in.

Sprinkle the rest of the crumb mixture evenly over the plums. Bake the tart for 45 to 55 minutes, or until it's lightly browned and the plum juices are bubbling. Remove from the oven and cool for 10 minutes. Remove from the pan and transfer the tart to a flat plate. Serve warm or at room temperature.