Tuesday, June 30, 2020

Margaritas Magnifico

This post contains affiliate links.
I love Mexican food, and, like many who do, I have a favorite restaurant that’s been around since the days I was in high school. Recently they started providing curbside pick up, something I found I absolutely could not resist. My aunt, generally my partner in Mexican food eating crime, heard the same and suggested we both order. She’d pick up the food, she told me, bring it out to my house, and we could enjoy it at a safe distance. Wonderful, I replied, I’ll make the margaritas. Truth be told, while I had drunk plenty, I had never actually made a margarita. But, I know what I like, so gave it a shot. I’m not going to say these were the best part of the meal, because it was excellent, but these were amazing. My aunt is a dozen years older than I am, and said this was the best margarita she had ever had in her life. I have to agree. We seriously could not stop drinking them. Maybe we’re alcoholics, maybe it's the pandemic, or maybe, just maybe, she is absolutely right!
Margaritas Magnifico

2 c.
sweet and sour mix
1 c.
Patròn Tequila
½ c. Triple Sec
1/3 c. Patròn orange
1/3 c. Brandy

Pour all ingredients into a cocktail shaker and shake away. Chill in the fridge until ready to serve.
Salt the rims of four margarita glasses, add ice, and fill each with this magnificent nectar. Sit back and wait for the compliments. Serves 4...or maybe only two...or one, I don't judge.


Monday, June 29, 2020

Jacques Pépin-Inspired Fresh Herb Egg Salad

This post contains affiliate links.
If you haven’t read last week’s blog post featuring the recipe for Jacques Pépin’s Herbed Potato Salad, you may want to give that a look. This egg salad was inspired by that recipe, and I think it is one of the most flavorful egg salads that I have ever eaten.

My hankering for egg salad had me hard-boiling eggs. I also had a refrigerator full of fresh herbs, a stalk of celery with a frozen exterior needing seeing to, and had just eagerly picked my first bunch of homegrown scallions. I chopped everything up, tossed it into a bowl, and then as I was about to reach for the mustard, mayonnaise, and other ingredients I generally use in dressing egg salad, I spotted the remaining dressing that I’d used in the potato salad and thought, why not? So I grabbed the jar, unscrewed the lid, and poured what remained of the dressing over all. It turned out to be the perfect amount for these ingredients, blended in as smooth as silk, and was absolutely wonderful. This is my first time making a mayonnaise dressing in a mason jar, but it will not be my last. Much experimenting is in my future, stay tuned. Meanwhile, you must try this egg salad.
Jacques Pépin-Inspired Fresh Herb Egg Salad

3 extra large eggs, hard boiled, chopped
1/3 c. chopped celery
1/4 c. chopped scallions
1/4 c. chopped flat leaf parsley
1 T. chopped fresh dill
Freshly ground black pepper
Pinch of salt

Combine egg salad ingredients in a large bowl. Pour half of the dressing on top of the egg mixture, and fold to combine. Store remaining dressing in the refrigerator to use on lettuce, potato, or other salads. Keeps for up to a week.

Dressing
2 T. mayonnaise
2 T.
Dijon mustard
2 T. water
¼ c. olive oil
1 t. sugar
½ T. cider vinegar
Copious amounts of salt and freshly ground black pepper

Place all ingredients into a
jar, screw on the lid, and shake for all you’re worth.


Saturday, June 27, 2020

Zucchini Spice Bread

This post contains affiliate links.
I bought a zucchini in order to make a favorite recipe of my mom’s. Then one day, in a sleep-deprived haze, I mistook it for a cucumber, and bought another. Then, I lost my mom's recipe. I’ll find it, not to worry, but as time passed, those zucchinis were starting to lose their crispness. So, I rummaged through some recipes for zucchini bread, decided that I wanted to make one of my own with a bit more flavor, and here it is. I’ve been enjoying it, as is, for breakfast, but it’s also good when spread with a little cream cheese and served alongside a bowl of soup or a salad for lunch. My guess is that it would be equally good with a scoop of ice cream on top and drizzled with a little caramel sauce for dessert, but then what isn’t? 
Zucchini Spice Bread

3 c. flour
1 t. salt
1 t. baking soda
1 t. baking powder
1 T. ground cinnamon
½ t.
allspice
¼ t. cloves
3 large eggs
1 c. vegetable oil
1¼ c. granulated sugar
1 c. brown sugar, packed
1 T. vanilla extract
2 c. grated zucchini
1 c. chopped walnuts

Preheat oven to 325° F. Spray two
8” x 4” loaf pans with Baker’s Joy.

In a medium bowl, sift together flour, salt, baking powder, baking soda, cinnamon, allspice, and cloves; set aside.

In a large bowl beat together eggs, oil, vanilla, and sugar until creamy. Add sifted ingredients to the creamed mixture, beating well. Fold in zucchini and nuts.

Divide batter between two prepared pans. Bake for 55 to 60 minutes or until loaves test done. Cool in pans for 20 minutes. Remove to wire rack to cool completely.


Tuesday, June 23, 2020

Jacques Pépin’s Potato Salad with Fresh Herbs

This post contains affiliate links.
While scrolling through Facebook the other day, I ran across a couple of videos from that French, culinary charmer, and award-winning chef, Jacques Pépin. I think I have been a little bit in love with this guy all of my life. He was making a very simple potato salad that looked so refreshingly good. By the time I had finished his short video, I was in the kitchen boiling potatoes and chopping herbs. I added dill to mine, and changed up his dressing a bit by adding a hint of sugar, and a splash of vinegar. I thought this was very good -- easy, fresh, and so delightfully French. It’s best when served warm; I found it a delightful and surprisingly good accompaniment to morning eggs. Mix things up a bit! Have fun, and keep cooking. It will keep you sane.
Jacques Pépin’s Potato Salad with Fresh Herbs
  Slightly adapted from the original.

Dressing
2 T. mayonnaise
2 T.
Dijon mustard
2 T. water
¼ c. olive oil
1 t. sugar
½ T. cider vinegar

Copious amounts of salt and freshly ground black pepper
Place all ingredients into a
jar, screw on the lid, and shake for all you’re worth.

Potatoes
2 large red skinned potatoes (1 lb.)
3 scallions, chopped
½ c. chopped fresh parsley
½ c. chopped fresh dill
Salt and pepper

Boil potatoes, skins on, for 30 to 40 minutes until they are fork tender. Drain potatoes, and, when they are cool enough to handle, peel and cut into cubes. Put potatoes into a large bowl along with the scallions and fresh herbs. Season to taste with salt and pepper. Pour half of the dressing overall, and stir gently to combine. Serve warm.


Monday, June 22, 2020

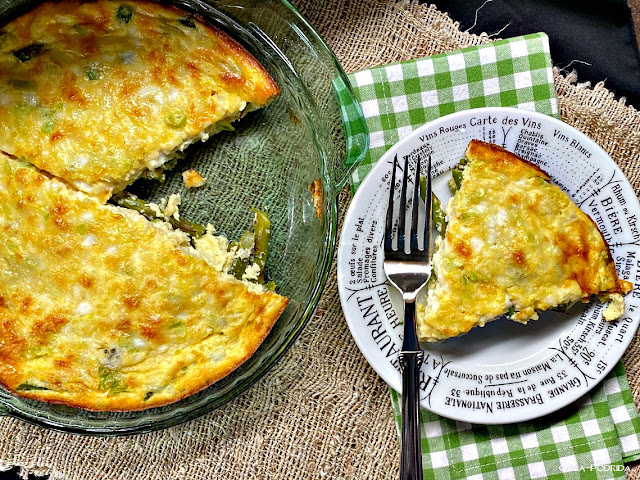
Crustless Asparagus and Spring Onion Quiche

This post contains affiliate links.
There are plenty of things to love about spring, and I am reflecting upon them as we move into the heat of summer. One of my favorite things about spring, and surely a harbinger of the season, is fresh asparagus. I get as much is I can, and use it in as many ways possible. This crustless quiche employing the use of both fresh asparagus, and those wonderful, crunchy, peppery spring onions is a real winner. It captures the taste of spring, combining it with the richness of three flavorful cheeses, to make one wonderful reason for getting up in the morning.
Crustless Asparagus and Spring Onion Quiche

½ lb. Melissa’s fresh asparagus, trimmed and cut into 1½” diagonals
4 extra large eggs
1/4 c. heavy cream
1 t.
Dijon mustard
½ t. salt
¼ t. paprika
Pinch cayenne pepper
Few gratings fresh nutmeg
1 c. small-curd cottage cheese
1 c. grated Gruyere cheese
¼ c. freshly grated Parmesan cheese
1 small bunch of scallions, diced

Preheat oven to 350° F. Spray a
9-inch deep-dish pie plate with Pam; set aside.

Bring ½ cup water to boiling in sauté pan. Add asparagus, cover, and remove from heat. Allow the asparagus to steam while you prepare the other ingredients.

In a medium mixing bowl, at medium speed, beat eggs until frothy and lemon yellow in color. At low speed, beat in cream, mustard, salt, paprika, cayenne, and nutmeg until combined.

Using a heavy wooden spoon, stir in the three cheeses until fully incorporated.

Drain asparagus; pat dry. Arrange over the bottom of prepared pie plate. Sprinkle chopped onions over asparagus. Pour mix egg mixture over all.

Bake for 35 to 40 minutes, or until the quiche has puffed, browned, and is set in the center. Allowed to cool 5-10 minutes before slicing and serving.


Sunday, June 21, 2020

The Munchy Munchy Cookbook for Kids, Reviewed

This post contains affiliate links.
How often have I said that there is good and bad in everything? Too often, no doubt, but it is perpetually true. The pandemic is unlike anything we have seen in the past, but sheltering in place has given us the opportunity to pursue interests that heretofore had gone by the wayside. It similarly allows parents, for better or for worse, to spend more time with their children, and what better opportunity to teach those children how to cook than now?.
If you have no idea where to begin, Pierre A. Lamielle will guide you through the process, step-by-step, with his new The Munchy Munchy Cookbook for Kids. This is a wonderful cookbook! I love it so much, that it is going to remain in my personal cookbook library, open to young people for viewing, but it is just too precious for me to let it go.
Children are visual learners, and this book provides wonderful images geared to their level without talking down to them. It encourages children to cook, but also warns them of dangers that can lurk in the kitchen, such as sharp objects, heat, and spoilage. The illustrations, simple though they may be, will get the message across to even the youngest learner.
A wide variety of cooking utensils are included in this book, with explanations as to how they may be carefully employed. I found it absolutely delightful.
Various tastes such as sweet, salty, bitter, and sour are also covered at great length.
 
The comic book-style formatting in the informational section is very engaging, and will get them reading and learning at the same time. I have to say that this cookbook had me wishing there were adult versions as colorful, artistic, and as creative as this one.
One might think that recipes in a children’s cookbook would be quite mundane, but that is not the case here. While there are certainly simple recipes like scrambled eggs and pancakes, the author also teaches children how to make more company worthy items such as Caesar salad, pizza dough, and one of my personal favorites, butter chicken. There is a nice chapter on sweets, but it doesn’t overwhelm; this book focuses equally on all types of cooking, giving young chefs the opportunity to learn skills in all areas.
Oversized, with a heavy-duty, wipe-clean cover, the cookbook is spiral bound to allow it to lie flat on the counter. I was absolutely charmed by this book. If there is a child in your life, treat him or her, and start them off on the enjoyable path of culinary delights.


Disclaimer: I received a complimentary copy of this cookbook in exchange for an honest review.

Friday, June 19, 2020

Panera-Inspired Smokey Summer Corn Chowder

This post contains affiliate links.
Having been on lock-down for so long, anytime one of my friends orders food for delivery or curbside pick up, we all know about it. I think there has been more detailed, in-depth food talk around here than ever before. One friend had a salad and Summer Corn Chowder from St. Louis Bread Co. (or as you call it, Panera), loved it, and as a consequence, has beaten a trail to their drive-thru ever since.

Intrigued, I had to try it. I had no recipe, so based this on the description on the web: “Roasted corn and skin-on red potatoes simmered with sweet cream, poblano peppers and cilantro.” Having never actually tried that soup, I had no basis for comparison, so Linda, God love her, got me some.  When I shared the end result with her she was delighted. “Nailed it!” she told me. “Now,” she went on, “I can have it year round.” So can you.
Panera-Inspired Smokey Summer Corn Chowder

2 T. olive oil
2 T. unsalted butter
2 large Melissa’s shallots, diced
3 T. flour
1 1½ lbs. Melissa’s baby red potatoes, skin on, cubed
4 c. fresh, roasted corn kernels*
1 poblano pepper, chopped
1 14.75-oz. can creamed corn
½ T. cumin
Salt, to taste
¼ t. freshly ground black pepper
½ c. fresh chopped cilantro
1 c. half-and-half
Diced fresh tomatoes, for garnish
Chopped fresh scallions, for garnish

Place the oil and butter in a pot over low heat. Add the shallots and cook until transparent, 6 to 8 minutes. Sprinkle the flour over the shallots and cook, stirring, for an additional 3 to 5 minutes.

Add the broth, chicken base, and potatoes; bring to a boil. Reduce the heat to medium and cook, partially covered, for 10 minutes or until the potatoes are tender, stirring occasionally.

Add the corn, poblano pepper, red peppers, creamed corn, cumin, salt, pepper, cilantro, and half-and-half; cook over low heat for 8 minutes, smashing potatoes with a small masher (I use
this one), until the soup has thickened and heated through.

Ladle 2 cups of soup into each bowl. Before serving, place 1 tablespoon of diced tomatoes in the center of each and top generously with additional chopped cilantro. Serve immediately.

*To roast corn: Preheat oven to 400° F.  Line a jelly roll pan with foil and set aside.  Rub softened butter over each ear of corn and sprinkle with salt and black pepper.  Line ears of corn up on prepared baking sheet and bake for 35 - 40 minutes, turning halfway through.


Wednesday, June 17, 2020

Pickled Asparagus

​​ This post contains affiliate links.
I have long had an Etsy shop wherein I sell mystery and literary theme gifts and jewelry. Recently, ​​I decided to go out on a limb, and add some culinary offerings, including cocktail theme bracelets. They ended up being quite popular. So much so that I have been receiving requests. Where am I going with this, you ask? Hold on and I’ll tell you. A recent request was for a Bloody Mary theme bracelet. The requester mentioned a variety of things she would like on her bracelet to reflect the various garnishes in a Bloody Mary. One of the things she wanted was asparagus. I like a good Bloody Mary, but I’m not a Bloody Mary drinker, and I was trying to imagine how a piece of asparagus would be. Then, she educated me by telling me it was pickled. Pickled?! Now that interests me.

I am not a “pickler,” per se, but I do go wild for pickled onions, radishes, and green beans, so thought I would add this to my repertoire. As it turned out, I liked them a good deal, and plan to make more, changing up the recipe each time, adding more onions and more garlic, because they were such delicious additions. Even if you don’t imbibe, consider these as excellent additions to a crudités or charcuterie tray. It’s hard to stop eating them.
Pickled Asparagus

2 bunches Melissa’s asparagus spears*
1/3 c. coarse salt
2 quarts cold water
1 2/3 c. white vinegar
1/4 to 1/3 c. sugar
1 t. kosher salt
1 t.
yellow mustard seed
2 Melissa’s shallots, sliced into rings
2 cloves garlic, peeled

½ t. chili pepper flakes
2 sprigs of fresh dill

Trim the cut end of the asparagus spears, and cut them into 3” links. Place them in a large bowl with 1/3 cup salt, and cover with water. Allow to stand for two hours. Drain, rinse under cold water, and pat dry.

Sterilize
two pint-size wide-mouth jars in simmering water for five minutes.

In a saucepan over medium heat, combine the vinegar, sugar, 1 teaspoon of salt, mustard seed, and onion rings. Bring to a boil and boil for one minute.

Place half of the onions in the bottom of each jar. Top onions in each jar with one sprig of dill, one clove garlic, and a portion of red pepper flakes. Pack asparagus stems, tips up, as tightly as possible, in the hot jars leaving ½” of space from the rim. Pour hot pickling liquid into the jars to within ¼”of the rim. Wipe rims with a clean, damp cloth and seal with lids; process in a boiling water bath for 10 minutes.

Cool to room temperature. Check seals when cool by pressing the center of the lid. It should not move. Label and date; store in a cool, dark place. If any jars have not sealed properly, refrigerate and eat within two weeks.

*I had thin asparagus on hand, so it took me two bunches to fill two jars; if your asparagus is thicker, one bunch may do it for you..


Tuesday, June 16, 2020

One-Bowl Blackberry Lemon Spoon Cake

This post contains affiliate links.
Food, be it sweet or savory, should have an appetizing name; a name that engages, draws us in, creating within an intense desire to take that first bite. This is a rather enhanced version of what some people like to refer to as, if you will pardon the expression, “dump cake.” I find that name horribly off-putting. Never, and I repeat NEVER should the words “dump” and cake” be used in the same sentence, unless you have burned one and are throwing it into the trash.

Here, I have revised the standard recipe to enhance the flavor, creating more depth and brightness, without creating much additional work.

This is best while warm and topped with vanilla ice cream, but don’t let that keep you from enjoying it at breakfast. You will find many pleased guests if you serve them a small dollop of this in a ramekin along with other brunch favorites (stay tuned for a spring crustless quiche coming later in the week), and will set yourself ahead of the average hostess.

If blackberry seeds bother you, feel free to swap out the blackberry pie filling for blueberry pie filling, it will be equally good.
One-Bowl Blackberry Lemon Spoon Cake
 
2 21-oz. cans
blackberry pie filling
1 lemon cake mix
Pinch of salt
1 lemon, zested
12 T. unsalted butter, cubed

Preheat oven to 350°F. Spray a 9” x 13” pan, or
2-quart casserole dish with PAM. Pour pie filling into prepared pan, spreading evenly along the bottom. Sprinkle lemon zest on top of that, and scatter a pinch of salt overall. Pour dry cake mix evenly across the top, and then scatter butter on top of that. Slide into the oven and bake for 50 to 55 minutes until the edges are browned and bubbly.

Serve warm or at room temperature topped with vanilla ice cream...or not.


Wednesday, June 10, 2020

Olive Cheese Bread

This post contains affiliate links.
Hands up if you like cheese garlic bread. I do too; it is so good. But, it can become commonplace if you serve it again and again, so I have a fabulous alternative. Instead of garlic bread, try this Olive Cheese Bread. The olive lovers in your family are going to love it, and even those who aren’t wild about olives are going to love it because the flavors meld so beautifully. This can be used in so many ways, slathered on a split loaf of French bread, spread on a thick slice of Texas toast, or, as I have done here, slathered on a thick slice of sourdough. Cut it into diagonals and serve it with soup or salad, or, have it by itself for lunch as an open-faced toasted cheese. This is a game changer. Plus, the mixture will keep in the refrigerator for up to a week (perhaps more, but mine has never lasted longer than that). 

You have to try it!
Olive Cheese Bread  
Slightly adapted from Allrecipes

1/2 c. butter, room temperature
¼ c. Duke’s mayonnaise
1 t.
garlic powder
1 t. onion powder
Pinch cayenne pepper
2 cups shredded mozzarella
½ c.
chopped black olives
Thick sliced bread of your choice

Preheat oven to 350° F.

Stir together butter and mayonnaise until smooth and creamy. Mix in garlic powder, onion powder, cayenne, cheese, and olives. Spread mixture evenly over bread and place on a foil-lined baking sheet.

Bake for 10 to 12 minutes. Switch setting to broil, and do so until cheese melts and bread is golden brown, 2 to 3 minutes.

Serve immediately.

Mixture keeps, covered, in the refrigerator for up to a week.


Wednesday, June 3, 2020

Ziti with Pistachio Cream Sauce

This post contains affiliate links.
April seemed two months long, May seemed two weeks long, and here we are in June. Need I tell you that I am perpetually confused? Honestly, I have no idea what day it is, least of all month. Saturday morning, when I took a look at my June calendar, I was shocked to see that, on the second, I had an appointment with my tax preparer. I was pretty busy over the weekend, as you can imagine. When I got home after the appointment, the last thing I wanted to do was cook (although, truth be told, I haven’t much been in the mood for it anyway). So, I was looking for something that would be tasty, satisfying, and on the table in 30 minutes. This was it! You can make it easy on yourself, and use absolutely any kind of pasta. While the pasta cooks, you make the sauce, and, oh, what deliciousness! The toasted pistachios give this a wonderful richness. Keep this in mind for your vegetarian friends or Meatless Monday. It’s a winner!

Ziti with Pistachio Cream Sauce

8 oz. ziti (or pasta of your choice)
5 T. butter, divided
½ t. salt, or to taste
2 T. freshly squeezed lemon juice
1 c. heavy cream, warmed
½ c. freshly grated Parmesan

Bring a large pot of water to a boil. Add a heaping tablespoon of salt, then add pasta, and cook according to “al dente” directions on box.

While the pasta is cooking, make the sauce. In a
9” sauté pan, melt 1 tablespoon of the butter. Sauté the pistachios for 2 to 3 minutes. Transfer pistachios to a food processor (I used my mini ninja), and pulse until minced. Remove 1 tablespoon for garnish. Melt the 4 tablespoons of remaining butter, and add to the food processor, along with garlic, oil, salt, and lemon juice. Pulse again until thoroughly blended.

Pour the nut mixture back into the sauté pan, turn the heat to low, and add the warmed heavy cream and Parmesan cheese. Stir occasionally while pasta finishes cooking.
When pasta has finished cooking, reserve 1/2 cup of the pasta water, drain the pasta, and immediately add to the sauté pan, tossing well to coat. Add pasta water, a little at a time, until desired creaminess is reached. Serve immediately garnished with reserved pistachios and a sprinkling of Parmesan cheese.

Heartily serves two, lightly serves four.