Friday, September 30, 2011

Corn Fritters with Spicy Remoulade

This post contains affiliate links.

I was able to try yet another tasty recipe thanks to the glut of zucchini I harvested this year (and by "glut" I mean four), once again making use of the October 2011 issue of Bon Appetit magazine, and a recipe by Maxcel Hardy.  I've tried many a fritter recipe in my day, coming away disappointed every time.  Until now.  This is a tasty recipe made even better by the addition of a truly wonderful remoulade sauce.  I ended up with 20 of them -- way too many for the two of us -- so froze the rest.  When we're ready to have them again, I'll pull out as many from the freezer as I need, place them on foil and pop them into a preheated 350 degree oven for about 20 minutes.

Corn Fritters with Spicy Remoulade
2 tablespoons olive oil
1 cup (packed) grated zucchini
3/4 cup fresh (or frozen, thawed) corn kernels
1/4 cup finely chopped onion
2 teaspoons chopped fresh thyme
2 teaspoons chopped fresh cilantro
3/4 cup all-purpose flour
1/2 cup plus 2 tablespoons packaged corn muffin mix
2 tablespoons sugar
1/2 teaspoon kosher salt
1/2 cup whole milk
1 large egg, whisked to blend
Vegetable oil (for frying)
Spicy Remoulade (see below)

Heat olive oil in a large heavy skillet over medium heat. Add zucchini, corn, onion, and thyme and saute until corn is slightly softened, about 3 minutes. Stir in cilantro and let cool.


Whisk flour, corn muffin mix, sugar, and salt in a medium bowl. Whisk milk and egg in a small bowl to blend; whisk into dry ingredients. Add zucchini mixture; fold just to blend. Chill for 30 minutes.
While the recipe (as you can see below) calls for a large pot and deep-fry thermometer, I found a saute pan with about 1/2" of oil worked just fine.
Pour vegetable oil into a large pot to a depth of 2". Attach a deep-fry thermometer to side of pot. Heat oil over medium heat to 325. Working in batches, spoon batter into oil by heaping tablespoonfuls. Fry until golden brown, turning once. Using a slotted spoon, transfer fritters to paper towels to drain. Serve with Spicy Remoulade.

Spicy Remoulade
 Feel free to cut back on the cayenne to tame this tangy sauce.

½ c. mayonnaise
2 T. coarse-grained mustard
2 T. drained prepared horseradish
2 T. chopped scallions
½ t. paprika
½ t. cayenne pepper (or less)
½ t. fresh lemon juice
Kosher salt
Freshly ground black pepper
Whisk first 7 ingredients in a small bowl. Season with salt and pepper. Makes about 2/3 cup.

DO AHEAD: Can be made 2 days ahead. Cover and chill.

Wednesday, September 28, 2011

Kale Chips

If you've ever tried the flash-fried spinach that seems to be so popular at restaurants these days, then you are going to love this recipe.  I had some kale left over from yesterday's pork roast (prior to yesterday's culinary adventure, I was a kale virgin), and wondered what the heck to do with it.  Then I remembered my cousin telling me (Thanks, Kelly!) that she tosses it with olive oil, sprinkles it with salt, bakes it in the oven and her kids (yes, her kids) love it.  She and her husband do too.  And now, so do we.  Can you imagine something crispy, crunchy, tasty, and healthy?  It tastes very much like the fried stuff, but this is baked.  I know, I couldn't believe it either.  You're just going to have to try it for yourself.  It goes together in no time.

Here's how:

Crispy Kale Chips

1 head kale, leaves separated, rinsed, 
dried, cut lengthwise in half, 
center ribs and stems removed
1 tablespoon olive oil
Dash of sea salt

Parmesan cheese (optional)

Preheat oven to 250°F. Place kale on a foil-lined baking sheet and drizzle it lightly with oil.  Toss together until the leaves are coated. Sprinkle sparingly with sea salt and pepper. Arrange leaves in single layer and bake until crisp, about 30 minutes.  Remove from oven and dust lightly with Parmesan cheese. Transfer leaves to rack to cool.

Tuesday, September 27, 2011

Prosciutto-Wrapped Pork Loin with Roasted Apples

My husband is the one who receives Bon Appetit magazine every month, so I generally leave it up to him to peruse each issue, scouting out recipes for us to try.  But this month I was struck by the wonderful prosciutto-wrapped roast on the cover and decided without even opening up the issue that I was going to try it.

It is not difficult to do, but it is time consuming.  It involves butterflying a roast (something I'd never done before, but found it to be a breeze), making a filling, rolling the roast, wrapping it in prosciutto and trussing it (something I learned to do by going on You Tube). As you can see from the picture, it makes an elegant, showy meal.  It is also a very good one.  The plus is that the roast can be assembled one day and roasted the next.  The only thing I'd change about this recipe is to substitute a cup of slivered leeks for the onion in the filling.  Leeks are an excellent accompaniment to pork and, in my opinion, have a much better flavor.

The recipe can be found in the current issue of Bon Appetit, online at epicurious.com, or below.  What follows is a step-by-step photo tutorial in case you'd like to give it a whirl.

Our pork roast was a little less than 1-1/2 pounds, so I cut the filling recipe in half.
A sharp knife is the key to butterflying a roast. Begin with the knife in this position.
As you slice, continue to unroll the roast.
The roast should look like this when you've finished.
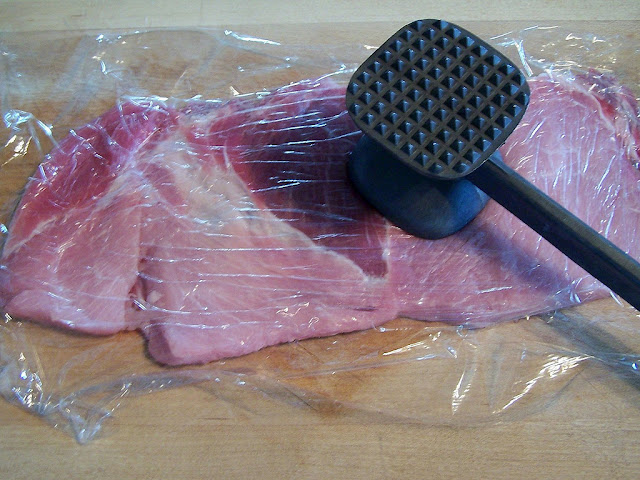
Cover with a sheet of plastic wrap and flatten with a mallet.
The stuffing ingredients all mixed together and ready to be spread on the roast.
First a layer of blanched kale.
Top the kale with the stuffing and smooth almost to the edges.
Roll up tightly and place seam side down on the cutting board or counter.
Wrap with thin layers of prosciutto.
Truss with kitchen twine and slip sprigs of fresh rosemary beneath twine.
Sear on all sides.
Place on a bed of apples, pour sauce all around and roast in the oven.
Pat yourself on the back and admire your beautiful roast.

Prosciutto-Wrapped Pork Loin with Roasted Apples


1 ounce (1 cup) dried whole porcini mushrooms
2 ounces (3/4 cup) dried apples
1 pound kale, bottom stems trimmed
2 teaspoons kosher salt plus more
2 tablespoons (1/4 stick) unsalted butter
1 cup minced onion
1 tablespoon finely minced garlic
1 1/2 teaspoons dried thyme
1 1/2 teaspoons dried rosemary
2 tablespoons brandy or Calvados
1/2 teaspoon freshly ground black pepper
1 pound ground pork

Pork
 1 (trimmed) 2 1/2 to 3-lb. pork loin
1 teaspoon kosher salt plus more for seasoning
1/2 teaspoon freshly ground black pepper plus more for seasoning
3 ounces thinly sliced prosciutto
5 sprigs rosemary
4 medium apples (such as Granny Smith or Fuji), quartered, or 8 small apples, halved
3 tablespoons unsalted butter, divided
2 tablespoons extra-virgin olive oil
1 cup dry hard cider
1/2 cup low-salt chicken stock

Preparation: Filling

Place dried mushrooms and dried apples in separate small bowls. Add 1 cup boiling water to each bowl. Let mushrooms and apples soak until very soft, about 30 minutes. Strain mushrooms. Cover and chill soaking liquid (about 3/4 cup). Drain apples, discarding soaking liquid. Finely chop mushrooms and apples, combine in a small bowl, and set mushroom and apple mixture aside.
Meanwhile, blanch kale in boiling salted water just until wilted, about 1 minute. Using tongs, transfer kale to a rimmed baking sheet. Refrigerate until cool. Remove any large, tough ribs.

Melt butter in a large skillet over medium heat. Add onion; cook, stirring often, until soft and lightly golden, about 8 minutes. Add mushrooms and apples; cook, stirring occasionally, until flavors meld, about 5 minutes. Stir in garlic, thyme, and rosemary; cook for 1 minute. Add brandy and cook until liquid is absorbed, about 1 minute. Stir in 2 tsp. salt and 1/2 tsp. pepper. Transfer mixture to a bowl and let cool completely. Add ground pork and stir to combine well.

Preparing the Pork Roast

To butterfly, put pork loin on a work surface with short end facing you. Holding a long, thin sharp knife parallel to work surface and beginning along one long side, cut 1/2" above underside of roast. Continue slicing inward, pulling back the meat with your free hand and unrolling the roast like a carpet, until the entire loin is flat. Cover with a sheet of plastic wrap. Using a meat mallet, pound to an even thickness.

Uncover pork. Season with 1 tsp. salt and 1/2 tsp. pepper. Place kale leaves on top of loin in an even layer, overlapping as needed and leaving a 1" border. Spread filling on top of kale. Roll pork into a tight cylinder. Wrap one layer of prosciutto around roast. Tie roast securely with kitchen twine in 1" intervals. Tuck rosemary sprigs under twine, spacing apart. DO AHEAD: Pork roast can be made 1 day ahead. Cover and chill. Let stand at room temperature for 1 hour before continuing.
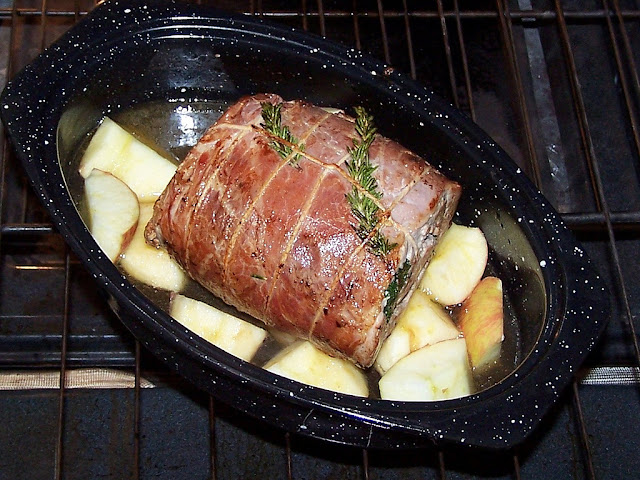
Preheat oven to 400 degrees F. Place apples in a roasting pan. Melt 1 Tbsp. butter with oil in a large skillet. Brown pork on all sides, about 5 minutes total, then set on top of apples in pan. Add cider and 1/2 cup water to skillet and bring to a boil, scraping up browned bits. Pour mixture into roasting pan. Roast pork until an instant-read thermometer inserted into center of loin registers 140 degrees F (it will be cooked medium but still slightly pink), about 1 hour 40 minutes. Let roast rest for at least 20 minutes and up to 2 hours.
Put roast on a platter. Reserve apples from roasting pan; spoon off fat from juices in pan. Place pan on top of stove over medium-high heat. Add chicken stock. Pour in reserved mushroom liquid, leaving any sediment behind, and cook, scraping bottom of pan to release any browned bits, until slightly thickened, about 5 minutes. Whisk in remaining 2 Tbsp. butter and season to taste with salt and pepper. Strain sauce; slice pork. Serve sauce and apples alongside sliced pork.


Monday, September 26, 2011

Pumpkin Pie Cocoa

I spent a good bit of time the past couple of days "whipping up" (and yes, I did use the term facetiously here) the meal we enjoyed for dinner tonight, and that graces the cover of the October 2011 issue of Bon Appetit.  It is a good one (stay tuned later in the week for the results and step-by-step tutorial), but it took up so much time that I thought I deserved a break.  

So I decided to enjoy the beautiful day, put my feet up, and peruse the latest issue of Everyday with Rachael Ray (I do seem to have a one-track mind, don't I?).  Craving something pumpkin (as I tend to do this time of the year), this recipe leapt off the page at me, and sent me right back into the kitchen.  Pumpkin and chocolate (for those of you know don't know) is an excellent combination. It was nearly a year ago when I first acquainted you with this combo in the recipe for Harvest Pumpkin Loaf. Now here I am again acquainting you with yet another and, people, this one is DECADENT! I groaned when I took my first sip, that's how good it is. Since I only wanted to make one cup I cut the recipe in half.  I used Williams-Sonoma's Sweet Ground Chocolate instead of hot cocoa mix (pricey but well worth it), and added a pinch of pumpkin pie spice to the whipped cream.

Try it.  Go ahead.  I'm sure you deserve it.

Pumpkin Pie Cocoa

2 1/4 cups low-fat milk
1/2 cup hot cocoa mix
3 tbsp. canned pure pumpkin puree
1 1/2 tsp. pumpkin pie spice
1/2 cup whipped cream

In a saucepan, whisk milk, cocoa mix, pumpkin puree and pumpkin pie spice; heat until steaming. Pour into mugs and top with whipped cream.


This post is linked to:


Saturday, September 24, 2011

Sharing Recipes

If you read this blog with any regularity, you know that I collect recipe postcards.  What you probably don't know is that I also make them. It started years ago -- my guess is back in the 80s, but who knows? -- when a friend asked me for my recipe for Lemon Squares.  Rather than just dictate it to her over the phone (this was in the days before email), or send it to her in a letter, I thought, why not make it the letter, or in this case, postcard.  Making use of a piece of clip art and sheet of yellow card stock, my longtime love of creating recipe postcards was born, and continues to this day.  I am one woman who is determined not to let the art of correspondence go by the wayside, and figure that I'm helping out the post office at the same time.  (At my local post office, all of the employees know me by name.)


As my interest in rubber stamping grew, I changed my approach to the postcards, hand-stamping and coloring them rather than making use of clip art.  


I have, at this point, close to forty different designs, but those that reflect my long-held love of mysteries tend to be my favorites.  


(The back side)

Back in 2002 they came to the attention of Rubber Stamper magazine, and they featured some of my work on a page in their October issue.


 I hope you'll consider doing something like this the next time someone asks you for a recipe.  Your miniature work of art will be both a delight and keepsake to its recipient.

This post is linked to:

Metamorphosis Monday-BNOTP
Mosaic Monday-Little Red House
 Brag Monday-The Graphics Fairy
Making the World Cuter Monday-Making the World Cuter
Motivate Me Monday-Keeping it Simple
Masterpiece Monday-Boogieboard Cottage
Amaze Me Monday-Dittle Dattle
Thrifty Thursday-Tales from Bloggeritaville
 
100 Ideas Under $100-Beyond the Picket Fence
 Show and Tell Saturday-Be Different Act Normal

Fall in Love - Decor to Adore

Thursday, September 22, 2011

I made pie!


When I asked my husband to bring home apples, I meant bring home APPLES.  Bags and bags of fresh-from-the-farm apples so I can make apple butter, apple sauce, and pie.  Well, today he brought home apples all right, four of them.  So instead of embarking on "The Great Pie Adventure" I decided to try my hand at a small one. A little six-inch mini pie with a lattice crust, to be exact.  This is a first ever for me since actually eating pie has never been my thing.  Truth be told, I always thought pie was the liver of desserts.  I mean it's crust with hot, soggy fruit.  There is something about limp fruit that I never find particularly appealing.  BUT, lest the pie fanatics try to hunt me down and hit me about the head and shoulders with a rolling pin, I am beginning to change my mind, and if not totally embrace eating pie, well, then certainly embrace the artistry that comes from its creation. Looking bubbly and delicious (and it actually was!), the recipe I used is Ina Garten's Deep Dish Apple Pie that I cut way down. I used a purchased crust, fitting what I could into the little blue ceramic pie plate and then rolling out the leftover scraps to make the lattice. This was my first ever lattice crust, so I'm pretty proud!  

Here it is prior to going into the oven brushed with cream and sprinkled with sanding sugar.

If I can do it, so can you!


This post is linked to:


Wednesday, September 21, 2011

St. Louis-Style Cream of Broccoli Soup

A big broccoli score at the Farmer's Market had me searching for as many broccoli recipes as I could find.  An avid vegetable lover, I can eat broccoli any old way, even raw.  My family, however, does not share my zeal and consequently considers well-disguised broccoli as the best broccoli. So, years ago, in an effort to keep all of us happy, I created this soup recipe, calling it St. Louis-style because of the addition of St. Louis's own Provel cheese.  It, like the Velveeta this soup also contains, is a processed cheese, so not the apex of healthfulness, but boy, is it good.  Quick and easy to make, this soup is a crowd pleaser.  I like to think the goodness of the broccoli offsets the decadence of the cheese.  I served mine in cups with slices of the zucchini corn bread that I made yesterday on the side.

St. Louis-Style Cream of Broccoli Soup

1 large head fresh broccoli, separated into florettes
1 cup water
2 cups whole milk
1 cup half and half
1 cup Velveeta cheese, cubed
1 cup Provel cheese, grated
2 teaspoons chicken soup base (I use L.B. Jamieson)
1/2 cup flour  
1/4 teaspoon freshly grated nutmeg (more or less to taste)


In a large saucepan, cook broccoli with bouillon in one cup of water until tender.  Do not drain.  In a small bowl, mix together milk, cubed Velveeta, Provel, flour, and half and half.  Add to cooked broccoli.  Heat until thickened, stirring constantly (about 3-5  minutes).  Remove half of soup from pan and blend with upright blender, immersion blender, or food processor until smooth.  Pour back into the pan, stir in nutmeg, heat through and serve.


This post is linked to:

Real Food Wednesdays
No Whine Wednesdays
What's on Your Plate
Cast Party Wednesday
What's Cooking Wednesday


Tuesday, September 20, 2011

Zucchini Corn Bread

You may recall from this post that I was lamenting what to do with the two zucchini that I'd harvested for the year, shaking my head at the fact that I had so many recipes, and too few zucchini.  Well, today I pulled in a third! Yes, four plants, a summer of care, water, worm castings, organic compost, and my guess is that each zucchini has probably cost me around $37.50, but I digress...

The zucchini in question.  Isn't it a beauty?
Today I knew exactly what recipe I wanted to try.  I spotted it in the July 2011 issue of Bon Appetit and thought it sounded unique and wonderful.  It is.  I think this is the best corn bread I've ever tasted.  Moist, dense, flecked with my home grown zucchini, just the right amount of sweetness, and it is not at all crumbly, so cuts like a dream.  It was the perfect accompaniment to our brisket dinner tonight, and I suspect will made a great adornment to the chili I expect to make later in the week.

Zucchini Corn Bread

1/2 cup (1 stick) unsalted butter plus more for pan
2 large eggs, lightly beaten
1/2 cup buttermilk
1 large zucchini (about 10 ounces)
1 cup all-purpose flour
1/2 cup whole wheat flour
1/2 cup sugar
1 teaspoon baking powder
3/4 teaspoon fine sea salt
1/2 teaspoon baking soda
3/4 cup medium-grind cornmeal

Position a rack in the middle of oven and preheat to 350 degrees F. Butter a 9 x 5 x 3" loaf pan.


Melt 1/2 cup butter in a small saucepan over medium-high heat. Continue cooking until butter solids at bottom of pan turn golden brown, about 3 minutes. Scrape butter into a medium bowl. Set aside and let cool. Whisk in eggs and buttermilk.


Trim zucchini ends. Thinly slice five 1/8" rounds from 1 end of zucchini and reserve for garnish. Coarsely grate remaining zucchini. Add to bowl with butter mixture and stir until well blended.


Sift both flours, sugar, baking powder, salt, and baking soda into a large bowl. Whisk in cornmeal. Add zucchini mixture; fold just to blend (mixture will be very thick). Transfer batter to prepared pan and smooth top.

Bake bread until golden and a tester inserted into center comes out clean, 55-65 minutes. Let cool in pan 10 minutes. Remove from pan; let cool completely on a wire rack. DO AHEAD Can be made 1 day ahead. Store airtight at room temperature.
Isn't this a beautiful loaf? Although, seriously, could I have found a napkin that looks more putrid than the one I selected for this picture? 


This post is linked to:

Dr. Laura's Tasty Tuesdays
Tuesdays at the Table
Tuesday Night Supper Club
Slightly Indulgent Tuesdays
Tempt My Tummy Tuesday
Tasty Tuesday


Monday, September 19, 2011

Tasty, but Ugly Shortbread Cookies


One of my favorite quotes comes from British author Catherine Aird, "If you can't be a good example, then you'll just have to be a horrible warning." Today, as I share one of my failures with you, let me be your horrible warning.

A rainy, dreary Sunday had me in the kitchen experimenting.  Sometimes, as I'm sure you know, things work out, and other times, well, they don't.  As a rubber stamper I am always looking for new ways to use my gobs and gobs of rubber stamps.  So when perusing the Martha Stewart Cookie app and running across a recipe for "Stamped Shortbread Cookies" I got an idea.  Instead of using cookie stamps to make an impression on a cookie (something I've tried in the past with mixed results), why not rubber stamp them?

I wisely made a half a batch of Martha's cookie recipe and while it was chilling, prepared the cookie sheets, selected and cleaned the rubber stamps, and sprayed them with baking spray to keep them from sticking.  
The lightly chilled dough rolled out beautifully, and I was pleased to see that it took the impressions very well (see top photo).  Unfortunately, as has always been my experience when trying to make an impression into dough, once baked, the design tends to disappear.  Such was the case here, alas.  As I pulled them from the oven and waved the cookie sheet in front of my husband, he studied each one and asked, "Am I supposed to recognize something here?"  Yep, that pretty much said it all.
My son stopped by and had a look at them.  
"Is this one of the villains from Scooby Do?" he wanted to know.  
No, I told him, that is Perry Mason.  
"It looks more like, ummm, Perry Mortem," he smiled. 
"It's postmortem, but I get the picture."  And I did. 


It is a rather tasty cookie though, so if you'd like to try it for yourself, here's the recipe:

Stamped Shortbread Cookies (Martha Stewart)

2 cups all-purpose flour, plus more for parchment
1/4 teaspoon salt
1 cup (2 sticks) unsalted butter, softened
1 cup confectioners' sugar
1 vanilla bean, split, seeds scraped and reserved (pod discarded)
Vegetable oil, for cookie stamp

Whisk together flour and salt in a bowl. With an electric mixer, beat butter, sugar, and vanilla seeds until pale and fluffy. Reduce speed to low. Add flour mixture; mix until just combined. Divide dough in half. Shape each into a disk; wrap in plastic. Chill until firm, about 1 hour.

Preheat oven to 350 degrees F. Let dough soften slightly at room temperature. Working with 1 disk at a time, roll out dough on a lightly floured piece of parchment to 1/2 inch thick*. Stamp with a lightly oiled cookie stamp no larger than 2 inches in diameter; cut out with a 2-inch cutter. Repeat. Gather together scraps, reroll, stamp, and cut out. Space rounds 1 inch apart on parchment-lined baking sheets.

Bake until edges are pale golden, 16 to 18 minutes. Let cookies cool slightly on sheets. Transfer cookies to wire racks; let cool completely. Cookies can be stored in an airtight container up to 1 week.

*This seemed way too thick to me, so I tried 1/2", 1/4" and 1/8" and found that I liked the cookies rolled to 1/4" the best.

This post is linked to:
Metamorphosis Monday 


Thursday, September 15, 2011

Beef and Broccoli for Two

If you're anything like me, you occasionally get a hankering for Chinese food.  If you are even more like me, when it gets to around seven o'clock in the evening you're often too tired to go out for Chinese.  Here is a great recipe for two that cooks up in no time and tastes as close to restaurant-style beef and broccoli than any other that I've tried.  It's adapted from a recipe that I found on epicurious.com, but I like my version better.

Beef and Broccoli for Two

Marinade for Beef:
2 teaspoons low sodium soy sauce
1/2 teaspoon sugar
1/4 teaspoon salt
3/4 pound boneless sirloin, cut across the grain into 1/4-inch-thick slices

Sauce:
1 tablespoon cornstarch
1 tablespoon low sodium soy sauce
1 tablespoon medium-dry Sherry
1/4 cup beef broth
2 tablespoons oyster sauce
1 teaspoon sugar
2 teaspoons Oriental sesame oil

For rice:
1/3 cup Basmati rice, well rinsed
2/3 cup water
1/2 teaspoon salt
1/2 tablespoon butter

3 tablespoons vegetable oil
1 tablespoon minced peeled fresh ginger root
1 tablespoon minced garlic
1 teaspoon dried hot red pepper flakes, more or less to taste
1 medium head broccoli, cut into flowerets

Prepare the beef:
In a small bowl stir together the soy sauce, sugar, and the salt.  Add the beef, and let it marinate for 30 minutes.

Make the sauce while the beef is marinating:
In a small bowl dissolve the cornstarch in the soy sauce and stir in the Sherry, broth, oyster sauce, sugar, and sesame oil.

Make the rice:
 Spray a medium-small saucepan with canola oil.  Put the rice, water, salt, and butter in the pan and place over high heat.  Bring to a boil and let the rice simmer until the level of water is equal to that of the rice.  Cover with lid and reduce heat to low.  Simmer 20-25 minutes.  If you happen to find yourself cooking the beef mixture longer than the rice is to cook, simply turn the heat off and let it rest the in the pan while you prepare the remainder of the meal.  It will keep for another 30 minutes without any adverse effects.

Heat a wok or large heavy skillet over high heat until it is hot, add 2 tablespoons of the vegetable oil, and heat it until it just begins to smoke. Stir-fry the beef in the oil in batches for 1 minute, or until it is no longer pink, and transfer it as it is cooked with a slotted spoon to a plate. Add the remaining 1 tablespoon vegetable oil to the wok, heat it until it is hot but not smoking, and in the oil stir-fry the gingerroot, the garlic, and the chili for 30 seconds, or until the mixture is fragrant. Add the broccoli and stir-fry the mixture for 1 minute. Add 1/3 cup water and steam the broccoli, covered, for 1 1/2 to 2 minutes, or until it is crisp-tender. Stir the sauce, add it to the wok with the beef and any juices that have accumulated on the plate, and cook the mixture, stirring, for 2 minutes, or until the sauce is thickened and the beef is heated through. Transfer the mixture to a heated platter and serve it with the rice.

This post is linked to:


Sunday, September 11, 2011

Kirsten's Fried Pork Chops with Country Gravy


Believe it or not, this is actually a breakfast dish. Now I don't know about you, but no matter how hungry I am in the morning, the last thing I want is a pork chop.  Pancakes yes, pork chops, no!  So, I made these for dinner.  I was actually looking for a recipe that was fairly quick, easy, and didn't call for any oddball ingredients when I stumbled upon this one in Bruce Aidells's Complete Book of Pork: A Guide to Buying, Storing, and Cooking the World's Favorite Meat.  It advocates what I've been doing for years, namely brining pork (I'll never cook another pork chop without brining ever again!). If you're one of those people like I used to be who thought pork chops were chewy and dry, wait until you try this!  I let them brine for about 6 hours before cooking and they were moist and tender and so delicious.  It's worth making for the gravy alone, but do try the chops as well.

Kirsten's Fried Pork Chops with Country Gravy

BASIC BRINE:
3 cups cold water
1/4 cup kosher salt
1/4 cup sugar (I used light brown)
2 cups ice cubes
6 bone-in pork rib chops (each 1/2-inch thick) or 6 boneless pork chops

COUNTRY GRAVY
1/2 pound bulk fresh sausage (I used Bob Evans' "Hot")
2 tablespoons all-purpose flour
2 cups half-and-half, plus additional if needed
Freshly grated nutmeg
1/4 teaspoon Worcestershire sauce
Kosher salt
Freshly ground black pepper
Hot sauce (recommended: Tabasco)
Freshly ground black pepper
1/2 cup all-purpose flour
Sausage fat or bacon fat

DIRECTIONS

To make the brine: Put the water in a large bowl and stir in the salt and sugar until the sugar is dissolved (I add the salt and sugar to a cup of water and microwave it for 3 minutes until everything is well dissolved, then add the rest of the water and ice cubes). Add the ice cubes and cool the mixture to at least 45 degrees F. Submerge the pork chops in the brine. Refrigerate for 2 hours or up to 4. Remove the pork chops from the brine, pat dry, and wrap in plastic wrap. Store in refrigerator until ready to cook.

To make the gravy: In a large skillet, cook sausage over medium heat, breaking it up with a spatula or fork. Pour off all but 2 tablespoons of the fat and discard. Reserve the fat in a cup for cooking chops.

Sprinkle the flour over the cooked sausage in the skillet; stir to coat. Gradually stir in the half-and-half, nutmeg and Worcestershire sauce. Cook, stirring, until the sauce thickens, scraping up any browned bits from the bottom of the pan. Add more half-and-half if the sauce becomes too thick. Season, to taste, with salt, pepper and hot sauce. Cover the skillet and set aside while you cook the chops.

Sprinkle the chops generously with pepper. Dredge them in the flour, shaking off excess. In a large, heavy skillet, heat the reserved fat plus additional oil to a depth of 1/8-inch over medium-high heat. Put the chops in the pan, as many as will fit without crowding, and fry until golden brown, about 2 to 3 minutes. Turn and cook on the other side, 2 to 3 minutes. If you're cooking more than one batch of chops, keep the fried chops warm in a preheated 250 degrees F oven.

To serve, put 1 chop on each diner's plate (you will have 2 remaining for second helpings) and spoon the gravy over them. Serve extra gravy on the side to pour over biscuits or grits...or not.

Bruce Aidells's Complete Book of Pork: A Guide to Buying, Storing, and Cooking the World's Favorite Meat

This post is linked to:
Savvy Home Made Monday @ Home Savvy A to Z
Melt In Your Mouth Monday @ Make-Ahead Meals for Busy Moms
Mouthwatering Mondays @ A Southern Fairytale
Homemaker Mondays @ 11th Heaven’s Homemaking Haven
Recipe Sharing Monday @ Jam Hands
Menu Mondays @ Faith and Family