Tuesday, March 30, 2021

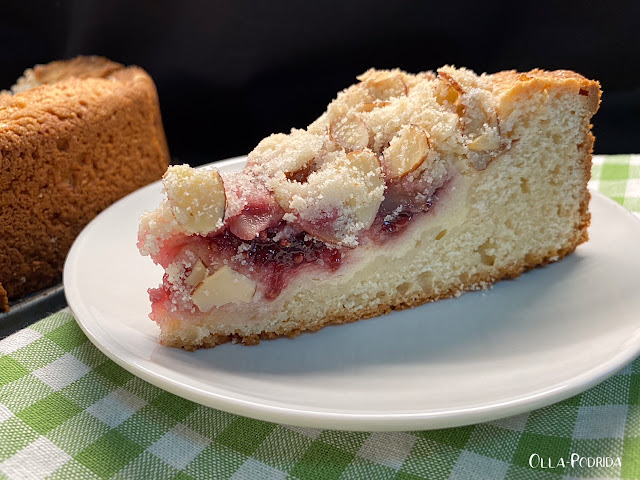
My Mom’s Raspberry Cream Cheese Coffee Cake

This post contains affiliate links.

There are a number of reasons why I am not going to be celebrating Easter this year with a brunch or dinner, none of them particularly interesting. I will say that last weekend I had my aunt over for Palm Sunday brunch, reminiscent of those that my mother used to host. I used a combination of both her and my recipes, as well as her decorative pieces. The food was delicious, and we waxed nostalgic over a box of family photos that I had found in her bottom desk drawer when I cleared out her and dad’s house.

One thing that she served every year without fail was Raspberry Cream Cheese Coffee Cake. People would get pretty surly if she didn’t. One taste and you will know why, it is delicious! Here’s her recipe.

 My Mom’s Raspberry Cream Cheese Coffee Cake

For cake:
2¼ c. flour
¾ c. sugar
¾ c. unsalted butter
½ t. baking powder
½ t. baking soda
¼ t. salt
¾ c. sour cream
1 egg
1 t. almond extract

For filling:
1 8-oz. pkg. cream cheese, room temperature
¼ c. sugar
1 egg
2/3 c. raspberry preserves

For topping:
1/2 c. sliced almonds

Preheat oven to 350°F. Spray the bottom and sides of a 9-inch spring-form pan with Baker’s Joy.

In the work bowl of a food processor combine flour and 3/4 cup sugar. Pulse until blended. Add butter and pulse until mixture resembles coarse crumbs; reserve one cup crumb mixture. To remaining crumb mixture and baking powder, baking soda, salt, sour cream, one egg, and almond extract. Pulse until dough forms (It will be slightly sticky.).

Spread dough over the bottom and up 2 inches of the side of the prepared pan. Batter should be about 1/4 inch thick on the sides.

In a small bowl combine cream cheese, 1/2 cup sugar, and one egg; blend well. Pour cream cheese mixture over batter in pan. Carefully spoon preserves evenly over cheese filling.

In a small bowl, combine the 1 cup reserve crumb mixture and sliced almonds. Sprinkle over top. Bake for 45 to 55 minutes or until cream cheese filling is set, and crust is a deep golden brown. Cool 15 minutes. Remove sides of pan and cool completely. Cut in wedges; serve.


Monday, March 29, 2021

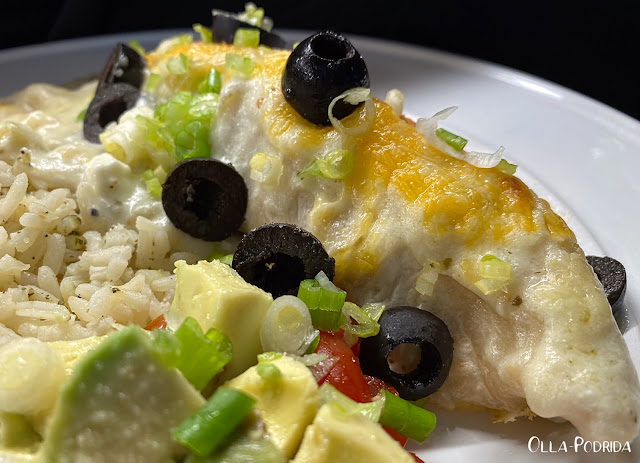
Sour Cream Chicken Enchiladas Florentine

This post contains affiliate links.

 As much as I love Mexican food, prior to making them myself, I had never had chicken enchiladas. Recently I’d heard of no fewer than three of my friends making these for dinner, so I had to jump on that bandwagon. Generally, I leave the making of Mexican food to the Mexicans, because they do it so well. This was easy enough to do, so I will be making them again at some point, experimenting with the filling. This recipe makes plenty, so I enjoyed a delicious meal many nights in a row, and have a couple of frozen ones for the future. The addition of mushrooms and spinach (both of which you can leave out, if you must) made this a hearty and nutritious meal. I served it with a side of cilantro rice, and thoroughly enjoyed it.

 Sour Cream Chicken Enchiladas Florentine 

1 T. vegetable oil

1 lb. chicken breast, diced

2 Melissa’s shallots, minced

1 c. sliced mushrooms

½ t. Montreal chicken seasoning

2 handfuls baby spinach

8 (8”) flour tortillas, softened

2 c. Mexican blend cheese, divided

1c. butter

1c. flour

1 15-oz. can chicken broth

1 c. sour cream

1 4-oz. can chopped green chilies

 Preheat oven to 400° F. Lightly spray a 9” x 13” baking dish with nonstick vegetable coating, like PAM.

 While oven is preheating, prepare chicken mixture.  In a 10-inch sauté pan heat oil until shimmering. Add chicken, shallots, and mushrooms, and sprinkle seasoning overall. Sauté over medium-high heat until chicken is just done. Add spinach, and stir until wilted.

 Divide cooked chicken evenly between 8 tortillas; top each with 1/4 c. cheese. Roll enchiladas and place seam-side down in prepared baking dish.

 Melt butter in a medium saucepan; stir in flour and cook until bubbly, stirring occasionally. Gradually whisk in chicken broth and bring to a boil, stirring frequently. Remove from heat; stir in sour cream and green chilies.

 Pour sauce evenly over enchiladas.

 Top with remaining cheese and bake at 400° F for 20 minutes until cheese is melted and sauce near edges of baking dish is bubbly.


Sunday, March 28, 2021

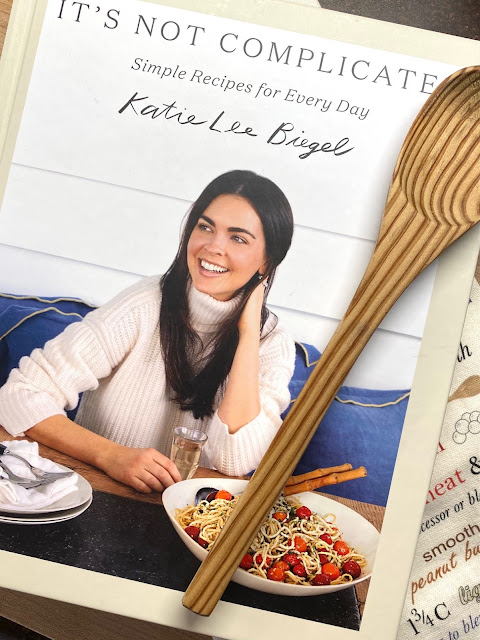
It’s Not Complicated: Simple Recipes for Every Day, Reviewed

This post contains affiliate links.

After years of throwing lavish, carefully planned dinner parties, hosting numerous food shows, and jet-setting across the globe, Katie Lee Biegel, co-host of Food Network’s The Kitchen, and author of Katie Lee’s Easy-Breezy Eats: The Endless Summer Cookbook, has settled down. She now prefers quiet dinners with her family to multi-day cooking affairs for dozens of guests. Smart girl. It took me decades to figure this out for myself. I now prefer small, quiet, simple dinners, with just a few people to the big parties that I used to host. Good food, and being able to relax while I eat it, is so much more important than acting as a high-end server to a house full of family and friends. That’s why I love her latest book, It’s Not Complicated: Simple Recipes for Every Day.


There are four things I look for in a good cookbook. First of all, I want a lot of good, easy to prepare recipes. Second, I want beautiful photographs of nearly all of the dishes in the cookbook to use as both guide and inspiration. Third, I want a wide variety of recipes to suit a multitude of tastes. Lastly, I want recipes written in a clear and concise fashion using ingredients that I’m not going to have to run out and buy in some obscure specialty shop. This book fits these criteria. It is, in a word, wonderful. It is loaded with delicious, but simple dishes that will be sure to please every member of your family. In addition to being family friendly, a good many of them are company worthy as well, and who doesn’t love that?

The photos are mouthwatering, and there is a wonderful variety of recipes to suit all tastes and preferences. To my way of thinking, it is worth owning for the vegetable recipes alone. Think Crunchy Ranch Corn on the Cob, Soy and Lemon Roasted Broccoli, Fondant Potatoes, and more. Not a vegetable person? OK. How about the mouthwatering Animal-Style Burgers, Barbecue Potato Chip-Crusted Salmon, or Prime Rib with Beef Gravy, the latter far easier than you might think.

This is not to say that Biegel skimps on desserts; quite the contrary. Here you will find all forms of sweet deliciousness including Chocolate Croissant Bread Pudding, Pumpkin Cheesecake, Cannoli Trifle, and Mocha Swirl Ice Cream.

It’s Not Complicated: Simple Recipes for Every Day is a book designed for a variety of skill levels, a plethora of tastes, and makes the perfect hostess, Mother’s Day, or wedding shower gift. You can buy a copy here; you might want to pick up one for yourself as well. In fact, I insist upon it.


Disclaimer: I received a complimentary copy of this book from Abrams as a part of their Abrams Dinner Party Program in exchange for an honest review.


Friday, March 26, 2021

Animal-Style Burgers

This post contains affiliate links.

Despite all of the unique and complex things that I have prepared over my decades and decades (groan) of cooking, my favorite food continues to be the cheeseburger. I tend to not make them at home, however, because I never seem to be able to replicate the taste of a restaurant cheeseburger...until now. This recipe for Animal-Style Burgers from Katie Lee Biegel’s latest book, It’s Not Complicated (review coming Sunday), is one of the best burgers I have ever eaten, much less made at home. Topping the burger patty with yellow mustard before it is grilled is genius; it adds juiciness and flavor. Making two very thin patties instead of just one thicker patty, topping each with a slice of cheese, takes this burger over the top. For me, her recipe is burger perfection.

Animal-Style Burgers

From It’s Not Complicated

1 onion, ½ grated, ½ thinly sliced
1 clove garlic, grated
1 large egg
1 t. kosher salt
¼ t. freshly ground black pepper
1 lb. ground beef
1 T. unsalted butter
3 T.
yellow mustard
8 slices American cheese
Special Sauce (recipe follows)
4 potato buns, buttered and lightly toasted
Iceberg lettuce
Sliced tomato*
Pickles

Spray a baking sheet with nonstick cooking spray. In a medium bowl, whisk together the grated onion, garlic, egg, salt, and pepper. Add the ground beef and use your hands to
gently mix until combined. Divide the mixture evenly into four portions, then divide each into two, to give you eight total. Form each into a thin patty and place on the prepared baking sheet. The mixture will be wet and a bit sticky. Refrigerate for 20 minutes.

Heat a griddle or
large cast-iron skillet over medium-high heat. Add the butter and sliced onion and cook, stirring every so often, until the onion slices have a nice cedar to them, 45 minutes. Set aside.

Wipe the griddle clean and return to medium-high heat. Put the patties on the grill, working in batches if necessary. Spoon 1 teaspoon mustard (or squeeze directly from the bottle) onto the top raw side of each patty. Cook for about three minutes, then flip and cook for an additional three minutes. Top each with a slice of American cheese.

Spread some special sauce on each bottom bun, then add lettuce, one patty, some onions, a second patty, tomatoes, pickles, more sauce, and a top bun. Serve.

Special Sauce
Yield: About 1 cup

½ c. mayonnaise
3 T.
yellow mustard
2 T. sweet relish
1 T. ketchup
1 T.
apple cider vinegar
1 t. garlic powder
1 t. onion powder
1 t. paprika

Combine all the ingredients in a medium bowl and whisk until well blended.

 *I used a Melissa’s organic heirloom tomato. A burger like this deserves to be topped with only the best!


Thursday, March 25, 2021

Smoky White Bean Queso Dip

This post contains affiliate links.

A major staple in my diet during my high school years was jalapeño bean dip. That, and a bag of nacho cheese Doritos, and I was good to go. Good times. It wasn’t the greatest diet for a growing teenage girl, but at least the beans provided protein. It could’ve been a lot worse. Today, that love for bean dip continues, only now instead of buying it in a can, I make my own. This recipe is a favorite. If you like it extra spicy, feel free to add more jalapeños. Me? I think it’s perfect as it is.

Smoky White Bean Queso Dip

1 8-oz. pkg. cream cheese, room temperature
1 10-oz. can
[Rotel] diced tomatoes with green chiles, drained
1 15-oz. can
white chili beans, drained
½ t. kosher salt
¼ - ½ t.
cumin
Few gratings coarsely ground black pepper

In a medium
microwave safe bowl, combine cream cheese and tomatoes, and microwave on high for one minute. Stir in beans and microwave again for two minutes, stirring after one minute, until the cheese has melted and the mixture is smooth. Add remaining ingredients, and serve warm with tortilla chips. Garnish as desired.


Tuesday, March 23, 2021

Creamy Olive Dressing

This post contains affiliate links.

I eat a lot of salad; I think I get that from my dad. There was not a day that would go by that he didn’t have a salad. Those, and his martinis, are probably what led to his long life. He chalked it up to clean living, but who knows? (Insert wry smile.) Unlike my dad, I don’t have bottles of salad dressing stacked up in my fridge like cord wood as he did. No, I make my dressing fresh. One thing that makes homemade salad dressing super easy is having a mini ninja blender. If you don’t have one of these, you need to get one. It has a multitude of uses, of course, but it makes brilliant salad dressing. When you use this blender to make salad dressing it will stay emulsified no matter how long you keep it in the fridge. No more shaking in the hopes of returning it to the wonderfully blended state that it was initially, it stays that way. This creamy flavorful dressing will delight olive lovers. If one of them happens to be you, you must try this. It is equally as good on a green salad as it is in a pasta salad.

Creamy Olive Dressing

½ c. mayonnaise

½ c. sour cream

1 garlic clove, halved

¼ c. roughly chopped parsley

1 T. chopped scallion (1 medium)

1½ T. freshly squeezed lemon juice

1½ T. olive oil

1/3 c. ripe (black) olives, drained

1/3 c. Kalamata olives, drained

1/8 - 1/4 t. kosher salt

Few gratings freshly ground black pepper

Place all ingredients into a blender (I use a mini ninja blender) and process until smooth. Keeps in the refrigerator for 7 to 10 days.


Monday, March 22, 2021

Special St. Pat's Postmark

It’s not always that things go to plan, but they did this month, at least for me. Last month when I mailed out St. Valentine’s Day cards well in advance, a woman who lives four houses down from me didn’t get hers until a month later. I made sure, when I mailed out my St. Patrick’s Day cards, that I also included a greeting for a Happy Easter in case there was a duplicate of that scenario. 

 
I decided to mail the St. Patrick’s Day cards on the first of the month, doing so via Saint Patrick, Missouri in order to get their special postmark as I mentioned in
this post. I was so pleased to see mine arrive on the 17th. I said that I would share what the postmark for this year looked like, and here it is. This is a nice service that they offer, free of charge, and it adds so much to the envelope.

I did learn that there is an Easter, South Dakota, but it’s a small town and they don’t have a post office. Unfortunately. ;-)


Thursday, March 18, 2021

Italian Meatloaf

This post contains affiliate links. 

As a kid I never liked meatloaf. My mother used to make it covered in tomato sauce, and it wasn’t until I got into college that I embraced the goodness of tomatoes. Even though I now like tomatoes and tomato sauce, I still like my meatloaf unadorned. When meatloaf is not buried under a heavy sauce, it has to have a lot of flavor. This one certainly does. It’s delicious warm from the oven with a side of pasta, served on top of a pile of mashed potatoes, or the next day on a sandwich. It freezes well, so even if there are only a couple of you dining, freeze some for later. You’ll crave it.

Italian Meatloaf

1½ lbs. ground chuck
2 eggs, beaten
¾ c.
Italian breadcrumbs
¼ c. chopped flat leaf parsley
¼ c. ketchup or marinara sauce
¼ t.
Montreal steak seasoning
1 t. Italian seasoning
1 t. dried oregano
1 t. dried basil
1 t. garlic salt
½ t.
dried minced onion
¼ t. granulated garlic
1 14.5-oz. can petite diced tomatoes with garlic and onion, drained
  c. shredded mozzarella

Preheat oven to 350°F. Spray a broiler pan with PAM, or place a rack into a foil-lined jelly-roll pan, and spray the rack with PAM; set aside.

In a large bowl, mix together ground chuck, eggs, breadcrumbs, parsley, and ketchup (or marinara sauce). Stir in Montreal steak seasoning, Italian seasoning, oregano, basil, garlic salt, minced onion, granulated garlic, diced tomatoes, and cheese. Shape into a loaf and place it on the prepared rack. Cover loosely with foil.

Bake approximately one hour, or until internal temperature reaches 160° F.


Wednesday, March 17, 2021

St. Patrick’s Day Tablescape

This post contains affiliate links.

It’s going to be a socially-distanced party of three for St. Patrick’s Day this year, but that doesn’t mean that it’s not going to be festive. Quite the contrary, as you can see from these photos I went for drama.

Whereas I would normally opt for layered plates in white and green, I decided to go with the boldness of black.
Water Hyacinth placemats are topped with Bordallo Pinheiro geranium leaf chargers on top of which are square black plates from Rachael Ray. The square plaid plate on top of that was a local find; the bowl another Bordallo Pinheiro find is their cabbage leaf design. In each bowl is a Guinness Irish Soda Bread Muffin. Each place setting will have its own special vintage postcard reproduction plaque. You can use regular postcards to do the same. You might consider hand writing a recipe from the dinner on the back.


The flatware once belonged to my mother, the pitcher an older, but much loved and often used, design from Fitz and Floyd. The leprechaun salt and pepper shakers are a part of that set, and a real treasure.

The large shamrock wine glasses with the Happy St. Patrick’s Day greeting that turned out to be a bit of a disappointment, are from Pier One. Despite my every effort to follow the care instructions to the letter, i.e. washing them carefully in lukewarm water, by hand, the letters spelling out the greeting were improperly adhered, and most of them floated right off, or into the next letter to create some garbled message of dubious meaning. Grrr. The glass that you see in this picture is complete only because I don’t use it, and haven’t washed it, because it has a chip in the rim. Sigh.

There always has to be a pot of gold somewhere, and each place setting has its own, but instead of the gold-wrapped chocolate coins that I have used in the past, this year I chose the festiveness of green mint M&Ms.

I hope you’re celebrating as well as you are able. But if not, at least treat yourself to a special dinner and toast yourself for how well you’ve done the past year under difficult circumstances

Sláinte.


This post is linked to:

Tablescape Thursday


Tuesday, March 16, 2021

Strawberry Spinach Salad with Walnut Crunch

This post contains affiliate links. 

Let’s face facts. It’s hard to find something new by way of a green salad. We’ve all had various combinations of salad greens tossed with various combinations of vegetables and fruits. What makes a salad different and special is that little extra something, as in this case with the walnut crunch. It takes your already tasty fresh salad over the top, changing it from every day, to a special day.

Strawberry Spinach Salad with Walnut Crunch

Fresh baby spinach
Fresh strawberries, cleaned, hulled, and quartered
Walnut Crunch (recipe below)
Raspberry Vinaigrette (recipe below)

To make walnut crunch:

1 large egg white, room temperature
¼ c. packed dark brown sugar
½ t. espresso powder
Pinch of kosher salt
1 c. walnut pieces, coarsely chopped

Preheat oven to 325° F. Line a
rimmed baking sheet with a
Silpat or parchment paper; set aside. You can also line your pan with foil, and spray the foil with PAM.

Whisk egg white with sugar,
espresso powder, and salt in a medium bowl until blended. Fold in walnuts until coated. Spread mixture into your prepared pan. Bake for 20 to 25 minutes until dry to the touch. Transfer pan to a wire rack to cool completely. Lift with metal spatula and break into pieces. Store in an airtight container on the counter. Keeps for 10 to 14 days.

Raspberry Vinaigrette Salad Dressing

¼ c. canola oil
¼ c.
raspberry balsamic vinegar
3 T. granulated sugar
1 t
. Dijon mustard
Pinch of salt
Few gratings freshly ground black pepper
Pinch of dried oregano

Method #1: Place sauce ingredients into a
mini ninja blender. Pulse until emulsified.

Method #2: Place all ingredients EXCEPT the oil into a small mixing bowl. Whisk together until blended. Continue to whisk as you slowly pour in the oil. Whisk until emulsified. Drizzle over salad.


Monday, March 15, 2021

Cranberry Walnut Irish Soda Bread Muffins

This post contains affiliate links.

Oh my goodness, these are so good! I was perusing the Guinness website because I had bought a six-pack, but only had firm plans for two bottles (one for my traditional corned beef, the other for Irish Guinness Brown Bread), and was wondering what to do with all of the rest. (I am not a beer drinker. No.) When I came across this recipe, I had to try it. This recipe also included another recipe for what they referred to as maple butter, although instead of using maple syrup, they used honey. Umm, that would be honey butter, not maple butter, but I digress. So, I adapted that to use real bourbon-aged maple syrup, and it is phenomenal on pretty much anything in the baked good category.

I am not a baker, as you all know, it irritates me. This recipe, however, didn’t irritate me as much as some. You don’t need any special equipment to make it, and I didn’t have to drag out the mixer. That pleased me. These are good at any time of the day. I can’t speak for how well they freeze, but my hope is that they will because they’re going into the freezer until I serve my St. Patrick’s Day dinner au deux on the 20th.

 Cranberry Walnut Irish Soda Bread Muffins

(with Whipped Maple Butter)

Slightly adapted from Guinness.com

 ½ c. dried cranberries*

1 c. Guinness® Extra Stout

2¼ c. flour

2 t. baking powder

¼ t. baking soda

½ t. salt

1/3 c. granulated sugar

1 egg

1 c. buttermilk

6 T. melted Irish butter

½ c. chopped walnuts

Flaky sea salt**

Demerara sugar

 Preheat oven to 400°F.

 Combine cranberries and Guinness® Extra Stout. Microwave on high for 45 seconds and let it steep and cool, to allow those cranberries to saturate with all that lovely beer flavor. Strain and set aside.

 Mix together flour, baking powder, baking soda, salt and sugar. In a separate bowl, whisk together egg, buttermilk and melted butter. Combine the dry and wet ingredients until just mixed. Do not over mix, you just want all the dry ingredients hydrated.

 Gently fold in cranberries and walnuts.

 Fill muffin tin with tulip liners (or spray muffin tin with a liberal amount of non-stick cooking spray). Fill each section about ¾ of the way up. Top with a pinch flaky sea salt and Demerara. Bake for about 18-25 minutes or until a toothpick or cake tester comes out clean.

 Cool for 5 minutes and quickly remove each muffin from the tin and finish cooling on a wire rack.

 Whipped Maple Cinnamon Butter

 2 Sticks Irish Butter, room temperature

¼ c. pure maple syrup

1 t. cinnamon

1 t. kosher salt

 Using a whisk, whip butter until everything is combined. Season to taste. Use on everything!

 *I used Melissa’s dried tart cherries. I think they are much more flavorful, and because of their larger size tend to hydrate better, holding more of that Guinness goodness.

**I used Fleur de Sel.


Friday, March 12, 2021

Shallot, Mushroom, and Ricotta Florentine Egg Skillet

This post contains affiliate links.  


When I get up in the morning, I generally hit the ground running, mug of coffee in hand. The last thing on my mind is spending time in the kitchen making myself a hearty breakfast. That’s not to say that I don’t like a hearty breakfast, mind you, it just says that I have no one to make it for me. When I’m interested in having breakfast food, I tend to have it more often for dinner than at any other time of the day. If you feel the same, then this delicious egg skillet dish is going to appeal. Outside of chopping, there isn’t a whole lot to it, it goes together in a flash, and is wonderfully tasty, particularly with a slice of ham or a couple of strips of bacon on the side. It reheats well, so if there are only a couple of you, you can have this for dinner one day, and for breakfast the next. You can also have it for breakfast, of course, if you feel inclined to make it.


Shallot, Mushroom, and Ricotta Florentine Egg Skillet

4 large eggs
¼ c. whole milk
¼ c. ricotta cheese
2 T. cornstarch
¼ t. fine sea salt
Pinch cayenne pepper
Few gratings fresh nutmeg
2 T. butter
2 T. extra virgin olive oil
2 Melissa’s shallots, sliced
1 c. sliced Cremini mushrooms
½ c. thinly sliced deli ham
 1 c. chopped fresh spinach


Preheat oven to 375° F.

In a medium bowl, whisk eggs until frothy. Add milk, ricotta cheese, cornstarch, salt, cayenne, and nutmeg, and whisk again until there are very small lumps of ricotta and cornstarch.

Melt butter and oil together in a 10-inch ovenproof skillet over medium heat. Add shallots, mushrooms, and ham, and sauté until shallots are soft and translucent, stirring frequently. Add the spinach and cook until wilted, about one minute. Remove from heat, spread mixture evenly over the bottom of the pan, and pour egg mixture over the top.

Bake for 15 minutes at 375° F, and then increase the oven temperature to 400° F and bake for an additional 10 minutes, until the eggs are puffed and set in the center. Serve immediately.