Showing posts with label Fourth of July. Show all posts

Tuesday, June 27, 2023

Summer Berry Icebox Cake

 
There is a lot to like about this dessert, particularly where patriotic summer holidays are concerned. It is cool and refreshing, makes use of the sweet goodness of fresh fruit, will be enjoyed by all, it is boldly red, white, and blue, and probably most importantly is that this no-bake dessert is make ahead. There is nothing to putting together this simple dessert; it’s more assembly than anything. I have found its sweet, cool deliciousness to be quite welcome for breakfast, so I think this would be as suitable for brunch as it would be for lunch or dinner.

No Bake Summer Berry Icebox Cake

Adapted from cakescottage.com

 21 graham crackers

8 oz. cream cheese, softened

2 (3.4 oz) packages Vanilla Instant Pudding

2 c. whole milk

½ c. Amaretto

12 oz. Cool whip (or homemade whipped cream)

3 c. sliced fresh strawberries

1½ c. fresh blueberries

2 oz. white chocolate chips

 Beat cream cheese and dry pudding mixes in large bowl with mixer until blended; gradually beat in milk and Amaretto.

 Gently stir in Cool Whip or homemade whipped cream, reserving ½ cup. Spread a thin layer of Cool Whip in a 9” x 13” pan just to coat the bottom.

 Layer 5 graham crackers across the center of the pan, then 2 more, breaking them as needed, to fit around the top and bottom edges.

 Spread a layer of pudding mixture over grahams and top with a layer of blueberries and sliced strawberries. Place graham crackers on top of berries, then pudding mixture, and then layer of berries again. Repeat the graham/pudding/berries layers 1 more time (3 times total) and you should reach the top of the pan.

 Refrigerate for at least 4 hours or overnight until the graham crackers have softened completely.

 When ready to serve, melt white chocolate chips in a bowl as directed on package and drizzle over dessert.

As an Amazon Associate I earn from qualifying purchases.

Monday, July 2, 2018

Stars & Stripes Tablescape


Thinking back, I cannot remember a time when I hosted a Fourth of July anything. For years my dad played in a symphonic band that had a fabulous Fourth of July concert, complete with a spectacular fireworks display, that was held on the Fourth every year at the local Civic Center. We would either head to my mother's for a Fourth of July barbecue, or to my aunt’s, and then we would all go to the Civic Center, spread out our blankets, set up our lawn chairs, and unload our cooler full of beverages and cold desserts, and enjoy the concert and display.

But, as happens, people moved out of the area, got older, became ill, and this celebration that I remember so fondly, ceased to take place. After that, Fourth of July just didn’t seem as important to me anymore. I do have a spectacular view of the fireworks from my deck, and I enjoy that every year, generally while sipping a cocktail. This year, instead of being an old poop, I decided that I was going to set a pretty table as well.

Some Pottery Barn rewards dollars were burning a hole in my pocket, so I spent them on these placemats and blue napkins with the white stars. From there, I just started rummaging through my hutches, cabinets, drawers, closets, you name it, in order to dig up something that would go together and look attractive. It’s not as heavily laden as some of my previous tables, but it gets the job done. The beauty in this table is its simplicity.

Whatever you do or however you celebrate the Fourth of July, be safe!

Sources:
Placemats, flatware, and star napkins - Pottery Barn
Jeweled chargers - Pier 1
White dinner plates -
“Amelie” by Versailles
Heart-shaped salad plates -
Amazon
Small red and blue bowls - Fiestaware
Candleholder Centerpiece - Pottery Barn
Blue champagne flutes - a wedding gift, years ago
Red napkins with white stars - my mother made these years ago


This post is linked to:

This post contains affiliate links.

Thursday, June 28, 2018

Oreo Cookie Bars


This past Tuesday was my dad's birthday. I went out to his house loaded with meals for his freezer, a delicious dessert, birthday goodies, and lunch for us both to enjoy. It took me an entire day, well into the night, and two runnings of the dishwasher in order to prepare all that I took. At one point, early in the day, I had entertained the idea of making a homemade German Chocolate Cake. It’s my favorite, and one that my mother used to make me every year on my birthday. But after some thought, I realized that, it alone, would take me too much of the day, so I opted for something simple.

As you all know, I don’t bake. I do, however, print out and save recipes for various baked goods that I think might please one person or other. This recipe for Oreo Cookie Bars, looked simple enough, and tasty. As it turned out, they were both. Because I made these late in the day, and was too exhausted to thoroughly read the instructions, I made the mistake of trying to cut them before I chilled them. Do not do that! The filling squished out and I had a right mess. Fortunately, I only attempted to cut a couple before I realized the error of my ways, and shoved the whole pan right into the fridge.

Personally, I think these taste better the second day, so I’m going to file these under the categories of
easy and make ahead. My dad enjoyed them, as did my number one son and his family. In fact my son reported that “The kids heard choirs of angels when they took their first bites.” How could a recommendation possibly be any higher than that? So, if you have a dad to please, children, or grandchildren, this appears to be a winner! And that “make ahead” thing is always aces in my book.
Oreo Cookie Bars
Adapted from Your Cup of Cake

1 box chocolate cake mix, any brand
2 large eggs
1/3 cup canola oil

Cream cheese filling:
6 tablespoons unsalted butter, room temperature
8 ounces cream cheese, softened
1 teaspoon vanilla extract
2 1/2 cups powdered sugar

Preheat oven to 350°F. Line a 9“ x 13“ pan with parchment paper. Spray parchment paper with Pam or Baker’s Joy (I used the latter).

In a large mixing bowl combine cake mix, eggs, and oil. Beat until blended. Dough will be thick. Using a large spoon or ice cream scoop, drop globules of dough, evenly spaced, into the bottom of your prepared pan. Using moistened hands (I ran mine under cool water, and shook them off) press dough evenly along the bottom and into the corners of the pan. (If you used too much water on your hands, blot excess with a dry paper towel.)

Place pan into the middle of your preheated oven and bake for 10 minutes. Remove from oven to a wire rack and allow to cool.

Meanwhile prepare filling: Beat butter and cream cheese until smooth. Add vanilla and powdered sugar, 1/2 cup at a time. Set aside.

Invert cooled cake onto a parchment-lined cutting board. Measure and mark 6 1/2 inches in from the side on both top and bottom so as to provide a guide for cutting it in half evenly. Frost one of the halves with cream cheese filling. Carefully place the other half on top and press down gently. Put in the refrigerator to chill for one hour, and then cut into bars. These are very rich, so you might want to cut them into smaller rather than larger squares. You can, after all, always have two!

Store, covered in the refrigerator, and serve cold. These are very refreshing on a hot day. Kids love them!

Another delicious kid pleaser is this recipe for easy Chocolate Peanut Butter Éclair Dessert Squares.


This post is linked to:

This post contains affiliate links.

Tuesday, June 7, 2016

Red, White & Blue Salad with Fresh Strawberry Dressing

This salad is SO good and just perfect for the sultry days of summer, those patriotic holidays in particular because of the red, white, and blue. It is a snap to toss together using spinach, fresh strawberries, fresh blueberries, and a sprinkling of bleu cheese (or any crumbled white cheese of your choice, feta, for example). What knocks this out of the park is the fresh strawberry dressing. You'll need a small blender or processor in order to properly pulverize the strawberries, but the dressing, like the salad, goes together in a breeze. Make lots of this one. People are going to love it!
Fresh Strawberry Dressing

1/2 cup fresh strawberries, halved or quartered depending upon size
1/2 Tablespoon granulated sugar
2 Tablespoons Balsamic vinegar
2 Tablespoons olive oil
1/4 teaspoon salt
1/8 teaspoon dry mustard

Place all ingredients into a bullet (or any similar) blender and whir for 30-45 seconds. Drizzle over salad and toss. Store any leftover dressing in the refrigerator for up to 3 days.

This dressing is equally good on any type of salad that you enjoy, whether fruitful, or fruitless. :-)

Friday, July 4, 2014

Bing Cherry Crepes

It was a GLORIOUS day! 
Partly sunny with highs in the upper seventies and relatively low humidity made this a very rare, wonderfully enjoyable July day.  On a day like this, nothing pleases me more than a trip to Historic Main Street in Saint Charles, MO for some serious shopping and dining al fresco at Magpie Cafe.I've mentioned Magpie here before because I love it so much, the patio dining, in particular. With a table nestled under the trees, and a view of Main Street with the occasional, passing horse-drawn carriage, it is always a delight, as are the desserts. 

It's truly difficult trying to decide which dessert to choose.  My dining companion opted for the Blackberry Cobbler. While I was tempted, I chose, instead, the Bing Cherry Crepes, huge fan of Bing cherries that I am. 

If you are the cherry fan that I am, then you will love these crepes. They are easy to assemble, particularly when using
Melissa's Ready Made Crepes (something I always keep in the freezer just for such an occasion).  The filling recipe is Magpie’s, and can be made the day ahead and stored in the fridge; the Bing Cherry Sauce is my own creation and the recipe can be found here. When it is time to serve dessert, just fill and roll the crepe, and spoon the warmed jewel-toned sauce on top. An elegant, easy, crowd pleasing dessert. Add a sprinkling of blueberries and you have the perfect treat for the Fourth of July.

Crepe Filling
The Magpie Café Cookbook

3 packages (8-oz. each) cream cheese, softened
½ cup sugar
Juice of one lemon
1 teaspoon vanilla extract
½ teaspoon almond extract

With a mixer, cream the cheese until smooth, then add the rest of the ingredients and beat until well mixed.

To fill a crepe, place about 3 tablespoons of filling on one side and roll it up. This recipe will fill about 16-20 crepes depending upon how generous you are with the filling.  Top with Bing Cherry Sauce.


This post is linked to:

Sunday, July 3, 2011

Dinner from the Garden

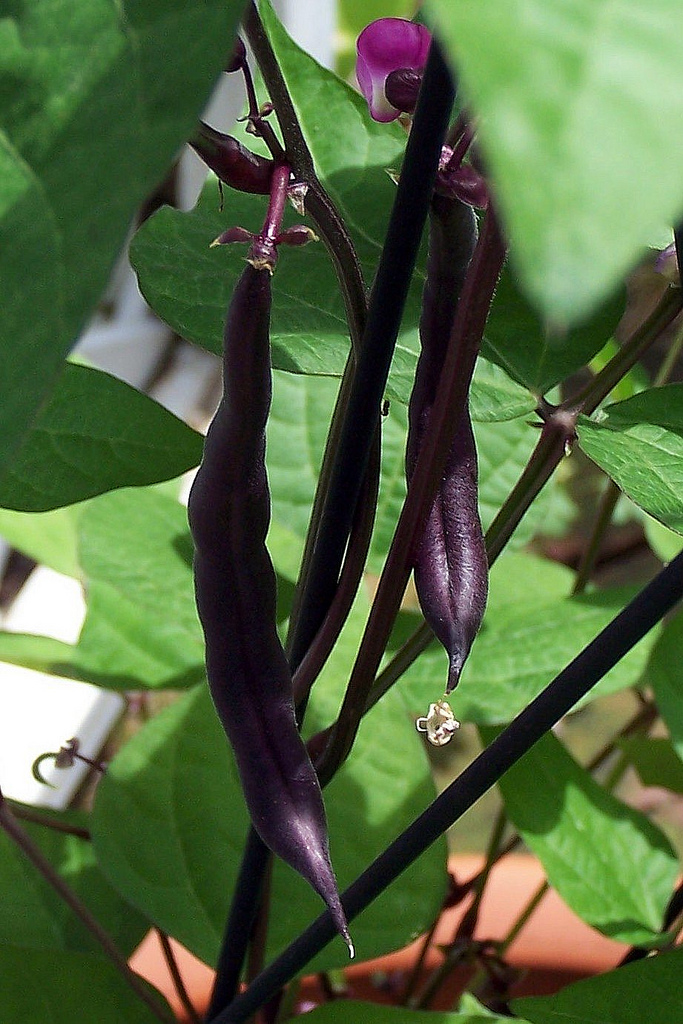
One of the great things about the Fourth of July is that it marks the beginning of harvest season.  There is nothing I like better than to serve a meal that features something I've grown myself.  Such was the case this evening when I served filets topped with sauteed mushrooms, "Trash Can Potatoes" (recipe and explanation at the bottom of this post), along with the purple beans I'd grown in a container on the patio. (They turn a dark green when cooked and have a buttery taste that far exceeds plain old green beans.)
Newly sprouted Phaseolus Vulgaris a.k.a. Purple Queen Bush Bean (though I have found them to be climbers, hence the little metal obelisk). This is a fun vegetable to grow in a garden. It is easy and forgiving with dark green leaves and deep purple string beans that turn green when cooked and have a wonderful flavor.
They will turn into lovely deep purple beans that cook up a rich green with a buttery taste.
If you have trouble getting your kids to eat green beans, wow them with these purple ones, and engage them in the cooking process so they can watch them turn from purple to green.

You're probably wondering about the name of the potatoes.  Back when my husband and I were dating, he had a long drive to come pick me up and, as a consequence, he'd sometimes (more often than not, if truth be told) make a pit stop in the powder room just off the entrance hall shortly after arrival.  The powder room also served to have the most convenient waste basket for getting rid of junk mail.  I tend to toss junk mail rather willy nilly without giving it much thought.  My husband, who then as now, simply cannot throw anything away, fished a real estate brochure out of the trash during one of his, ummm, visits, because he spied a recipe on the back that looked tasty.  Come to find out, it IS tasty and it's become a summer favorite for 16 years now.  The actual name is "Saucy Skillet Potatoes," but we tend to call them trash can potatoes since that's where he found the recipe.


Trash Can Potatoes a.k.a. Saucy Skillet Potatoes

1 T. butter
1 cup chopped onion
1/2 cup mayonnaise
1/3 cup cider vinegar
1 T. sugar
1-3/4 t. salt
1/4 t. freshly ground pepper
4 medium potatoes, cooked, peeled and sliced (4 cups)
1 T. freshly chopped parsley
1 T. bacon, cooked and crumbled

In a large skillet, melt butter over medium heat. Add onions; cook 2-3 minutes or until tender-crisp.  Stir in mayonnaise, vinegar, sugar, salt, and pepper.  Add potatoes; cook, stirring constantly, 2 minutes or until heated through (do not boil).  Garnish with parsley and bacon.  Makes 4-6 servings.


This post is linked to: Seasonal SundayMetamorphosis MondayMade by You Monday, On the Menu Monday, This Week in My Garden and Outdoor Wednesdays