Tuesday, June 13, 2017

All Decked Out (Part Two!)

As I promised last week, here is an update on the deck. It’s all framed out, and I get more and more excited with every pound of the hammer. I’m not going to lie to you though, these early hours are about to do this nocturnal girl in, but I’m trying to keep my bleary eyes on the prize!
 It was exciting to see the roof go on, not only because it is actually starting to look like something, but also because it was pretty fascinating to see how it was done.
 I opted for a tray ceiling, and I am loving the look already.
 Scroll to the bottom for the eye candy of the week!

I found this rug quite by accident (an entire blog post is coming about how I stumbled upon the color scheme and furnishings), but I love the color combination, Talavera pattern, and vibrancy. Doesn’t this just scream summer? (Or maybe it’s screaming Margaritas, not sure which.)
Photos by Joe Rogers of Advanced Carpentry and Remodeling, LLC, and Plow & Hearth.

Monday, June 12, 2017

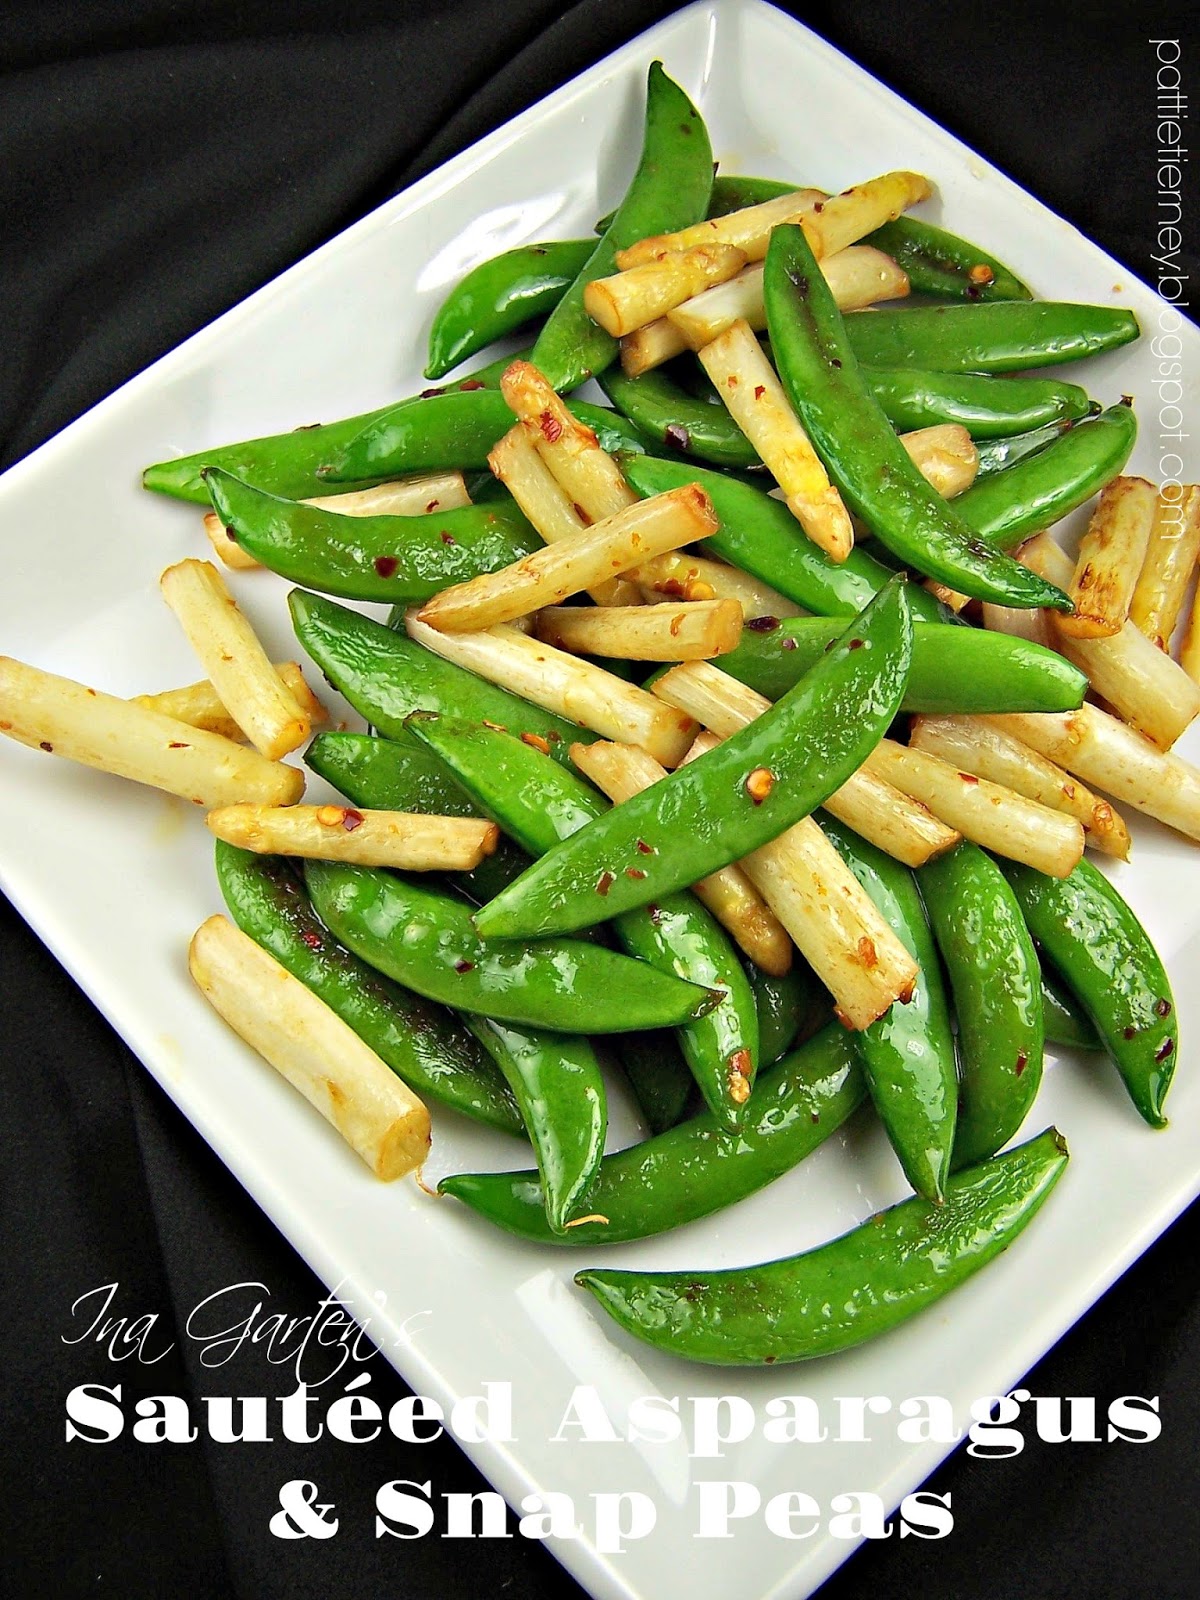
Ina Garten's Sautéed Asparagus and Snap Peas


Do any of you like Ina Garten? I suspect a good many of you do. I've been a fan of hers ever since I first saw her on Food Network. She has a new show now called Cook Like a Pro. I'm not sure if I like it better than her original show, Barefoot Contessa, or not, but I have been enjoying, and learning, from it. I have never had an Ina recipe fail. Never. I tend to stick with her simple recipes, and I'm always amazed at how good they turn out.

One of her easiest recipes is simply asparagus and sugar snap peas, sautéed together, seasoned, and served. It sounded almost ridiculous when I read it the first time. I mean, how can something this easy be any good? But it is. I changed up the recipe only slightly, by using white asparagus instead of green. I love white asparagus, but particularly here for the contrast in color, the white asparagus against the bright green peas. It's surprisingly delicious, not to mention super fast and easy. If you're looking for a wonderful side dish to go with this summer's grilled meats, this is the one.
 
Ina Garten's Sautéed Asparagus and Snap Peas

3/4-pound sugar snap peas
2 tablespoons good olive oil
Kosher salt
Freshly ground black pepper
Red pepper flakes, optional (But use them!)
Sea salt, for serving

Cut off the tough ends of the asparagus and slice the stalks diagonally into 2-inch pieces. Snap off the stem ends of the snap peas and pull the string down the length of the vegetable.

Warm the olive oil in a large sauté pan over a medium heat and add the asparagus and snap peas. Add the salt, pepper, and red pepper flakes, to taste, if desired. Cook for approximately 5 to10 minutes until al dente, tossing occasionally. Sprinkle with sea salt and serve hot.

This post is linked to:

Thursday, June 8, 2017

Time-Out Black Bean Dip

A couple of weeks ago (and I honestly cannot believe it was that long) I told you about a book called 175 Best Superfood Blender Recipes. At that time, I provided you with some recipes, but told you that another was coming, namely one for a delicious and easy black bean dip. Shortly thereafter, I completely forgot about it. It was not until I made the dip again yesterday that it dawned on me. So, finally, FINALLY! Here it is.
I enjoyed it just as much the second time as I did the first. One of the things that I really like about this dip, aside from the taste and ease, is that it goes amazingly well with my new favorite tortilla chips, these Wickedly Prime Sweet Potato Tortilla Chips from Amazon. 
If you haven't tried them, you simply must! How often can you get a tasty snack chip that also has some nutritional value? (Ingredients consist only of yellow corn, sweet potatoes, sunflower or corn oil, flaxseeds, black sesame seeds, chia seeds, and sea salt.) They are crispy, crunchy, and not overwhelmingly tasting of sweet potato so as to allow you to enjoy the subtlest of flavors in all of your favorite dips. If you want to read more about them, you can click here. I really love them, and find they go with so many of my favorite dips and salsas, particularly in this case. Total Yum!! While you’re at it, you might want to check out Wickedly Prime Plantain Chips, Roasted & Salted, 12 Ounce (Pack of 4) as well.
Time-Out Black Bean Dip

As seen in 175 Best Superfood Blender Recipes


2 cans (each 14 to 15 ounces) black beans, drained and rinsed
1 red onion, peeled and quartered
1/4 cup fresh cilantro leaves
1 clove garlic
2 tablespoons balsamic vinegar
1 tablespoon lime juice
1 tablespoon sunflower oil or extra-virgin olive oil
Kosher salt and freshly ground black pepper

Add black beans, onion, cilantro (reserving a few leaves for garnish), garlic, vinegar, lime juice and oil to the extra tall cup. Twist the extractor blade onto the cup to seal. Blend for 30 seconds or until smooth.

Transfer to a serving bowl and season to taste with salt and pepper. Garnish with reserved cilantro just before serving.


This post is linked to:

Wednesday, June 7, 2017

Country-Style Gravy


As I mentioned to you a while ago when I was discussing my initial fear of tartar sauce (and then ultimately learning to embrace it), I’d bought a variety pack from Omaha Steaks. In that variety pack, in addition to the Pub Cod, there was a box of Chicken Fried Chicken Patties. I didn't quite know what to expect, but figured that I just really couldn't go wrong, and I was right. They’re darn good! These days, with the deck construction going on, the house an absolute mess, and everything in a bit of an uproar, the last thing I want to do is cook.

The other night I tried a Chicken Fried Chicken patty, and was very pleased. I served it, diner style, on one of vintage grill plates, along with green beans, mashed potatoes (two of my favorite diner sides), and topped it with Country Style Gravy. I had no idea how to make country gravy, so did a little research. Essentially, it's nothing more than a béchamel using bacon fat in place of butter. I'm one of those people who, when I fry bacon, save the bacon fat (in a vintage canning jar stored in the fridge), after multiple screenings through a sieve and cheesecloth before doing so. As a consequence, the bacon fat that I have is the purest, most beautiful bacon fat that you can imagine. Oh, how my grandmother would be proud!

The recipe for tasty country gravy is as follows; I encourage you to give it a try. Adding some dried or fresh herbs makes a great deal of difference. I had intended upon adding some chopped fresh rosemary, but my rosemary plant is struggling amid all the chaos, so instead, I added some rubbed sage. It was a good choice. I enjoyed it, and I think you and your family will too.

(I imagine that a lot of you have your own versions, so tell me about them in the comments section below. I love hearing from you!)

 Country-Style Gravy

1 tablespoon pure, strained bacon grease
1 tablespoon all-purpose flour
1 cup whole milk
Salt and freshly ground black pepper to taste
1/4 teaspoon of your favorite dried herb, or,
2 teaspoons of your favorite minced fresh herb

Melt bacon fat in a medium saucepan over medium low heat. Whisk in flour, and continue whisking for 1 to 2 minutes to be certain to eliminate the floury taste. Slowly pour in whole milk, whisking continually; cook and stir until thickened. (This took me about 3 to 5 minutes.) Add salt and pepper to taste, and stir in the dried or fresh herbs of your choice. Top chicken patty or mashed potatoes and serve.

 This post is linked to:

Monday, June 5, 2017

All decked out! (Coming soon!)

When people ask me about my blog, I refer to it as a "food and lifestyle blog." That was my intention when I first started it back 2010. But, as we all know, it's more food than anything else. Yes, there are table settings, and occasionally a little about what's going on in my life, but I don't devote a lot of space to lifestyle. That's about to change, because I'm in the midst of what will end up being a huge change in my lifestyle.

I decided, because living alone I am now the Queen of Everything, that after three very difficult, exhausting years of care giving, and the painful loss of my husband of 21 years, that I deserved a treat. When I moved into this house five years ago, it was a spec home. So, it was new, but not one that I’d designed on my own. It had a small cedar deck on the back, accessible from the dining area. Why a cedar deck was built onto this house in a neighborhood full of composite decks, I'll never know. But I do know that I had to paint this rascal every single summer. Having moved here from a 120-year-old Victorian farmhouse with lots of gingerbread, that I needed to paint every year, I decided that I am just too old to paint. It’s not the way that I want to spend my time any longer.

After consulting neighbors, I got in touch with a contractor, and, last September, we came up with a plan for a covered deck with an open area to the side to use for grilling (Grilling recipes, people!). My contractor is excellent and, as a consequence, a very busy guy, so he wasn't able to start working on it until the middle of last month.

Every Monday, until its completion (and then brace yourself for posts about dining al fresco!), I'm going to give you updates on this project. It’s the most exciting thing I've been involved in in a long time. Not just the excitement of seeing one guy -- that's right one man doing this on his own -- build a wonderful addition to the house, but also planning what I'm going to do with it by way of decoration.

Today's post is merely an introduction to the project.

Here is the back of the house with the deck that was original. It was entirely cedar, but I wanted to paint it to blend in with the decks in the rest of the neighborhood, so painted it white with a stained floor. The neighbors appreciated that, because I didn't stick out like such a sore thumb, but it ended up being a heck of a lot of work, not only because I had to paint it every year no matter what type or brand of paint I used, but I also had to stain the floor.
The old deck is gone, and I couldn't be happier.
The framework is going up for the base of the deck. It looks massive. In fact, as I look at it, I can only wonder what the neighbors are thinking. It's a monster! I have one of the smaller homes in the neighborhood, but, clearly, the biggest deck. Let me tell you, it's caused quite a stir.
Next Monday I'll show you what it looks like it framed out.
Oh, here is a bit of eye candy. The colors I’ve chosen to use in decorating my new space are those shown in this piece of fabric that I’m using to make napkins. I can hardly wait!

All photos by Joe Rogers of Advanced Carpentry and Remodeling, LLC

Saturday, June 3, 2017

Penne with Mushroom & Spinach Alfredo​


​​In my last post I mentioned that I had twisted my knee. Well, it started feeling better, so I continued on with my life as usual, and twisted it again. Blast! Some people never learn. So, I'm back to digging around in the fridge to see what I have in order to come up with a nice meal.
Heavy cream is something that I always have on hand, it's my only vice. Well...it's one of a few vices. All right, I have many vices, heavy cream is somewhere among the “H’s,” but I digress. As I was saying, I always have heavy cream. Additionally, I have a wide variety of pastas, not only because I like pasta, but I also like the cuteness of all those different shapes, and I also keep heaps of Parmesan cheese in my freezer (I do get a little panicky when I'm running low), and I always have frozen chopped spinach. Don't judge! I like spinach, and it's amazingly versatile. You can toss it into soups, stews, pasta dishes, what have you, and it's always going to be a nice, not to mention, nutritious addition.
With this in mind, I came up with a delicious spinach, mushroom, and penne alfredo. This sauce can be used with any type of pasta, and feel free to season it up anyway that you like.  Add more nutmeg if you like nutmeg like I do, less if you're not that keen on it. Add more pepper, toss in extra mushrooms, do whatever you like. This is no fail. Pasta, spinach, heavy cream, Parmesan cheese, what's not to like?
Penne with Mushroom & Spinach Alfredo​

1/2 cup butter

6 ounces cremini mushrooms, sliced
​3/4 cup frozen chopped spinach, thawed and squeezed dry
1-2/3 cups heavy whipping cream
3 tablespoons cream cheese
3/4 cup grated Parmesan cheese
1 teaspoon garlic powder
​1/4 teaspoon freshly grated nutmeg
Salt and freshly ground black pepper, to taste
1/8 - 1/4 cup grated Parmesan cheese, for garnish
 
Melt butter in a 10-inch skillet over medium heat. Stir in mushrooms and cook for 2 to 3 minutes. Add spinach and cook until warmed, about 1 minute. Add cream and cream cheese; cook and stir until cream cheese is melted, about 5 minutes.

Stir Parmesan cheese and garlic powder into spinach mixture; season with nutmeg, and salt and pepper. Simmer until sauce is thickened and smooth, about 10 more minutes. Serve immediately, topped with additional cheese, if desired.


This post is linked to:

Thursday, June 1, 2017

Chicken and Mushroom Crêpes


If you don't make crêpes because of the hassle of, well, making crêpes, then let me introduce you to a product from Melissa's Produce that I always have on hand. Melissa's Ready-to-Use Crêpes come in packages of nine, are every bit as good as homemade without the hassle, work equally well for both sweet and savory dishes, freeze beautifully, and have saved me many times.

They work equally well for breakfast, brunch, and lunch as they do for dessert and dinner. You can wrap almost anything up in a crêpe, top it with something sweet or savory, and have a wonderful main dish, side dish, or dessert.

I twisted my knee over the weekend, no surprise considering all of the furniture moving and heavy lifting that I do, so didn't want to struggle out to the supermarket today. I did, however, want a nice meal, so I rummaged around in the fridge to see what was available, and made these delicious crêpes.
Chicken and Mushroom Crêpes

1 tablespoon unsalted butter
6 ounces cremini mushrooms, sliced
1/2 cup diced onion
1/3 cup diced celery
1/2 teaspoon finely minced garlic
2 tablespoons butter (not to be confused with the unsalted butter above)
3 tablespoons flour
1/4 cup dry sherry
2 cups homemade chicken stock
2/3 cup heavy cream
Salt and freshly ground black pepper to taste
1 teaspoon chicken soup base (I use Jamison)
2 cups cooked chicken breast, cubed
1 package of
Melissa's Ready-to-Use Crêpes

Preheat oven to 350°F. Spray a 1-1/2 quart baking dish with Pam; set aside.

Melt unsalted butter in a 10-inch skillet over medium heat. Stir in mushrooms and cook for 2 to 3 minutes, then stir in onion, cook for 2 to 3 minutes, and, lastly, stir in garlic and cook for one minute more. Add butter, stirring until melted, and then sprinkle in flour, stir together and allow to cook for 1 to 2 minutes to get rid of the floury taste. Stir in the sherry, and the chicken stock, a little bit at a time, continuing to stir in the doing. Bring to a boil, turn down heat, and allow to simmer until mixture begins to thicken, 3 to 5 minutes. Stir in the heavy cream, salt and pepper, and the chicken soup base, and continue to simmer until sauce thickens again. 

Place chicken in a mixing bowl, and pour some of the sauce on top of it, 1/3 cup at a time, stirring after each addition, until the chicken comes together, much in the same way chicken salad would come together. Divide chicken among six crêpes (or more depending upon how full you want each crêpe), roll up, and place seam side down into your baking dish. Place into your oven and bake for 25 to 30 minutes. Warm the remainder of the sauce, pour over the crêpes, and serve.

 This post is linked to: