Showing posts with label pastry. Show all posts

Wednesday, August 17, 2011

Banana Crunch Muffins


It's been so noisy here all week with the roofers awakening us in the predawn hours that we've just been stumbling around the house muttering, "Coffee! Coffee!" able to do little else.  But this morning, having awakened to bird song, I figured it was time to get caught up with the weekend paper and have a nice hot muffin for breakfast.  This recipe is from Ina [Garten, the Barefoot Contessa] and is delicious!  Do NOT forgo the banana chips on top, they are wonderful.

BANANA CRUNCH MUFFINS

3 cups all-purpose flour
2 cups sugar
2 teaspoons baking powder
1 teaspoon baking soda
1/2 teaspoon salt
1/2 pound unsalted butter, melted and cooled
2 extra-large eggs
3/4 cup whole milk
2 teaspoons pure vanilla extract
1 cup mashed ripe bananas (2 bananas)
1 cup medium-diced ripe bananas (1 banana)
1 cup small-diced walnuts
1 cup granola
1 cup sweetened shredded coconut
Dried banana chips, granola, or shredded coconut, optional

Preheat the oven to 350 degrees F.
Line 18 large muffin cups with paper liners. Sift the flour, sugar, baking powder, baking soda, and salt into the bowl of an electric mixer fitted with a paddle attachment. Add the melted butter and blend. Combine the eggs, milk, vanilla, and mashed bananas, and add them to the flour-and-butter mixture. Scrape the bowl and blend well. Don't overmix.

Fold the diced bananas, walnuts, granola, and coconut into the batter. Spoon the batter into the paper liners, filling each 1 to the top. Top each muffin with dried banana chips, granola, or coconut, if desired. Bake for 25 to 30 minutes, or until the tops are brown and a toothpick comes out clean. Cool slightly, remove from the pan, and serve.

This post is linked to:
Real Food Wednesday
Cast Party Wednesdays
Wow Us Wednesday
Weekday Potluck
For more wonderful recipes from Ina, I highly recommend these books:
Barefoot Contessa How Easy Is That?: Fabulous Recipes & Easy Tips (Fabulous Recipes and Easy Tips)Barefoot Contessa Back to Basics: Fabulous Flavor from Simple IngredientsThe Barefoot Contessa Cookbook

Saturday, July 2, 2011

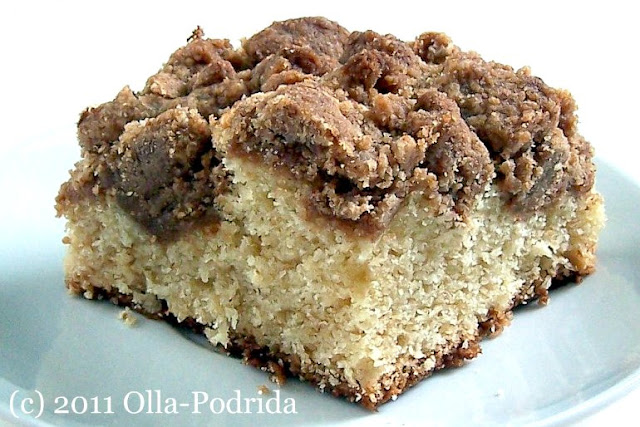
New York-Style Crumb Cake

I love a good pastry -- just ask my thighs.  There is nothing better in the morning with a nice cup of freshly brewed coffee than a GOOD pastry.  But with the nearest bakery of quality (and when I say quality I'm not talking Bread Co/Panera or Starbucks, both of whom I do patronize and enjoy, and both have good muffins and such, I'm talking the bakers-in-the-back making crumb cakes, tarts, and danish kind of bakery, the scent of which wafts through the shop greeting you at the door when you walk in, kind of bakery...A BAKERY!) more that 15 miles away, if I want something handy at breakfast time I'm going to have to make it myself.


This morning I found a recipe that certainly fills the bill.  It's a product of the BAKED bakery shop in Brooklyn, NY and now you can make it in your own home thanks to the proprietors' latest book Baked Explorations: Classic American Desserts Reinvented, a sequel to their first book, simply entitled Baked.


It is dense, moist, and delicious with a hefty amount of crumbs (something I deem absolutely necessary in a good crumb cake), and the beauty of this particular recipe is that the cake is honestly better the next day.  It freezes well too, if you have any left (I tend to dole out slices to anyone who have them and offer up an opinion), and is enhanced, I think, by warming in the microwave for about 15 seconds before consuming.  Oh, mamma, you're going to love this one!
New York-Style Crumb Cake


For the Crumb Topping:
1 cup firmly packed dark brown sugar
1/2 cup granulated sugar
1/2 teaspoon salt
1-1/2 tablespoons cinnamon
1 cup (2 sticks) unsalted butter, melted and warm
2-1/2 cups all-purpose flour

For the Cake:
2-1/2 cups all-purpose flour
3/4 teaspoon baking powder
1 teaspoon baking soda
1/2 teaspoon salt
12 tablespoons (1-1/2 sticks) unsalted butter
1-1/2 cups granulated sugar
2 large eggs
1-1/4 cups sour cream
1 teaspoon pure vanilla extract

Preheat the oven to 350 degrees F and position the rack in the center. Butter the sides and bottom of a glass 9 x 13-inch pan.

Make the Crumb Topping:
In a medium bowl, stir together both sugars, the salt, and cinnamon. Add the melted butter and whisk until combined. Fold in the flour until it is absorbed and set the mixture aside.

Make the Cake:
Sift flour, baking powder, baking soda, and salt into medium bowl. Set aside.

In the bowl of a standing mixer fitted with the paddle attachment, cream the butter until it is completely smooth and ribbon-like. Scrape down the bowl and add the sugar. Beat the mixture until it starts to look fluffy. Add the eggs, one at a time, and beat until incorporated. Scrape down the sides of the bowl and mix again for 30 seconds. Add the sour cream and vanilla and beat just until incorporated. Add the dry ingredients in three parts, scraping down the bowl before each addition, beating only until it is just incorporated.

Assemble the cake:
Pour the batter into the prepared pan. Use your hands to scoop up a handful of the topping and make a fist. The topping should hold together. Break off in chunks and drop them over the cake. Repeat to use all the topping. Remember, the topping layer will look outrageously thick.

Bake the cake for 45 to 55 minutes or until tester inserted in the middle comes out clean. Rotate the pan two times during the baking process. Cool the entire pan on a wire rack for about 30 minutes before serving.

Buy the book:
Baked Explorations: Classic American Desserts Reinvented
This is linked to:


Wednesday, January 26, 2011

Cheesy Bacon Pecan Spirals


Some time ago a friend gave me this recipe and I only just got a chance to try it when we were snowed in over the weekend.  Am I glad I did!  These are terrifically tasty little tidbits that work on so many levels.  They are great as a side dish for a brunch, as an appetizer for a dinner, or the perfect accompaniment to a bowl of soup or a nice salad for lunch.  Have you ever known a food to be so versatile as to work at every meal (other than the chocolate chip cookie, of course!)?

Cheesy Bacon Pecan Spirals

2 cups shredded sharp cheddar cheese
1 cup grated Parmesan cheese
1 3-oz. package Philadelphia cream cheese, room temperature
1 16-oz. package Hickory Smoked Bacon, cooked, drained and crumbled
1 cup toasted, chopped pecans
1/2 teaspoon cayenne pepper, or to taste
1 17.3 oz.pkg. frozen puff pastry, thawed
1 large egg
1 tablespoon water

In a medium bowl, mix grated cheeses and cream cheese; beat at medium speed with mixer until smooth.  Add bacon, pecans, and cayenne paper.  Beat at medium speed until thoroughly mixed.  On lightly floured surface, roll one puff pastry sheet into a 13" x 11" rectangle.  In a small bowl, combine egg and water, whisking to mix.  Brush egg mixture on puff pastry sheet.  Spread half of cheese mixture over pastry, leaving a 1/2" border.  Beginning with short side, roll up jelly-roll style.  Repeat procedure with remaining puff pastry sheet and cheese mixture.  Wrap tightly in plastic wrap and chill for 2 hours or up to 2 days, if desired.

To serve, preheat oven to 350 degrees F.  Line baking sheets with parchment paper.  Cut rolls into 1/2" thick slices, place on prepared baking sheets.  Bake for 20 to 25 minutes or until golden brown.

Makes approximately 2 dozen spirals.
Spreading the cheese mixture over the puff pastry is NOT an easy task.  I dipped my fingers into the egg wash mixture in order to accomplish this and even then I had a gap or two that didn't really make a difference in the end.
I did not have difficulty with this, but I think the next time I'll roll the puff pastry out onto a big piece of waxed paper to keep it from sticking to the board.
While the recipe does not state this, I cut off the doughy ends that didn't contain much of the mixture.
Use a sharp nice to slice and they come out beautifully!
I cut the recipe in half with great success, and baked up only six -- three each -- to be consumed with our salad for lunch. We both loved these.  I froze the rest and will let you know if that worked successfully.
Hot from the oven!
If you're planning a Super Bowl party, these would be a great snack.  They are equally good hot from the oven as they are at room temperature...if they last that long!


This is linked to


Saturday, December 18, 2010

Saturday Breakfast - Ebelskivers!


I will be the first person to tell you that kitchen gadgets are unnecessary.  That the only two pieces of equipment you'll ever need are a good, sharp knife, and a Microplane grater.  That's it. These two items will allow you to perform almost any task needed in today's kitchen.  But, heaven help me, I love gadgets, from donut machines to the latest little appliance that makes four pies all at once, I find them simply irresistible.


 I christened my newest acquisition this morning -- an Ebelskiver pan for making Danish filled pancakes.  I was pretty chuffed when I picked this up a month or so ago at Williams-Sonoma  for 15% off, then was intensely annoyed when, closer to the holidays it was reduced to 50% off before I'd been able to use it.  At any rate, I've now put it into service, and can't wait to use it again.


There's a bit of a learning curve involved, so don't be surprised if you burn a couple in the first batch, or add too much filling (jelly, say) and have it bubble over and burn on the pan, setting off the smoke alarm, and then raising a huge blister on the thumb of your left hand when you try to rid the pan of the offending pastry, but I digress.  The process is simple if a bit messy, but they go from pan to table in just minutes.  Pressed for time, I decided to use the pancake recipe on the Bisquick box, adding a bit more milk to thin the batter, along with a tablespoon of a granulated sugar, a teaspoon of vanilla, and some gratings of orange peel.  For fillings I chose what was easiest to grab - milk chocolate chips from the cabinet above the stove, and blackberry jam because it just happened to be in the front of the refrigerator.


I melted butter in a small dish and brushed each well with an ample amount using a silicone pastry brush.  I poured about a tablespoon of batter into each well and working quickly added various fillings.  It wasn't as easy to center the fillings as I thought it would be, but my skills improved with batch number 2.


Flipping them over was a breeze.  I used a chopstick rather than the official Ebelskiver flipping tool, and it worked great. I just pushed down on the one side and when the opposite side crept up out of the pan, I flipped it over to brown.


A dusting of powdered sugar later, some warm syrup drizzled on top, and I had a tasty breakfast unlike any I've had before.

Ebelskivers: Filled Pancakes and Other Mouthwatering MiniaturesNorpro Filled Pancake Pan, Aebleskiver PanNordic Ware Buttermilk Apple Pancake Mix


I'll be trying these again, and soon!  I was delighted to learn that books of recipes are available, so I'll be adding one or two to my bulging cookbook collection and will try recipes from sweet to savory and give you the skinny.  In the meantime, grab yourself a pan and try them for yourself.  I'll be waiting to hear of your success.