Showing posts with label Life with Jim. Show all posts

Monday, November 20, 2023

The Fruitcake Bowl

 
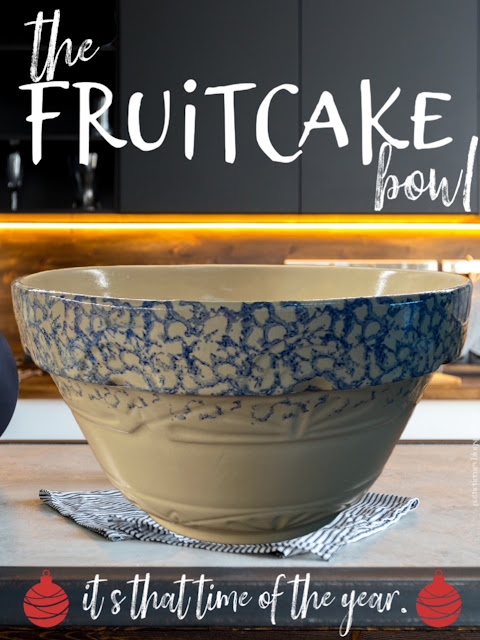
Long before we got together, the late Mr. O-P was making fruitcake. It was as much of a tradition for him as was putting up a tree. I had never made a fruitcake before, so this tradition was new to my experience. It is an arduous task, I can tell you. It’s also an expensive one. Over the years as I watched him make this, I had suggested he get a larger bowl. He was a bit of a messy cook under normal circumstances, but this generally made for a kitchen disaster.One spring I was out shopping with my mother, and spotted what I thought would be the perfect fruitcake-making bowl. I made the purchase, lugged the stoneware behemoth to the car, sneaked it into the house, and waited to present it to him at my parents’ annual brunch on Easter Sunday, filled with Easter grass and goodies. It wasn’t the right season, I know, but when you find special things, you need to buy them.

His reaction was a bit different than I had expected. For one thing, it’s heavy. I mean really heavy. When I put it on his lap, I thought the weight was going to send it right onto the floor. The bowl is 14” wide by 9” tall, and weighs 15 pounds. It’s also a real booger to store. He mentioned all of this on the way home in the car. I tend not to think about such things in the throes of shopping passion.

I won’t say that I regretted this purchase, although I did, but because I had bought it, and designated it as the official fruitcake bowl, it became so. Every November it had to be hoisted up from the basement, washed, and pressed into service. I still have that bowl, and let me tell you bringing it up from the basement at my advanced age is not easy. Combine that with the mixing of the fruitcake ingredients, and you’ve got quite the cardio workout.
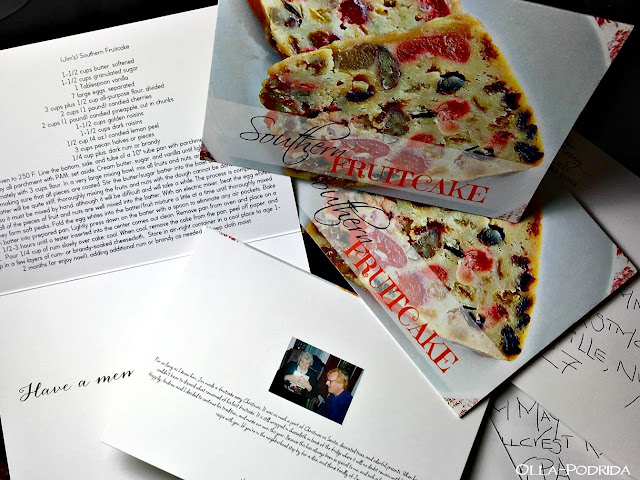
This is my first year making fruitcake on my own. The year after Jim passed away number two son, Andrew, came to make it with me. After that, I thought I would probably never make a fruitcake again, because the process made me a bit melancholy. This year I cast that aside, dug in, and I’m rather proud of myself. I used this fruitcake as the cover picture for my Christmas card the first year I celebrated as a widow. The recipe was inside. You can also find it here.

As I write this, the bowl is safely stored away on a shelf in the basement, and I’m ready to collapse in a heap. My family likes fruitcake, so they’re eager for their portions come Christmas. Do you have any similar baking equipment that means something special to you? Tell me about it.


Wednesday, December 12, 2018

My 2018 Christmas Card

A week or so ago I mentioned on my personal Facebook page that I had just finished designing my Christmas card for this year. A lot of people wanted to see it, and I think they were probably expecting a lot more than what I actually did. I went for sweet and sentimental, with a nod towards Jim, a man I think about every single day. I wanted to share something that was a part of his life for as long as I knew him, with all of his family and friends.
A number of years ago I did a blog post about Jim‘s fruitcake. You can read it here. This was something that he did every year, and it was as much a part of Christmas as the presents and the tree. I still have a large wedge of the last fruitcake that he made in December 2015 in the back of the fridge. I just can’t throw it away. This year my number two son, Andrew, and I decided that we were going to revive Jim's tradition and use his recipe to make a fruitcake to share with family and friends. I thought that perhaps I would be able to finally part with that last wedge of Jim's cake, but instead I put it into the freezer. When I fall off my perch, one of my sons can throw it away then, but I just cannot get rid of it.
 So here is my Christmas card for this year, the front, the interior, and the back. I’m happy with the way that it turned out, and I know I am going to delight so many people with this card. (UPDATE: I just received a message from one of Jim's nephews who said the card brought tears to his eyes.) The photo on the back of the card is of our first married Christmas in 1995. What happy days.

Wednesday, October 17, 2018

Drink the Wine!

The other day, when I made French Onion Soup, I was downstairs in the belly of the beast rummaging around (as I often do), looking for a bottle of port to add to the soup. While I was down there, I came across my husband’s wine rack, with all of his special bottles of wine on it. Some of them dated back to 1995, the year that we were married. He would buy these special (read: expensive) bottles of wine that he’d planned to uncork on a “special occasion.” He’s gone now, and apparently no occasion ever seemed quite special enough for him to drink this wine. I looked at those bottles, grabbed a bottle of French Bordeaux from 2007, and carried it upstairs. I relaxed that evening with a British mystery, some crackers and tomato basil cheese, and a glass of this wine. I don’t think my husband ever quite realized that just waking up in the morning is a special occasion.

Celebrate every day, people. Drink the wine!


This post is linked to:

This post contains affiliate links.

Thursday, August 9, 2018

Smoky Steak Sandwiches with Peppers & Onions


Those of you who have lost that special someone know that no matter how much time passes, things are never really quite the same. You learn to live with it and move on, and I have done that in spades, but I still find things on a daily basis that give me a melancholy pause.

This morning I was going through a stack of papers and found a recipe that Mr. O-P and I enjoyed a good bit. It was one he had found in a Williams-Sonoma catalog from April 2011. I know this, because he had typed up and printed out his own version turning their grill recipe into one that can be done on top of the stove, giving credit to that catalog. He had made a variety of notations on the recipe including that we liked it so much that, one week, we had it three times. I had to laugh at this. We did tend to go a little crazy when we found a recipe that we enjoyed. And, of all the recipes that we enjoyed, those that came together in a hurry were some of our favorites.

Do your prep work early in the day, and this comes together in a flash. I sliced the peppers and onions early on (including a green pepper that I grew myself!), as well as the steak that I did so while it was still partially frozen. (So much easier than waiting until it has completely thawed.)

I put this on a bun to show you that it really is a sandwich, but Mr. O-P and I used to make servings in individual
au gratin dishes, and have that as our evening meal. Sinking my teeth into the first flavorful bite, I can see why we enjoyed it. I hadn’t had this in about six years, and it brought back a lot of memories.
Smoky Steak Sandwiches with Peppers & Onions
Adapted from Williams-Sonoma

1 red onion, cut into ¼” strips
1 red bell pepper, seeded and cut into ¼” strips
1 green bell pepper, seeded and cut into ¼” strips
4 Tbs. olive oil
1 t. Hickory Smoked Sea Salt,* divided
Freshly ground pepper, to taste
1 ½ lb. New York strip sirloin, thinly sliced
4 French sandwich rolls (or not)
6 oz. provolone cheese, grated

Place a 10-inch skillet over medium high heat on the stove top. While this is heating, in a medium bowl, stir together onion, peppers, and 2 tablespoons of the olive oil. Season with ½ teaspoon smoked sea salt and freshly ground pepper, to taste.

Transfer vegetables to heated skillet, cover, and cook, stirring occasionally, until browned and softened (about 8 to 10 minutes). When cooked, transfer to a heatproof bowl and keep warm.

Return skillet to medium high heat. While it is warming, in another bowl, stir together steak strips with remaining 2 tablespoons of olive oil. Season with ½ teaspoon smoked sea salt and freshly ground pepper, to taste. Place beef strips in skillet over medium high heat. Cover and cook beef, tossing occasionally, until browned (4-5 minutes).

When beef is cooked, return vegetables to skillet. Stir to combine and warm through; meanwhile, set oven to broil. When the vegetable/steak mixture has been combined and warmed, divide equally in four ovenproof serving dishes (We used
these.), or into four sandwich buns placed into foil “boats.” Sprinkle a generous amount of Provolone cheese on top of each. Broil until cheese melts; watch to prevent cheese from burning. Serve immediately

Makes four servings.

*This is NOT an optional ingredient. You can find it at Williams-Sonoma. It isn’t cheap, but it lasts a long time, and is well worth it. Wait for a 20% off sale.

Another one of Jim’s favorite beef dishes is this recipe for what I now call Jim’s Steak Diane, in his honor.


This post is linked to:

This post contains affiliate links.

Thursday, August 2, 2018

Fort Fromage


Do the words Fort Fromage mean anything to you? If they don’t, then pull up a chair, you are going to love this blog post. And before I say anything else, let me say you’re welcome. That’s how much you are going to love this.

I can’t tell you how many times when the late Mr. O-P and I were planning a dinner party that we completely forgot to consider snacks to serve with a cocktail before the meal. This would invariably involve my sending Mr. O-P to Sam’s hours, sometimes minutes, before guests were supposed to arrive to pick up a big jar of mixed nuts, assorted cheeses, and perhaps a container of hummus. This was always a frantic situation because Mr. O-P was easily distracted. Case in point, I will never forget the night we were fixing a birthday dinner for my dad. All Jim had to do was go out and buy dessert. I thought I had everything else covered so I sent him out around noon to pick up dessert. Four and a half hours later he came home with a sprinkler and two tickets to Baltimore. I couldn’t believe it. Not only that, but he was pleased with this purchase.

“Who wants to go to Baltimore?” I asked through gritted teeth.

“We can fly to Baltimore, rent a car, and drive to Virginia Beach,” he said with a smug smile.

Okay, I was softening to this, “But that sounds a bit expensive,” I countered.

“Not when you get the tickets for $30 apiece,” he reported.

“Are we riding in the cargo hold?” I asked, horrified. Knowing some of the strange way in which we had traveled in the past, I thought this might be a possibility.

“No,” he said, “It was a lightning deal. I got us two round-trip tickets to Baltimore for $30 each, and I got the senior discount on mine, so it really only cost $27.”

I blinked. “But what about dessert?” I asked him, not quite so willing to let him off the hook.

“Don’t worry, I’m heading out for it now,” he assured me.

I looked at him. “I guess you know they will be here in 10 minutes,” I snarled.

“I’ll be back in time,” he assured me, and he was off.

Where am I going with this you ask? Well, I’ll tell you. Had I known about Fort Fromage back in those days, I wouldn’t have worried about sending him out, last minute or otherwise, to pick up a pre-dinner nosh. Fort Fromage is something any of us can put together with the leftovers that we have in our fridge. You heard me, leftovers! Not only that, but it’s delicious. It can also be made ahead, and it only gets better with age.

I first learned of Fort Fromage when I read that a local restaurant was serving delicious sandwiches that were nothing more than slices of crusty bread, spread with Fort Fromage, and topped with pickled vegetables. At that time, with a crisper full of vegetables, the pickled vegetable thing quite appealed to me. But, having never heard of Fort Fromage before, I had to investigate. There are a variety of recipes — this one is based upon Jacques Pépin’s — but, truth of the matter is, that no two versions are ever going to be the same. The reason is that Fort Fromage is made up of a clove of garlic, dry white wine, and a half-pound of whatever cheese bits you happen to have left over in your fridge.

How many times have you looked at those little too-small-to-grate cheese bits and had no clue as to what to do with them? Here is your answer. Weigh out a half a pound of whatever cheese scraps you happen to have, toss them into the
food processor with a clove of garlic, salt and pepper to taste, and pulse until it’s finely ground. Then, with the motor of the processor running, drizzle in 4-5 tablespoons of dry white wine until you end up with a creamy spread. How easy does that sound? Well, it is! Mine consisted of a little chunk of Brie, about a tablespoon of feta (boy was I glad to get that container out of the fridge!), some non-smoked provolone, and cheddar. It is absolutely wonderful! I wish I’d had this recipe before Jim passed away. He would have loved the quirkiness of it, the convenience of it, and because we were such cheese lovers and always had a wide variety in our fridge, we could have put some together every time we had guests — even the unexpected spur-of-the-moment ones —, and each time it would have been special. Well, at least I can enjoy it now, and share this recipe with you.

It is wonderful as is spread on crackers, pieces of toasted baguette, or with crudités, or, for a heartier snack, can be spread on top of slices of crusty bread, and broiled until the cheese melts. Delicious!
Fort Fromage

1/2 pound assorted cheese scraps
1 clove garlic
1/4 cup dry white wine

Salt and freshly ground pepper, to taste
1 tablespoon mayonnaise (optional)

Place cheese parts into a food processor and pulse 6-7 times until finely ground. Add garlic and pulse again.  Then, with the processor running, stream in white wine until a nice, spreadable consistency is reached. If you have used cheese that is particularly dry (as in the case of feta), add a dollop of mayo for creaminess.  Place into a lidded container and refrigerate for at least two hours. It gets better when refrigerated overnight.

Keep it cool and serve it attractively in this Chilled Cheese or Dip Server.


Another fabulous, spreadable cheese to keep on hand is this Homemade Boursin. It kicks the packaged variety to the curb and is far less expensive.

This post is linked to:

This post contains affiliate links.

Tuesday, July 31, 2018

The Saga of the Paella Pan


I am a passionate person. Those of us who are passionate people tend to anguish over many things. My anguish du jour (and I say “du jour” because indeed I do anguish about something new almost every day) is my late husband’s paella pan. Let me tell you the story of this pan.

My husband, too, was a passionate person, and one of his passions was cooking. He introduced me to all kinds of exotic cuisines that were completely new to my experience, and I embraced them all. One thing that he particularly enjoyed making was paella. He would make big pans of it, spending all day long on a dish that wasn’t supposed to be all that difficult, and would serve it at big parties we had with our friends. He decided one year, that the pan he had wasn’t big enough to serve the masses that often descended upon our home for a meal, and that he needed a bigger one. Upon hearing this, my mother’s ears perked up. She was always looking to buy someone that special something for Christmas that they didn’t deliberately ask for, wouldn’t expect, but would be delighted with its receipt.

So, my industrious mother managed to find a company that sold Spanish products, including paella rice, paella seasonings, and paella pans, and she put together quite a package of paella goodies for Jim that Christmas. Having never made paella, she had no idea what a paella pan looked like, so when she placed her order she asked for a large one. I can still see the look of shock and surprise on Jim’s face when he opened that box. My mother had given him the biggest paella pan that he had ever seen. If you’ve ever been to an open-air food market, say Camden Market in London, you may have seen food vendors stirring up food for the masses in pans this size. This pan is roughly 2 feet in diameter. This was way too big for Jim’s needs plus, every year one or other of our friends died off, and, sadly, our parties kept getting smaller and smaller. So, Jim put the pan aside.
Fast-forward a dozen years to today. My mother has now been gone five years, Jim has been gone a little over two, but the pan is still here. I stumbled upon it today, and it was like a kick in the gut. It was still in the shrink-wrap (and that was mighty shrink wrap, I had a devil of a time extricating the pan), and a wave of sadness swept over me. Suddenly, I remembered my mother’s delight in finding Jim the perfect gift; I remember the look of shock and surprise on his face when he opened it. I remember the parties that we used to have under the striped umbrellas, on the big brick patio at our house, with pitchers of ruby red sangria, pans of steaming, seafood-studded paella, laughter, music, conviviality, the works! Such good times. I have since moved house, most of those friends are gone, and here I am left with this pan, this unused, monster of a paella pan. It’s funny how something inanimate, and relatively insignificant, can cause such pain.
You may be inclined to tell me to donate it and get it out of the house, but I can’t do that. The fact of the matter is, I like it. I don’t make paella, I would never make this much paella, but because this pan caused happiness, shock, and awe in the past, it is going to have to be a part of my future. So, I am asking for your help. What can I do with this pan? It is big enough to use as a serving tray, I’m aware of that, but at a hefty ten pounds all on its own it, would be too heavy to carry. It is almost the size of my entire cooktop, so I cannot use it on the stove, and it would be too big to use near the stove. It may work as a centerpiece on a large table, but I’m not sure I have a table quite that large. Use your imagination, go little crazy if you like, and tell me what you would do with this behemoth among paella pans.

This post is linked to:

Sunday, March 25, 2018

My Favorite Mustard Sauce

I’m not sure where the late Mr. O-P got this recipe for mustard sauce, but what I do know is that it’s my favorite, and soon becomes the favorite of everyone who tries it. This is the mustard sauce that we have been serving with our Easter ham for more than a decade. When we first served it, our friend Stephanie liked it so much, that she wanted her own little bowl on the side. Yep, it’s that good. It’s easy to put together, and keeps 4 to 5 days in the fridge, if it lasts that long. In addition to ham, it goes equally well with corned beef, broiled salmon, and a wide variety of vegetables. Try it on ham sandwiches, or use it as an ingredient in egg salad, ham salad, deviled eggs, potato salad, you name it. I’m guessing that my favorite will soon become your favorite, too!
My Favorite Mustard Sauce

2 T.
brown mustard seeds
2 t. Worcestershire sauce
1/2 c. good mayonnaise
1/2 c. sour cream (not low-fat)
1/2 c. grainy mustard

Toast mustard seeds in a dry 9-inch sauté pan over medium heat until they start to pop. Do not burn! Turn seeds out into a medium mixing bowl. Add the remaining ingredients and whisk to combine. Store in refrigerator. Keeps 4 to 5 days.
This post is linked to:

This post contains affiliate links.


Tuesday, January 23, 2018

Crusty No-Knead Cranberry Walnut Bread

I think about my late husband every day, but never so much as in January, which would have been his birthday month, and today his birthday. He loved a good loaf of bread, and not a week would go by where I wouldn't find him buying a loaf or two from one of the local bakeries. He liked it with a crispy exterior and a dense and chewy interior. I don't know if it was because I was thinking about him that caused me to make this bread, or because I was just in the mood for dense and chewy home-baked goodness. Either way, when I spotted this recipe I knew I had to give it a try.
The recipe may seem long, but it is very simple to put together. It also yields spectacular results! Honestly, I could not believe it. I had a slice this morning, spread with softened cream cheese, and it was as good, if not better, than any bread I've had from one of the top local bakeries. The fact that I made it at home astounds me. I can tell you that this is going to be the starting point for other fruit/nut/seed varieties that I plan to make. If the thought of making bread seems daunting to you, you need to try this one. The fact that it requires no kneading and precious little work will have you making it again and again.

Happy Birthday, Jim! I miss you, sweetie.
 Crusty No Knead Cranberry Walnut Bread
Adapted from Sally's Baking Addiction

3 cups + 2 Tablespoons all-purpose flour, plus more for hands
2 teaspoons kosher salt
1/2 teaspoon granulated yeast
3/4 cup chopped walnuts
1 Tablespoon honey
1 ½ cups warm water (about 95°F)

Stir the first 6 ingredients together in a large bowl. Stir in the warm water. The dough will be pretty sticky. Don't be tempted to add more flour, sticky is what you're going for. Gently shape into a ball as well as you can. Cover tightly with plastic wrap. Set on the counter at room temperature and allow to rise for 12-18 hours. I tend to keep my house on the cool side (62° during the day and 55° at night) so mine took the entire 18 hours. You'll know the dough is ready when it doubles in size and sticks to the side of the bowl. The top should be covered with air bubbles.

Turn the dough out onto a lightly floured work surface and, using lightly floured hands, shape into a ball. Transfer dough to a large piece of parchment paper.

Using a very sharp knife, gently score an “X” into the top. Cover dough lightly with plastic wrap and set aside while you preheat your oven.

Place your covered Dutch oven into your oven and preheat it to 475° F. When your oven comes up to temperature, set a timer for 30 minutes. After 30 minutes, remove the Dutch oven from the oven, remove the plastic from the top of your bread dough, and carefully place the dough inside by lifting it up with the parchment paper and sticking it all-- the parchment paper included-- inside the pot. Cover with the lid.

Bake for 25 minutes with the lid on. Carefully remove the lid and continue baking for 8-10 more minutes until the bread is golden brown. Remove pot from the oven, carefully remove the bread from the pot, and allow to cool on the counter for 30 minutes before serving.

Cover and store leftover bread at room temperature for 1 week.


This post is linked to:

This post contains affiliate links.