Tuesday, May 18, 2021

The Diva’s Creamy Macaroni and Cheese

This post contains affiliate links.

I am a fan of Krista Davis’s “Domestic Diva” books, and have read every one of them. I have pre-ordered the next (The Diva Serves Forbidden Fruit), due to release on the 25th this month). I recently completed the current volume (#13), The Diva Spices It Up. One of the things I love about this series, in addition to the characters, setting, and darned good mystery is that recipes are provided at the back of the book for a lot of the food mentioned throughout the story. In this volume, one of those recipes was for Creamy Macaroni and Cheese. As a fan of mac & cheese, yet never quite finding a recipe that suits me, I had to try this one.

I don’t know about the hard copy, but if you have The Kindle version of this book, please be aware that the included recipe is wrong. There is a mention of cream cheese in the instructions, but none mentioned in the list of ingredients; at no time is there a mention of when to combine the pasta with the sauce (or even combining the pasta with the sauce at all); and, for my taste, there was too much salt. That said, this is the best macaroni and cheese that I have ever eaten. It is flavorful, creamy but not too creamy, and the crunchy topping adds that certain something that takes it over the top. I am not a fan of elbow noodles so I never keep them on hand, always substituting with
pipette. They’re much cuter for one thing, “pipette” is much more fun to say than “elbow noodles,” and they hold more of that delicious sauce.

Here is a cleaned up copy of Krista‘s recipe for Creamy Macaroni and Cheese. Follow it to the letter, and you will be in pasta heaven.
 

The Diva’s Creamy Macaroni and Cheese

Adapted from Krista Davis

8 oz. elbow macaroni*, cooked according to package
½ c.
Panko
½ c. freshly grated Parmesan cheese
4 T. unsalted butter
¼ c. flour
1 t.
garlic powder
1 t. smoked paprika
¾  - 1 t. Kosher salt
1 T. prepared mustard
2 c. whole milk
4 oz. cream cheese, cubed, room temperature
4 oz. shredded cheddar (shred your own, I’m not just kidding around here)
4 oz. shredded Colby cheese (not pepper jack, Colby Jack, Colby, shred it yourself)

Preheat oven to 400° F. Spray an 8” x 8”
baking dish** with nonstick spray (like Pam); set aside.

In a small mixing bowl, toss together Panko and Parmesan cheese; set aside.

After preparing the pasta, set aside to drain and make the sauce. In a large saucepan melt butter over medium high heat. Whisk in flour and cook until it turns amber in color and smells fragrantly nutty, 2-3 minutes. Continuing to whisk, gradually pour in milk. Add garlic powder, smoked paprika, salt, and mustard, and reduce heat to medium. Whisk occasionally until the mixture simmers at the edges and begin to thicken. Add cheeses, reduce heat to low, and stir with a wooden spoon until it has melted. Fold in drained pasta and turn into prepared dish.

Sprinkle Panko/Parmesan mixture over the top and bake for 20 to 25 minutes until edges are bubbly.

Generously serves 4 as a main dish; 6-8 as a side.

*I used
pipette.

**You can also use a 1.5 quart casserole dish.


Monday, May 17, 2021

Late Spring Vignette

The late Mr. O-P often accused me of being too strong an advocate of “form over function.” Guilty as charged. This may be a female thing, but I have certain items, vignettes, and corners of my home that are strictly there for my pleasure. I want to wake up every morning and see something pretty. In good times and bad times (particularly the last 18 months), I find it peaceful, calming, and often invigorating. I know I’m not alone. I recently started asking my friends what their favorite spot(s) in their home was/were and thoroughly enjoyed their loving and detailed responses.

This is a favorite spot in my new room (that goes under dual names of “The Conservatory
” -- this appeals to the Clue fan in me-- and “The Jungalow.”) I find these monkeys very appealing. It was one of my first purchases when I set up home after graduating from college. When my boys were born, I switched from delicate accessories, to sturdier ones, and passed these to my mother. She loved them so much that, even after my sons were grown and gone, she refused to part with them.

When dad passed away two years ago February, these were the first things I brought home with me. Their provenance made me smile, and looking at them never ceases to bring joy to my day.

What are your favorite spots?


Thursday, May 13, 2021

Early Spring Tablescape

This post contains affiliate links.

I don’t know how the weather is where you are, but we are unseasonably (shockingly) cool around here. This is my first spring tablescape and it represents our unseasonable weather in that instead of being soft pastel colors of spring, it still bears some of the darkness of winter.

I treated myself to many things during the pandemic, one of which is this fabulously over the top tulipiere. Tulips are one of my favorite flowers, but I never had a great way to display them until now.


 The tablecloth is also new this year from wayfair.com, and I love the boldness of the vase with the tulips at center.

The water hyacinth placemats are versatile and among my favorites. They are topped with Bordallo Pinhiero geranium leaf chargers. On top of them are square black plates that my son and daughter-in-law tired of and passed to me. This is my first time ever owning black plates, and I have to say I like them.


My interest in collage art made these salad plates from Pottery Barn quite appealing. I have yet to see any butterflies this early in the season, but I’m certainly inviting them to my home with all of the flowers I have planted thus far.


The glassware was a gift from a friend. The cappuccino cups are from Amazon.

The flatware is Mackenzie Childs “Courtly Check”, also available, surprisingly enough, from Amazon.

The white butterfly dishes are favorites of mine and I have had them since I was in college. They are designed to be used when serving Chinese food, to hold sweet and sour sauce and mustard sauce. I use them quite often to hold pats of butter and homemade preserves. I thought they made a nice addition here. I wanted unobtrusive salt and pepper shakers, and these house salt and pepper shakers from Magnolia Home filled the bill.

This post is linked to:

Tablescape Thursday

Tuesday, May 11, 2021

Coconut Sheet Cake

This post contains affiliate links.

I am known as a bit of an oddity in my family in that I don’t like pie. I mean, I’ll eat it, occasionally I’ll make it, and I appreciate the artistry involved in creating pie, but if someone told me that I couldn’t have pie for the rest of my life, I would be fine with that. Cake, is another story. For years my favorite was German Chocolate, but recently it has been usurped by white cake. Specifically bakery white cake, more specifically wedding cake. That’s why my recipe for White Almond Cake is one of my favorites, and one of the most read posts on this blog.

Recently I had a craving for coconut cake, and decided to try this recipe that is similar to
Tres Leche Cake in that it uses three different kinds of milk. With the first bite I thought of my dad who shared my love for coconut cake. This one is easy to make, and phenomenal! The cake itself is moist and intensely flavorful, the frosting is like a coconut cloud. If you like cake as much as I do, you must try this recipe.

Coconut Sheet Cake a.k.a. Coconut Poke* Cake

Slightly adapted from cookiesandcups.com

 Coconut Cake

1 (15.25- oz) box white cake mix

Ingredients on box to make the cake (oil, egg whites, water)

1 t. coconut extract

½ t. clear vanilla flavoring

½ c. flaked coconut

1 (14- oz) can sweetened condensed milk

1 (15- oz can) Cream of Coconut

 Coconut Cream Cheese Frosting

8 oz. cream cheese, room temperature

1 c. powdered sugar

1½ c. heavy whipping cream

½ t. coconut extract

½ c. flaked coconut to garnish, optional


Preheat oven to 350°F. Spray a 9”x13” baking dish with Baker’s Joy; set aside.

Prepare cake according to package directions, adding in 1 teaspoon coconut extract and ½ teaspoon clear vanilla flavorings with the liquids. Fold ½ cup flaked coconut into batter and then spread into prepared pan.

Bake according to package directions. Cake is done when an inserted toothpick comes out clean.

While cake is baking stir together sweetened condensed milk and Cream of Coconut; set aside. When cake is done, poke holes evenly all over the top using a large fork while it’s still hot. Immediately pour sweetened condensed milk mixture evenly on top of cake, and allow cake to cool completely.

To prepare frosting: In a bowl of a stand mixer fitted with a whisk attachment mix cream cheese and powdered sugar together until smooth. Add in heavy cream and extract and mix on medium-high speed until stiff peaks form. Spread frosting onto cooled cake and garnish with flaked coconut.

Chill cake for at least 2 hours before serving. Store airtight in the refrigerator for up to 3 days.
 
*I changed the name of this cake because the words "poke" and "dump" should never be used in association with food. Nope. Never.


Monday, May 10, 2021

Cajun Shrimp Mini Loaf Pizza

This post contains affiliate links.

I mentioned the other day about going a little crazy during the past year buying things. Not only did I buy items, but I also bought services. Later, I’ll tell you about all of the services I purchased, mainly upgrades to the house as well as a room addition, don’t get me started. Anyway, before I digress too much, when you have work done in your home dust gets everywhere, and you are forced to do something you don’t want to do and that is clean. Now I know some of you out there do you like to clean. My mother loved to clean. Let me tell you that apple fell far from that tree, and rolled into the next county. Cleaning is not my thing. My mother was known for her immaculate home. I am known for blowing on the furniture just before company’s about to arrive. 

Where am I going with this you ask? Well, I’ll tell you. In the process of cleaning (and tossing, mostly tossing) I decided to go through a stack of flyers and magazines that I had saved for reasons long forgotten. I came across a flyer from my local market (shout out to Schnuck’s Markets), the March/April 2020 issue in particular. It had a recipe for Cajun Shrimp Mini Loaf Pizza. Huzzah! I thought to myself, a new recipe to try, plus one that uses shrimp. If that isn’t a fateful win-win I don’t know what it is.

So I tried it, and boy is it good! Despite having purchased the mini French bread loaves, I ended up using a thick slice of rustic bread instead. I think I prefer that to using the French loaf because there is a greater topping-to-bread ratio. Because I had cooked the shrimp the day before, there was nothing to putting this together, and it was elegant, intensely flavorful, unique, and satisfying. I also cut back the ingredients so as to serve one. You could easily do the same to serve any number you like. This would work very well for a ladies luncheon, or a nice side with a salad for dinner. Wonderful! 

Cajun Shrimp Mini Loaf Pizza
From Schnuck’s Markets

1 T. olive oil
1 T. Cajun seasoning
1/2 lb. medium cooked shrimp, peeled and deveined
One mini loaf of French bread
1/2 c. spinach artichoke dip
1/2 c. shredded mozzarella cheese

Preheat oven to 400° F. Cover a baking sheet with parchment or foil.

In a medium bowl mix olive oil and Cajun seasoning. Add shrimp and toss to coat. Halve mini loaf lengthwise and place on a prepared baking sheet. Spread with spinach and artichoke dip and top with mozzarella cheese. Bake until cheese is melted and bread is toasted, 8 to 10 minutes. Top with prepared shrimp and bake to warm through, 1 to 2 minutes. Garnish with parsley and crushed red pepper.

The recipe claims this serves six. Funny!


Friday, May 7, 2021

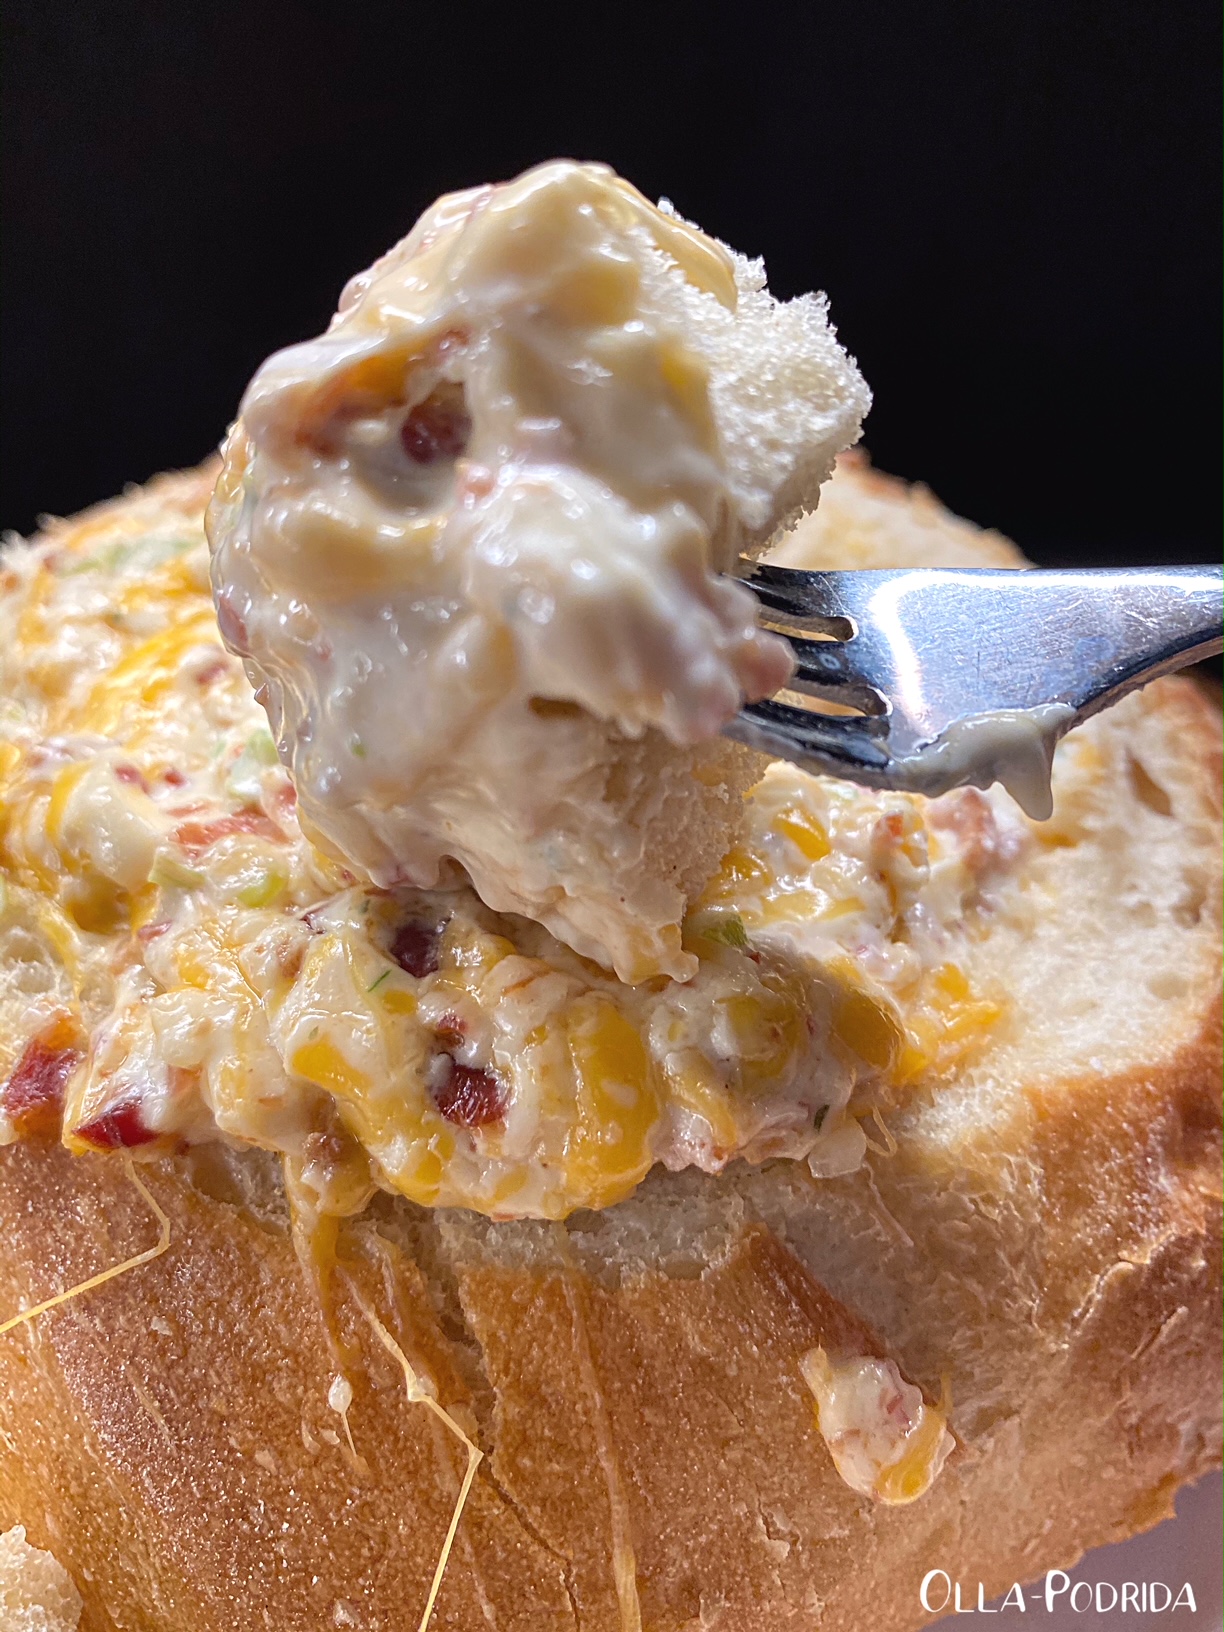
Cheesy Bacon Dip

This post contains affiliate links.

I love a good sale, who doesn’t? Every time I spot a sale on something that I like and I’m going to use, I stock up. It’s foolish, of course, because that same sale is going to repeat itself in one or two months hence, but I have this niggling fear despite all evidence that perhaps it won’t. So, as with yesterday’s shrimp, I also have a lot of bacon. Fortunately, it stacks. Also fortunately I have lots of recipes that call for bacon, and often find that even recipes that don’t call for bacon are improved by its smoky presence.

This dip is excellent! It’s an amalgam of a variety of other dip recipes, served in a bread bowl. I love those bread bowls. If you prefer not to use the bread bowl, spread it in a pie plate, top with crushed pecans (or not), and bake it until hot and bubbly. If you don’t want a hot dip, don’t heat it, serve it chilled or at room temperature. Looking for a sandwich topping? This is excellent on top of a burger. It’s also darned good on top of a steak. In fact, there is no way this isn’t absolutely delicious, even if you’re spooning it from the bowl directly into your mouth. It’s bacon!

Warm Cheesy Bacon Dip

1 1-lb. round loaf sourdough
1 8-oz. pkg. cream cheese, softened
1 c. sour cream
½ c.
Duke’s mayonnaise
1½ t. Worcestershire
¼ t. garlic powder
1 12-oz. pkg. bacon, cooked and crumbled
2 c. shredded cheddar
3 scallions, chopped

Preheat oven to 325° F.

Cut off top of sourdough bread; set aside. Using a sharp knife, cut a circle into the top of the loaf, and hollow out, leaving the exterior intact. This will be your serving bowl. Cube the removed bread to use as dippers.

Beat together cream cheese, sour cream, mayo, Worcestershire, and garlic powder. Fold in bacon, cheese, and scallions. Carefully spoon into the hollowed bread loaf. Wrap in
heavy-duty foil, and bake one hour until heated through.

Serve with various dippers such as bread cubes, crackers, crudités, or slices of apple.


Thursday, May 6, 2021

Bacon-Wrapped Shrimp

This post contains affiliate links.


 So...I bought shrimp. A lot of shrimp. I don’t know about you, but during this past year I went a little crazy buying things. I fell victim to one online ad after another. That’s not to say that it was a bad thing, I’m pleased with everything that I’ve gotten, it’s just that there’s a lot of it. The shrimp alone takes up an entire shelf in my freezer. I love shrimp, but it was the late Mr. O-P who handled fish and seafood in the kitchen.

What all of this means is that I need to educate myself in the ways of cooking with shrimp. I have spent the past week digging through family cookbooks, seafood cookbooks, magazines, you name it, compiling as many shrimp recipes as I possibly could. Here’s the first, and it’s a winner. If a rookie like me I can make something that’s delicious, so can you. You can put these together ahead of time and keep them in the fridge until you’re ready to bake them. If you prefer not to bake them, you can cook them on the grill. Makes a great starter, or entrée. More to come; I know you’re excited about this.

 Bacon-Wrapped Shrimp
Slightly adapted from Delicious.com

1 lb. shrimp (about 20 pieces), peeled and deveined, tails on
6 slices bacon, cut in thirds
4 T. butter, melted
2 T.
maple syrup
1 t.
chili powder

Preheat oven to 400° F. Line a large baking sheet with aluminum foil. Wrap each shrimp with a piece of bacon and secure with a toothpick.* Place shrimp on prepared pan.

In a small bowl, mix together butter, maple syrup, and chili powder.

Brush shrimp with about half of the maple butter. Bake for 15 minutes or until bacon is crispy and shrimp is cooked. Brush with remaining maple butter and broil 3 minutes.

 *I used bamboo skewers.