Showing posts with label Easter. Show all posts

Tuesday, March 10, 2026

Blossoming into Easter: My Floral Tablescape Makeover

 
Last week, I shared a serene, sage-toned tablescape and mentioned how “with only a few quick swaps, it can easily shift into bolder, brighter hues as summer draws near.” Well, summer may still feel far off, but with Easter just around the corner, I couldn’t resist giving that table a joyful, colorful refresh!
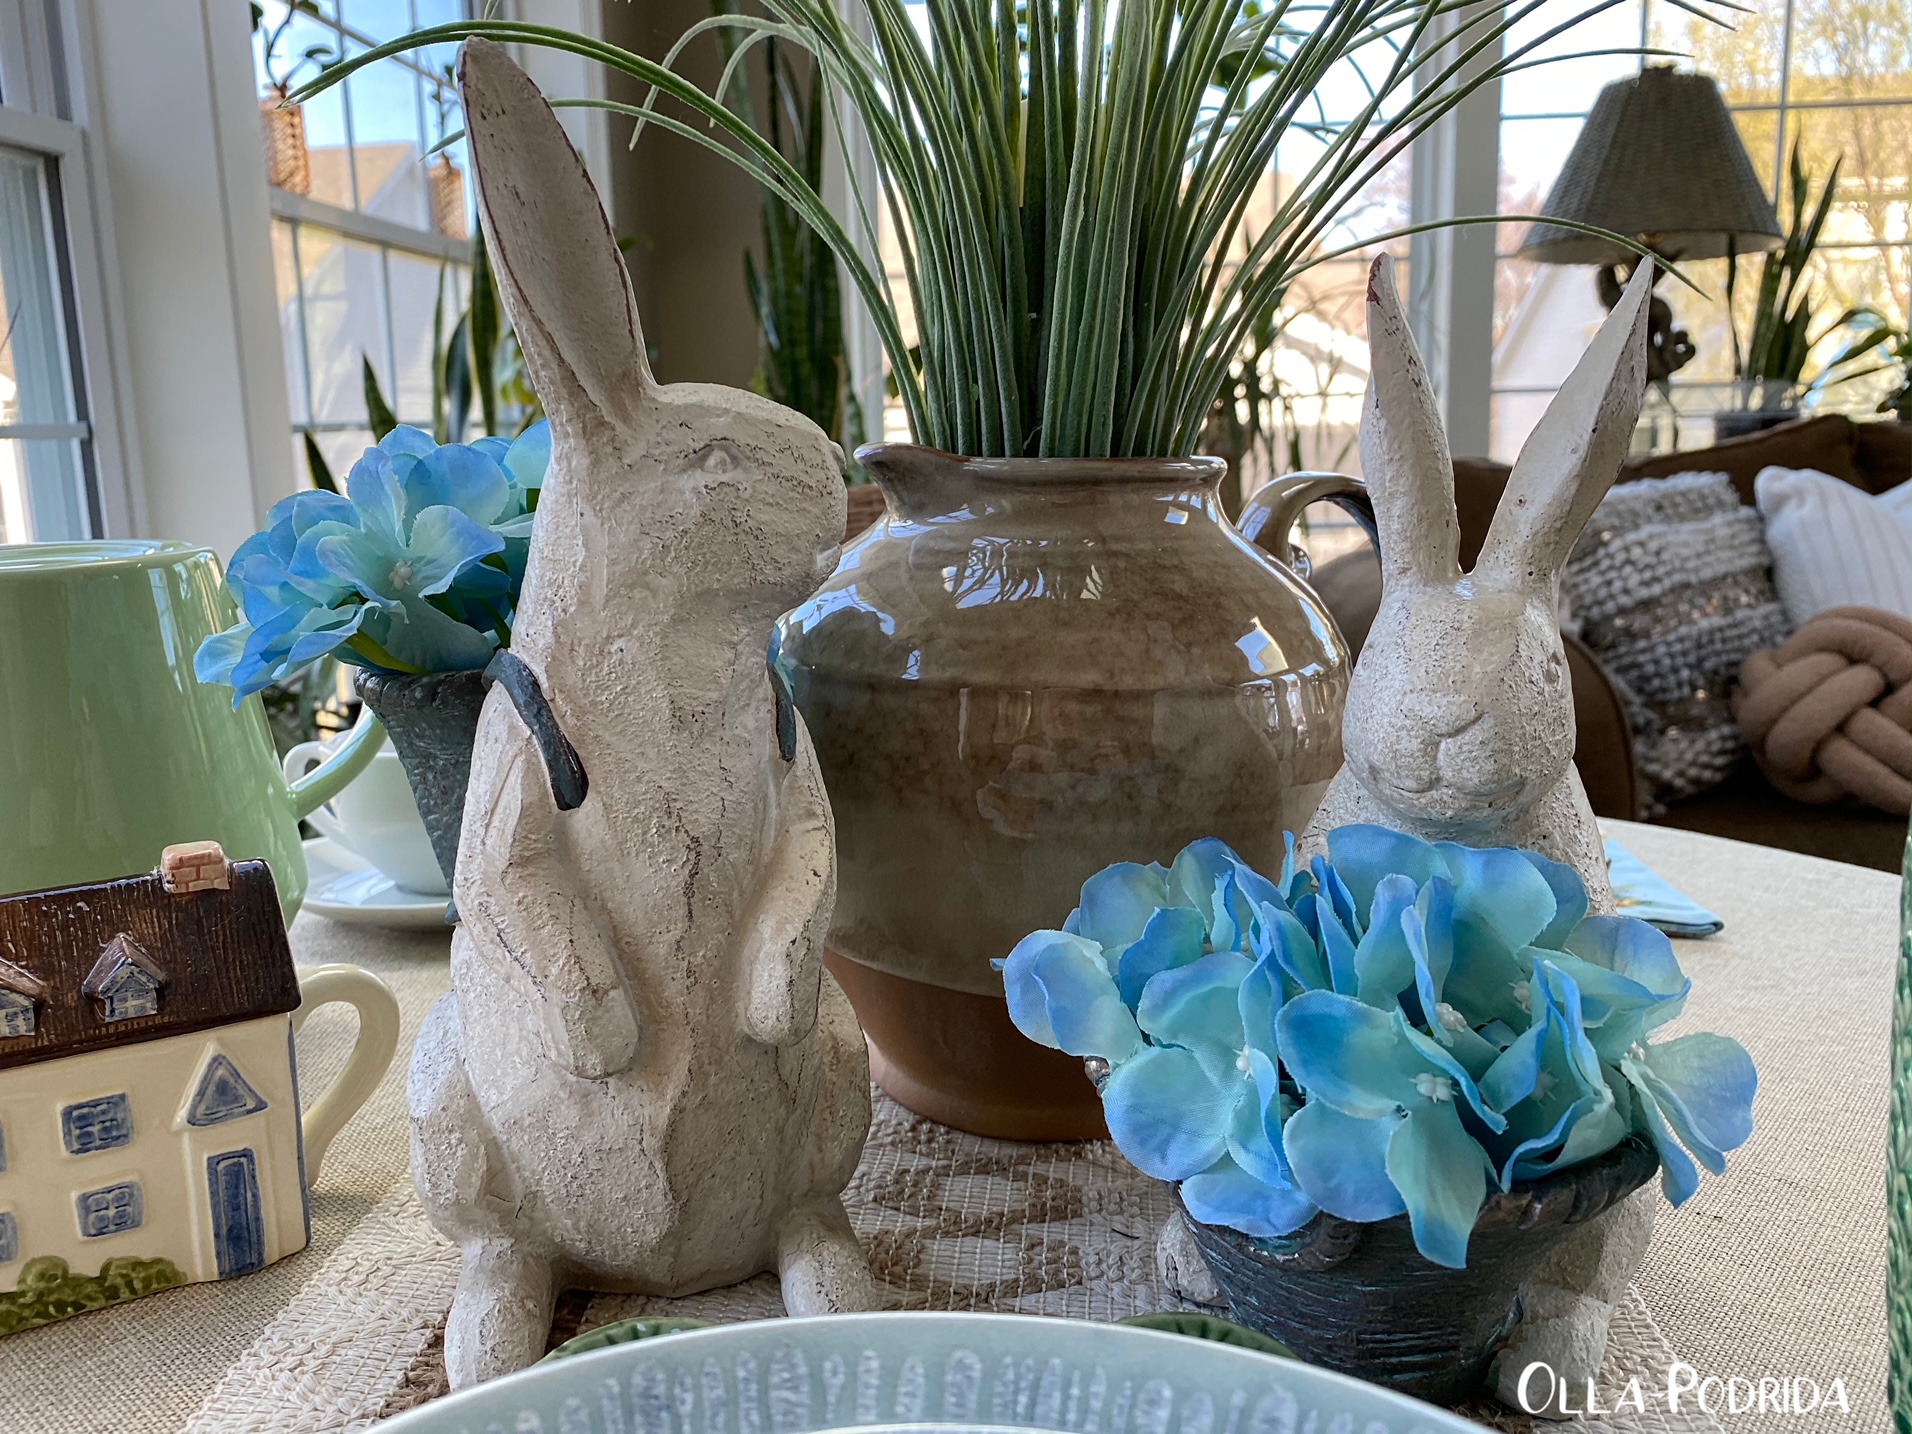
If you click through, you’ll see the transformation: the beautiful Bordallo Pinheiro geranium leaf bowls have been moved to the side, perfect now for serving a fresh spring salad. I cleared away the herb appetizer plates to let the stunning floral designs on the Portmeirion “Botanic Garden” dinner plates take center stage—they truly shine! 
I traded the sage napkins for vibrant floral ones from Pottery Barn that add instant cheer. Out went some of the glassware; in came my beloved salmon-colored water and wine glasses—purchased back in the 70s right out of college because I fell head over heels for them, and I love them just as much now. 
The large Portmeirion butterfly cups and saucers stepped aside to make room for Bordallo Pinheiro geranium leaf espresso cups—ideal for after-dinner coffee and a lovely echo of the cabbage leaf salad bowls.
  
Finally, I refreshed the centerpiece by blending last week’s cherry blossoms with a mix of soft pink and cranberry carnations plus alstroemeria. Voilà—a completely new, festive table is born! 
The best part? It really is that simple to transition from one season (or holiday) to the next with just a handful of thoughtful changes. Who else loves playing mix-and-match with their favorite pieces?
 
Many thanks to Rita of Panoply for organizing this Easter/Spring Tablescape Blog Hop.
 

Click on the links below for more Spring/Easter table inspiration from my blogging friends:

Panoply - Feeling Spring with Pink and Green Tablescape

Home is Where the Boat Is - Tulips and Bunnies for Easter

Hyacinths for the Soul - Hop, Hop, Hop into Spring!

Me and My Captain - Spring Is In The Air...In Florida Anyway

The Cat's Whiskerz - Bunny Ears and Easter Wishes

Everyday Living - The Splendor of Spring

Pandora's Box - Breakfast with the Bunnies

My Thrift Store Addiction - Whimsical Sweet Treats Easter Bar

Life and Linda - Welcome Spring With Bunnies

Mantel and Table - A Fresh Blue and Pink Tablescape For a Beautiful Spring

Olla-Podrida - Blossoming into Easter: My Floral Tablescape Makeover

Corner of Plaid and Paisley - Easter in the Garden

The Little Yellow Corner Store - Easter Bonnet Bunny Tablescape

Red Cottage Chronicles - Easter Tablescape Ideas: A Charming Pink and Green Table for Spring

Dinner at Eight - Springing into View - A Blossoming Table

Thrifting Wonderland - Simple Spring Tablescape Ideas

 As an Amazon Associate I earn from qualifying purchases.

This post is linked to: Tablescape Thursday 

Friday, March 28, 2025

Pineapple Cucumber Fiesta Salad

Pastels are undeniably the hues of spring, effortlessly weaving their charm through Easter and Mother’s Day celebrations. This salad is a stunning addition to your table, perfect for any occasion you choose. It’s cool, refreshing, and packs a delightful punch courtesy of jalapeño and chili lime seasoning. If you prefer a milder flavor like I sometimes do, simply remove the seeds and ribs from the jalapeño before mincing. Its eye-catching appeal deserves a clear dish to showcase its beauty—your guests won’t be able to resist! Pineapple Cucumber Fiesta Salad

2 c. cubed
Melissa’s Pinkglow Pineapple*
3 Melissa’s organic mini cucumbers, sliced into thin coins
¼ c.
Melissa’s organic red onion, finely minced
1 small Melissa’s jalapeño, finely minced
¼ c. Melissa’s fresh cilantro, chopped
Juice of 1 lime
1 T. honey
¼ t. salt
¼ t.
Melissa’s Chili Lime Seasoning

In a large mixing bowl, combine the cucumber, pineapple, jalapeño, red onion, and cilantro. Toss gently to mix.

In a small bowl, whisk together the lime juice, honey, salt, and Melissa’s Chili Lime Seasoning until smooth.

Pour the dressing over the salad and toss thoroughly to coat all ingredients evenly.

Chill in the refrigerator for 30 minutes to let the flavors meld. Serve fresh, and store any leftovers refrigerated for up to two days. 

 
*I opted for pink pineapple here because the pink-and-green palette is simply irresistible. A classic yellow pineapple works just as well—your salad will still dazzle in both flavor and presentation.

Thursday, March 21, 2024

Country Bunnies Tablescape

 
This table is set for a country Easter brunch. I started with the rustic bunnies holding faux hydrangea blossoms, and glazed pitcher, filled with faux grasses for the centerpiece, and went from there.
This table setting came together very quickly, because I used so many elements from my previous table. Let this be a lesson to you, a few changes, particularly where color is concerned, and you have an entirely different look.
 
 The plate stack features a variety of colors and textures. The chargers are Bordallo Pinheiro cabbage plates, topped with Amelie Versailles dinner plates in white, topped with bamboo salad plates, topped with a Blue Ombre appetizer plate by Pfaltzgraff in their “Logan” pattern, on top of which I have lovely vintage glass tea cups with matching saucers, perfect for holding a cup of cold summer soup prior to the meal. That is quite a descriptive sentence, and quite a plate stack, isn’t it?

 
My mother made the sweet bunny napkins many years ago. I had completely forgotten about them until I started digging around in the Easter decorations and there they were. I’m so happy to have them at my table.
 
 The silver, freshly polished, is by International in the “Contessa” pattern. A friend gifted it to me, and I absolutely love it. I am one of those people who does not mind at all polishing silver.
 
The cups are simple white cappuccino cups, the water glasses Villeroy & Boch.
Overnight guests gifted the pale green teapot to Jim and me years ago. The country cottage sugar and creamer set belonged to my mother. I had no idea that she had this set until I unearthed it when I was emptying out her and dad‘s house. I have had them on display in my home ever since.
 
I think you will agree that this is a charming and serene table for an Easter brunch.

 s an Amazon Associate I earn from qualifying purchases.


Friday, March 31, 2023

M&M Sugar Cookies

 In my Easter themed Table for Two tablescape, you may have noticed the pastel M&Ms in the bunny egg cups. I had a lot of those left over, and was looking for something to do with them, rather than just eating them straight out of the bag. I’ve always enjoyed M&M cookies, and recently had one from the bakery, that, instead of being made with dough similar to that of a chocolate chip cookie, was made of sugar cookie dough. I thought that was a great idea, so I combined a favorite sugar cookie recipe and the M&Ms, and this is the result. Imagine how cute these would be stacked in a cello bag with a pastel ribbon tied around the top to take as a hostess gift, put in Easter baskets, or at each place setting at your Easter dinner.

M&M Sugar Cookies

1 c. butter, softened
1 1/2 c. sugar plus more for rolling.
2 large eggs
2 t. vanilla extract
1 t. almond extract
3 c. flour
1 t. baking soda
1/2 t. baking powder
1/4 t. kosher salt
 One bag pastel M&Ms

  Preheat the oven to 375°F. Spray baking sheets with PAM, or line with a Silpat; set aside.

 In the work bowl of a stand mixer fitted with the paddle attachment, beat together butter and sugar until light and fluffy, 2 to 3 minutes. Add eggs, one at a time, mixing well after each addition; add vanilla and almond extracts, mix well.

 Sift together flour, baking soda, baking powder, and salt; add to creamed mixture, blending until combined.

 Using a 2 tablespoon cookie scoop, scoop out balls, roll in granulated sugar, flatten slightly, and place on prepared baking sheet spacing 1½” – 2” apart. Press 5 to 6 M&Ms into the top of each cookie. Bake for 9 – 12 minutes. Remove from oven and allow to cool five minutes before removing to a wire rack to cool completely.


As an Amazon Associate I earn from qualifying purchases.


Wednesday, March 29, 2023

King’s Hawaiian Cheesecake Danish

In the past, I have not been at all enamored with the phenomenon known as King’s Hawaiian sweet rolls. I think that’s probably because the first time I had them was part of a dinner, and there was something about a puffy sweet roll with a savory meal that left me cold. (Me, the fan of crusty rolls with dinner.) But recently, having tried the turkey cranberry sliders as well as beef sliders, both of which employ the use of this roll, I have done a complete 360. When I spotted cheese danish using them, I had to give it a try.

 There are a number of recipes online for these, none of which, I think, are as good as mine. These are relatively easy to assemble, and would be perfect to treat mom on Mother’s Day. Various components can be assembled the day prior to baking. You can even slide the rolls out of the package, cut your “X“ in each, and slide them back in, and no one would be the wiser.

King’s Hawaiian Cheesecake Danish

1 12-pack King's Hawaiian original sweet rolls

1/2 c. + 2 T. butter melted

3 T. brown sugar

2 t. ground cinnamon

¼ t. ground nutmeg

8 oz. cream cheese, softened

¼ c. granulated sugar

¼ t. almond extract

1 large egg, beaten

 Preheat oven to 375°F. Melt 2 T. butter and brush evenly along the bottom and up the sides of a 10” x 10” baking dish; set aside.

Separate the rolls and place into prepared pan. With a sharp knife (I used a fish boning knife), cut an “X” into the top of each roll about 2/3 of the way down.

 Stir together the 1/2 cup butter, brown sugar, nutmeg, and cinnamon in a small bowl; pour evenly over the rolls. Beat the softened cream cheese until smooth. Add sugar, almond extract, and egg, and beat until incorporated.

Transfer cream cheese mixture into a piping bag fitted with a wide tip. Press the tip down into the “X” that you created in each roll, and pipe full. You will see the roll expand as it fills with the delicious cheesecake filling.

 Bake, uncovered, for 12 to 15 minutes. In order to prevent sticking, allow rolls to cool for a couple of minutes, and then remove to a serving plate. Serve warm.

Tuesday, March 14, 2023

Carrot Dip

I don’t know about the rest of you, but I love cookbooks; I tend to read them like a novel. A couple of weeks ago my aunt, who is purging things, gave me a stack of cookbooks, and I have been having great fun. Not only did she give me full-sized hardback cookbooks, but also those small, soft cover cookbooks from Pillsbury and other companies that always appear (or used to appear, are they still there?) at the checkout stand at the market.

Because I went a little crazy chopping carrots, I had plenty left over to try this dip recipe that I found in a small cookbook from Midwest Living. Whether you’re a fan of carrots, or not, you will love the freshness of this tasty dip. I enjoyed it with crackers, but I also loved it with crudites (green pepper in particular), and used it as a sandwich spread. It made excellent tea sandwiches!

Carrot Dip

½ c. sour cream
4 oz. cream cheese, softened
¼ c.
Duke’s mayonnaise
2 t. soy sauce
1½ t. prepared horseradish
¼ t. salt
¼ t. freshly ground black pepper
1½ c. finely shredded carrots
½ c. chopped scallions

In a medium mixing bowl, beat together, sour cream, cream cheese, mayonnaise, soy sauce, horseradish, salt, and pepper until smooth. Fold in carrots and green onions. Cover and chill for 4 to 24 hours. Stir before serving. Makes about 2 cups.

As an Amazon Associate I earn from qualifying purchases.


Friday, March 10, 2023

Carrot Zucchini Bread with Raisins and Walnuts

Let me preface this by saying that this is going to sound a little crazy. Bear with me. For the past 25 years, I have owned various food processors that, for one reason or other, have not contained a shredding disc. I never really considered that to be of great importance until my most recently purchased food processor (read: about 10 years ago) conked out and I had to get a new one. I decided to get one with a little larger bowl due to reasons I will not disclose here. It came with both a slicing and shredding disc, so I decided to give that shredding disk a workout. I couldn’t believe all that I had been missing over the years. Somehow I felt as though life had shortchanged me. Suffice it to say that within the course of about five minutes I had shredded 4 pounds of carrots. Don’t ask me why. I just couldn’t believe the speed at which I was getting this done. It never occurred to me that I was actually going to have to use those carrots. As a consequence, I have been making carrot EVERYTHING. First stop is this delicious, carroty, appropriately seasonal zucchini bread. It is loaded with so many delicious bits and bobs, that it just has to be good for you. As far as the taste, fabulous!

Carrot Zucchini Bread with Raisins and Walnuts

1½ c. flour
½ t. salt
½ t. baking soda
½ t. baking powder
½ T. ground cinnamon

¼ t. allspice
1/8 t. cloves
2 large eggs
½ c. vegetable oil
¾ c. granulated sugar
½ c. brown sugar, packed
½ T. vanilla extract

1 c. grated zucchini

1 c. grated carrots

½ c. golden raisins

½ c. chopped walnuts


Preheat oven to 325° F. Spray a
9” x 5” loaf pan with Baker’s Joy.

In a medium bowl, sift together flour, salt, baking powder, baking soda, cinnamon, allspice, and cloves; set aside.

In a large bowl beat together eggs, oil, vanilla, and sugars until creamy. Add sifted ingredients to the creamed mixture, beating well. Fold in zucchini, carrots, raisins, and nuts. 

Pour into prepared pan. Bake for 55 to 60 minutes or until loaf tests done. Cool in pan for 20 minutes. Remove to wire rack to cool completely.

As an Amazon Associate I earn from qualifying purchases.


Tuesday, April 5, 2022

Peanut Butter Heavenly Hash Squares

Easter is on the way and, as usual, thoughts of the heavenly hash eggs that I would annually give to my dad, come to mind. He loved his sweets, particularly when studded with marshmallows and nuts. I added peanut butter to this version, taking it over the top. Dad would have loved it!

Peanut Butter Heavenly Hash Squares

 1 11-oz. bag semisweet chocolate chips

1 11-oz. bag butterscotch chips

1 c. Jif peanut butter

½ c. roughly chopped pecans, toasted

2 c. mini marshmallows

 Prepare a 9” x 9” baking pan by lining it with parchment paper, allowing 2”-3” excess to hang out over two sides of the pan. This will allow you to lift the whole block out of the pan once it has cooled, making slicing a breeze.

Prepare a makeshift double boiler by using a 6-quart saucepan half full of water, and a large metal mixing bowl. Into this bowl place chocolate chips, butterscotch chips, and peanut butter. Stir with a wooden spoon until the mixture has melted. Add the marshmallow and nuts, folding them together until they are well coated.

Pour the mixture into the prepared pan, smoothing it out, and flattening the top as well as you are able. Allow the chocolate to firm at room temperature before slicing. Do not refrigerate at this stage, or you whist risk getting white streaks in your chocolate.

Once it has firmed (3 - 4 hours on the countertop) you may then store in the refrigerator in an airtight container.


As an Amazon Associate I earn from qualifying purchases.


Tuesday, March 30, 2021

My Mom’s Raspberry Cream Cheese Coffee Cake

This post contains affiliate links.

There are a number of reasons why I am not going to be celebrating Easter this year with a brunch or dinner, none of them particularly interesting. I will say that last weekend I had my aunt over for Palm Sunday brunch, reminiscent of those that my mother used to host. I used a combination of both her and my recipes, as well as her decorative pieces. The food was delicious, and we waxed nostalgic over a box of family photos that I had found in her bottom desk drawer when I cleared out her and dad’s house.

One thing that she served every year without fail was Raspberry Cream Cheese Coffee Cake. People would get pretty surly if she didn’t. One taste and you will know why, it is delicious! Here’s her recipe.

 My Mom’s Raspberry Cream Cheese Coffee Cake

For cake:
2¼ c. flour
¾ c. sugar
¾ c. unsalted butter
½ t. baking powder
½ t. baking soda
¼ t. salt
¾ c. sour cream
1 egg
1 t. almond extract

For filling:
1 8-oz. pkg. cream cheese, room temperature
¼ c. sugar
1 egg
2/3 c. raspberry preserves

For topping:
1/2 c. sliced almonds

Preheat oven to 350°F. Spray the bottom and sides of a 9-inch spring-form pan with Baker’s Joy.

In the work bowl of a food processor combine flour and 3/4 cup sugar. Pulse until blended. Add butter and pulse until mixture resembles coarse crumbs; reserve one cup crumb mixture. To remaining crumb mixture and baking powder, baking soda, salt, sour cream, one egg, and almond extract. Pulse until dough forms (It will be slightly sticky.).

Spread dough over the bottom and up 2 inches of the side of the prepared pan. Batter should be about 1/4 inch thick on the sides.

In a small bowl combine cream cheese, 1/2 cup sugar, and one egg; blend well. Pour cream cheese mixture over batter in pan. Carefully spoon preserves evenly over cheese filling.

In a small bowl, combine the 1 cup reserve crumb mixture and sliced almonds. Sprinkle over top. Bake for 45 to 55 minutes or until cream cheese filling is set, and crust is a deep golden brown. Cool 15 minutes. Remove sides of pan and cool completely. Cut in wedges; serve.


Friday, March 12, 2021

Shallot, Mushroom, and Ricotta Florentine Egg Skillet

This post contains affiliate links.  


When I get up in the morning, I generally hit the ground running, mug of coffee in hand. The last thing on my mind is spending time in the kitchen making myself a hearty breakfast. That’s not to say that I don’t like a hearty breakfast, mind you, it just says that I have no one to make it for me. When I’m interested in having breakfast food, I tend to have it more often for dinner than at any other time of the day. If you feel the same, then this delicious egg skillet dish is going to appeal. Outside of chopping, there isn’t a whole lot to it, it goes together in a flash, and is wonderfully tasty, particularly with a slice of ham or a couple of strips of bacon on the side. It reheats well, so if there are only a couple of you, you can have this for dinner one day, and for breakfast the next. You can also have it for breakfast, of course, if you feel inclined to make it.


Shallot, Mushroom, and Ricotta Florentine Egg Skillet

4 large eggs
¼ c. whole milk
¼ c. ricotta cheese
2 T. cornstarch
¼ t. fine sea salt
Pinch cayenne pepper
Few gratings fresh nutmeg
2 T. butter
2 T. extra virgin olive oil
2 Melissa’s shallots, sliced
1 c. sliced Cremini mushrooms
½ c. thinly sliced deli ham
 1 c. chopped fresh spinach


Preheat oven to 375° F.

In a medium bowl, whisk eggs until frothy. Add milk, ricotta cheese, cornstarch, salt, cayenne, and nutmeg, and whisk again until there are very small lumps of ricotta and cornstarch.

Melt butter and oil together in a 10-inch ovenproof skillet over medium heat. Add shallots, mushrooms, and ham, and sauté until shallots are soft and translucent, stirring frequently. Add the spinach and cook until wilted, about one minute. Remove from heat, spread mixture evenly over the bottom of the pan, and pour egg mixture over the top.

Bake for 15 minutes at 375° F, and then increase the oven temperature to 400° F and bake for an additional 10 minutes, until the eggs are puffed and set in the center. Serve immediately.