Showing posts with label my mom's recipes. Show all posts

Friday, December 16, 2022

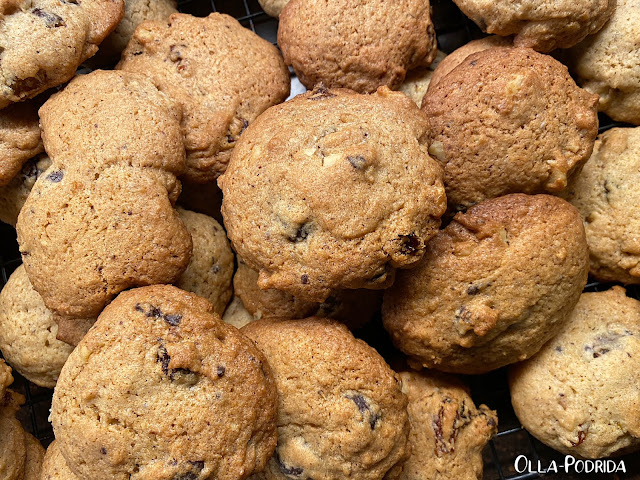
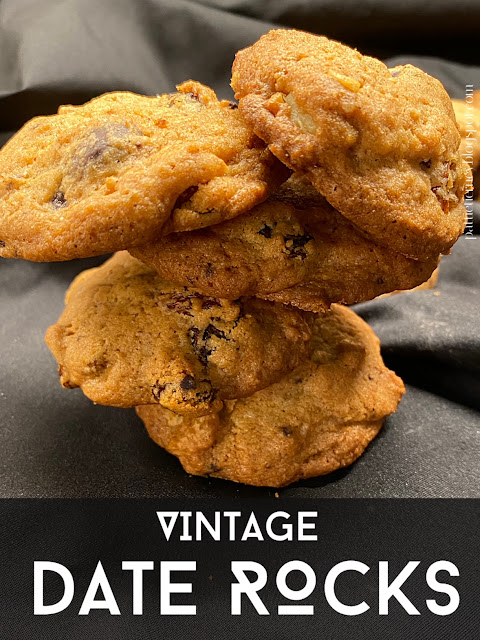
Date Rocks

When I was a little girl I used to enjoy going through my mother’s recipe box. I loved seeing all of the different styles of handwriting, looking at all of the different recipes, and particularly enjoyed the various types of stationery on which they were written. In one of my more creative moments, much to my mother’s dismay, I organized them by stationery category (matching the various types of recipe cards to each other, fold-a-notes, note cards, etc.) rather than by recipe type. It took her quite a while to get things back in order.

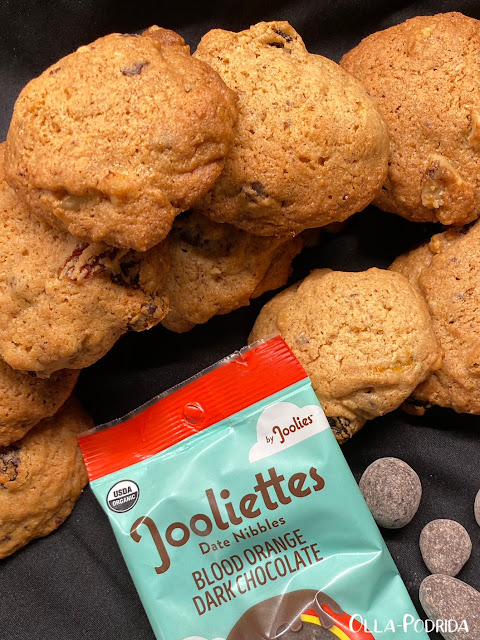
One of the recipes that I found, during that particular flight of fancy, was one that had been given to her by her sister. It was for a cookie called Date Rocks. I couldn’t imagine what those cookies tasted like, and wondered if they were as hard as the name indicated. It wasn’t until recently that I came across it again and decided to give it a try. As I often do, I changed things up a bit using Blood Orange Dark Chocolate-Covered Jooliettes Dates in place of plain ones. Wow! These are really delicious.

Date Rocks

 1½ c. brown sugar

1 c. butter, softened

3 eggs, room temperature

1 t. vanilla extract

3 c. flour

2 t. baking powder

½ t. baking soda

1 t. kosher salt

1 t. ground cinnamon

1/8 t. cloves

1 c. raisins

¾ c. Blood Orange Dark Chocolate-Covered Jooliettes Date Nibbles

1 c. walnuts

 Preheat your oven to 350°F. Line baking sheet with parchment paper or a Silpat; set aside.

 In a large bowl, cream together the softened butter and brown sugar. Add eggs and vanilla; beat to combine. Add flour, baking powder, baking soda, cinnamon, and cloves and beat to incorporate. Fold in raisins, dates, and walnuts.

Drop the batter onto prepared sheet (I used a cookie scoop), and bake for 15-17 minutes. Remove to a wire rack to cool.

  As an Amazon Associate I earn from qualifying purchases.


Wednesday, March 9, 2022

Cheese and Spinach Pie

I was rummaging around in my mother’s old recipe box, as I occasionally find myself doing, and came across one of her handwritten recipes. It was written on the front and back of two 3" x 5” index cards. The fact that my mother had written this out by hand in such length indicated to me that she really liked it. The recipe was for Cheese and Spinach Pie. The recipe called for a homemade double crust piecrust. Nope. Not having it. I don’t make piecrust unless I absolutely have to (a gun is being held to my head, for example), and it seemed to me that using it in this recipe would be way too carb-laden. So I kept the filling as is, and decided to use puff pastry instead. The result was wonderful.

 This is like nothing I have ever experienced before. My friend Alycia (of the Tablescapes at Table/Twenty One blog) asked me if it was more like quiche, or more like spanakopita. Truth be told, it’s not like either one of those things. This is something unique. I enjoyed it as a main dish for dinner one night, and the next day I had it for breakfast. Naturally, it would work well for lunch. It keeps in the refrigerator, for a couple of days, but when you reheat it, make sure you do so in the oven so as not to make the crust soggy.

Cheese and Spinach Pie

3 T. butter
1 medium onion, minced
2 garlic cloves, minced
1 10-oz. pkg. frozen chopped spinach, thawed and drained
1 8-oz. pkg. shredded mozzarella cheese
1 15-oz. container ricotta cheese
¾ c. dried breadcrumbs
1 t. chopped fresh dill (or ½ t.
dill weed)
5 large eggs, separated
1 t. salt
Pepper, to taste
One sheet frozen puff pastry

In
4-quartsaucepan over medium heat, melt butter. Cook onion and garlic in melted butter until tender, stirring often, about 10 minutes. Remove from heat and stir in spinach, mozzarella, ricotta, breadcrumbs, dill, four egg yolks, and salt.

Beat five egg whites until stiff peaks form. With wire whisk, gently fold egg whites into cheese mixture until well blended; set aside

Preheat oven to 400° F. Roll one sheet of puff pastry into a 12” x 12” square. Place it into a 9-inch deep-dish pie pan. Spoon spinach mixture into the center of the puff pastry, and smooth out. Lift each corner of the puff pastry over the filling to the center until all corners meet. Combine remaining egg yolk with 1 teaspoon of water and brush over pastry.

Bake for one hour or until knife inserted into center comes out clean.


As an Amazon Associate I earn from qualifying purchases.
 

Friday, April 9, 2021

Honey Cornbread

This post contains affiliate links.

I found a recipe in my mother’s recipe box for Honey Cornbread. It was her “go to“ recipe for cornbread, and my dad's favorite. The problem was, at least for those of us who love to slather on copious amounts of butter and marmalade, is that it always tended to be a bit too crumbly. So I went to work on this. I reduced the amount of cornmeal (the reason for crumbly cornbread), and increased the amount of flour. Perfect!

 This cornbread is a wonderful accompaniment to a bowl of Slow Cooked Pinto Beans, Red Beans and Rice, or, Overnight Slow Cooked Pinto Beans and Rice. It is easy to put together, has a touch of sweetness (I know that cornbread purists cringe at that, but I like it), and is improved with a schmear of butter while warm from the oven.

Honey Cornbread

 1¼ c. flour

¾ c. yellow cornmeal

¼ c. sugar

1 T. baking powder

½ t. salt

2 extra large eggs, room temperature

1 c. heavy whipping cream

¼ c. vegetable oil

¼ c. honey

 Preheat oven to 400°F. Spray a 9" x 9" baking pan with Baker’s Joy; set aside.

 In a small mixing bowl combine flour, cornmeal, sugar, baking powder, and salt. In a small bowl, beat the eggs. Add cream, oil, and honey; beat well. Stir into the dry ingredients just until moistened. Pour into prepared pan.

 Bake for 20-25 minutes or until a toothpick inserted in the center comes out clean. Serve warm.


Monday, February 8, 2021

Connoisseur’s Vegetable Casserole

This post contains affiliate links.


Last month in this post I mentioned that I had gone through my mother’s old recipes. In the doing, I discovered quite a few of my own, including this clever little menu card from Thanksgiving 1999 with one of the recipes from that dinner on the reverse. I had completely forgotten that I had done this, and marveled at my own cleverness and creativity. (Insert wry smile here.) 


Considering that I hadn’t made this dish in over 20 years, I thought it was time. Because I wasn’t going to be serving a crowd, I made a small casserole of it and put what remained into individual ramekins to freeze and use later. As a lover of both vegetables and casseroles, I really enjoyed this and wouldn’t mind having this as a main dish instead of a side. I’m also going to steal my own idea, and have menu cards with a recipe on the reverse the next time I have a friend or two for dinner. You might consider doing the same. In the meantime, make this casserole.

Connoisseur’s Vegetable Casserole

1 12-oz. can shoe-peg corn (white), drained
1 16-oz. can French-cut green beans, drained
1/2 c. chopped celery
1/2 c. chopped onion
1 2-oz. pimientos, chopped*
1/2 c. sour cream
1/2 c. grated sharp cheddar cheese
1 10.75-oz. can cream of celery soup
1/2 t. salt
1/2 t. pepper

Topping
1 c. Ritz cracker crumbs
1/4 c. (1/2 stick) butter, melted
1/2 c. slivered almonds

Preheat oven to 350 degrees F.

Mix all ingredients except topping.  Place in 1.5-quart casserole.

Combine topping ingredients. Sprinkle topping over casserole. Bake for 45 minutes.

*I used 1/4 c. chopped Melissa’s fire roasted red peppers.


Friday, October 23, 2020

The Reimagined Seven Layer Salad


I was talking to friends the other day (at a distance), and asked them if they remembered Seven Layer Salad. Everyone answered enthusiastically in the affirmative. They all loved it; one of them said it was a major staple at every big family gathering. The only problem, another said, was that not everybody liked all of the layers. I got to thinking about that as I was making use of the excess amount of vegetables that I had in the fridge. There is no reason to stick to the rules when cooking, particularly when it comes to salad. Use what you have on hand. If somebody doesn’t like peas, replace it with something they do like. Just be mindful that seven layers is usually enough, it’s helpful to layer different colors (and make sure there are quite a few colors otherwise it will look blah and unappealing), and be certain to have lettuce on the bottom. As far as the dressing, there is a standard dressing, but any of your favorite mayonnaise-based dressings will do. Reimagine what you recall from your youth. I waxed nostalgic as I enjoyed every bite of this salad. I added seasonings, fresh chives, and Dijon mustard to a small amount of ranch that I had left over, and it was wonderful! Below is the recipe from the ‘70s that my mom used to make, but feel free to mix it up to suit you, your family, and friends.

 The Reimagined Seven Layer Salad

 5 c. chopped green leaf lettuce

2 c. halved cherry tomatoes

2 c. white corn

1 (12-ounce) pkg. frozen green peas, thawed

2 c. chopped radishes

2 c. diced cucumber

Seven-Layer Salad Dressing (see below)

Garnish: shredded Cheddar cheese, crumbled cooked bacon

In a 3 ½-quart glass bowl, layer lettuce, tomatoes, bell pepper, peas, radishes, and cucumber. Top with dressing, spreading to edges to seal. Cover, and refrigerate for 4 hours to overnight. Garnish with cheese and bacon, if desired.


Tuesday, July 7, 2020

Ham and Vegetable Linguine

This post contains affiliate links.
With all of the fresh produce currently available, I must confess to often (read: always) going slightly overboard (read: run amok) when making a purchase. Let’s face it, it all looks so delicious and tempting that I tend to forget I’m not cooking for an army when I buy bag upon bag of fresh corn, zucchini, asparagus, onions, and anything else that I can lay my hands on. It’s times like these when I’m thankful for this recipe of my mother’s.

Mother never particularly liked pasta, unless it was full of vegetables, because vegetables were one of her favorite foods. This recipe is perfect for the summer when fresh and varied produce is in abundance.
Ham and Vegetable Linguine
 
1 8-oz. pkg.
linguine
¼ c. butter
½ lb. fresh
Melissa’s asparagus, cut into 1” pieces
½ lb. fresh mushrooms, thinly sliced
1 medium carrot, cut julienne
1 medium zucchini, cubed
2 cloves garlic, minced
8-oz. deli ham, cut in thin strips
1 c. heavy cream
½ c. frozen peas
3 scallions, sliced
¼ c. grated Parmesan cheese, plus more for garnish
1½ t. dried basil
¾ t. salt
1/8 t. freshly ground nutmeg
Freshly ground black pepper

Cook linguine according to package directions. While pasta is cooking, melt butter over medium-high heat in a
12" sauté pan. Sauté the asparagus, mushrooms, carrots, zucchini, garlic, and ham in the butter until the vegetables are tender.

Add the cream, peas, scallions, Parmesan cheese, basil, salt, nutmeg, and pepper; bring to a boil. Reduce heat; simmer for three minutes or until heated through, stirring occasionally.

Rinse and drain linguine. Add to vegetable mixture and toss to coat. Sprinkle with additional Parmesan cheese, if desired.

Makes four servings.


Tuesday, October 15, 2019

Aunt Gladys' Disappearing Chili Sauce

This chili sauce has a unique history. It came from my great aunt Gladys on my father's side (where she got it I do not know). Aunt Gladys passed it to my mother after she had tasted it during a visit to their Oklahoma home. I remember I was about four at the time, and was quite taken with their lovely home that included a vast rose garden and walk-in freezer. You might want to read those last couple of words again. My mother was in absolute heaven at the thought of a walk-in freezer. She was an avid maker of pies, and could envision them all stacked up waiting to be baked at some future point.

After we concluded our visit and returned home, my mother made the chili sauce. She loved it, I loved it, everybody loved it. Next year, following a bumper crop of tomatoes, she decided to make it again, but couldn’t find the recipe. That recipe stayed hidden for the next decade or so. Aunt Gladys had passed away at that point, and no one knew what had become of it.

Fast forward five more years when my mother pulled out an old cookbook to use, and found the chili sauce recipe that she'd apparently used as a bookmark. Immediately, she sat down, wrote out a copy, and gave it to me for safekeeping, just in case she lost it again. After my mother passed away, I had such a taste for that chili sauce that I went in search of my copy, but, alas, couldn’t find it. About a year ago, I did. It was during the winter, so I decided I was going to put it somewhere for safekeeping so as not to have it escape me during the summer. You know what I’m going to say here, right? I did lose it. Then I found it, and then I lost it again.

When I finally found it for the last time I decided that I was going to do something so as to prevent this from ever happening again -- I framed it. It is now hanging on the wall in my kitchen where I see it every day, and am thankful for my mother, my aunt, and a family history that caused such a stir. Because it gives me such a warm feeling every time I see it, I encourage you to consider giving one of your old family recipes this same treatment, and if you do, I would like to hear about it.

Come back tomorrow for the chili sauce recipe in readable form with my delicious adjustments.


This post contains affiliate links.

Thursday, February 14, 2019

Mandarin Salad


With Chinese New Year coming to an end for 2019 on the 15th of this month, I thought it would be fun to share a few appropriate dishes. No, the salad has absolutely nothing to do with Chinese New Year, but the word “ mandarin” in the name made it appropriate enough for me. This recipe goes back to the ‘70s. My mother made it frequently, and everybody always enjoyed it, even salad snobs like the often-picky Mr. O-P really liked this salad.

One of the reasons that it is so universally liked is that it is light and refreshing, and goes very well with a variety of meals, particularly those that are a bit on the heavy side. You might turn up your nose at iceberg lettuce (reference the picky Mr. O-P comment above), but you shouldn’t here. The crunch of the iceberg lettuce along with the celery is quite pleasant, and offsets the citrus-y sweetness of the oranges, the peppery kick of the scallions, and the wonderful toffee chewiness of the almonds. The dressing is flavorful, but not overpowering, particularly if you happen to use too much. In this case you simply cannot.
Mandarin Salad

Salad
1 head iceberg lettuce
2-3 scallions, white and green parts, chopped
1 cup chopped celery
1 15-oz. can Mandarin oranges, drained

Mix above ingredients together in a large bowl. Add dressing, toss, and garnish with almonds. Serve immediately.

Dressing
1/4 cup vegetable oil
2 tablespoons
rice vinegar
2 tablespoons granulated sugar
1/2 teaspoon salt
Few gratings fresh black pepper
3 to 4 drops
hot sauce
2 tablespoons fresh parsley, chopped

Mix above ingredients together in a mason jar, put the lid on, and shake for all you’re worth. Store in refrigerator until ready to use.

Almonds*
1/2 cup
slivered almonds
2 tablespoons granulated sugar

Stir almonds and sugar together in a skillet over low heat until sugar melts and almonds are a light toasty brown. Remove from pan to plate and allow almonds to cool slightly; break into clusters.

*To see a tutorial on this, click here.

Another delicious use of mandarin oranges is this Thai Chicken Salad with Spicy Peanut Dressing.


This post contains affiliate links.

Friday, December 14, 2018

Prosperity Sandwiches


I am happy to say that the Meal Plan I set out for myself at the beginning of the week worked exceptionally well, so I plan to continue this. One of the things I found curious was the number of you who asked me about the Prosperity Sandwich. I suppose when you grow up with something it never occurs to you that that something may be a regional dish that no one else has heard of. So, growing up with pork steaks, toasted ravioli, and gooey butter cake, it never once occurred to me that these were all St. Louis things, as is the Prosperity Sandwich. It dates back to the 1920s with origins at the Mayfair Hotel in St. Louis. The recipe was published years ago in the St. Louis Post-Dispatch, and has long been enjoyed by people in the area.

I remember my mother making this a lot in the 70s. It is a wonderfully satisfying hot sandwich, perfect for serving to a group of ladies at a luncheon because everything can be made ahead. The sauce can be made the day before and reheated, the bread can be toasted ahead of time, the tomatoes sliced, the meats sorted, and bacon (my mother’s addition) can be made a day ahead and then placed on top of each serving prior to sliding it under the broiler. Rustic bread works the best, but in a pinch it can be served over sandwich bread toast points. This knife and fork sandwich is also a hearty meal, so you won’t need to serve anything else with it.
Prosperity Sandwiches
 As appeared in the St. Louis Post-Dispatch
Serves 4

5 tablespoons unsalted butter
8 oz. white mushrooms, trimmed and sliced thin
1
Melissa’s shallot, minced
½ teaspoon salt

¼ cup flour
2 cups whole milk
8 oz. cheddar cheese, shredded (2 cups)
2 teaspoons Dijon mustard
2 teaspoons Worcestershire sauce
½ teaspoon pepper
4 (3/4-inch-thick) slices rustic white bread
8 ounces thinly sliced roast turkey
8 ounces thinly sliced deli ham
2 tomatoes, cored, cut into 8 (1/4-inch-thick) slices, and patted dry

Melt 1 tablespoon butter in large saucepan over medium-high heat. Add mushrooms, shallot, and salt and cook, stirring occasionally, until well browned, 5 to 7 minutes. Transfer to bowl.

Melt remaining 4 tablespoons butter in now-empty saucepan over medium heat. Stir in flour and cook for 1 minute. Slowly whisk in milk and bring to simmer. Reduce heat to low and cook, stirring occasionally, until thickened, 4 to 6 minutes. Off heat, stir in 1/2-cup cheddar, mustard, Worcestershire, and pepper; set aside.

Adjust oven rack 5 inches from broiler element and heat broiler. Line rimmed baking sheet with aluminum foil and spray with vegetable oil spray. Arrange bread slices on prepared baking sheet and broil until toasted, 1 to 2 minutes per side.

Place bread slices into individual au gratin dishes. Divide mushroom mixture among toasted bread slices. Arrange 2 ounces turkey, 2 ounces ham, and 2 slices tomato over mushrooms on each slice of toast. Spoon 1/2-cup cheese sauce evenly over each sandwich and sprinkle with remaining 1 1/2 cups cheddar. Broil until cheddar is browned, 3 to 5 minutes. Let cool for 5 minutes. Serve.

Another crowd-pleasing hot ham sandwich is this Open Faced Ham Sandwich.


This post contains affiliate links.

Thursday, July 12, 2018

Toffee Almonds


Back in the 70s, my mother used to make Mandarin Orange Salad. You may be familiar with it; it was comprised of lettuce, celery, chopped scallions, and mandarin orange segments, all tossed together in a light dressing along with toffee almonds. I loved that salad, but in my opinion, the toffee almonds were what made it. One time, she made the salad without those almonds, and it just wasn’t the same.

As a young person (and I was young once), I figured they were complicated to make. I mean, just look at them, they look like something you would find in specialty candy! But the fact of the matter is, they are very simple to make, and I wished I had asked my mother how to make them long before I actually did. There’s no need to provide you with a recipe for this, printable or otherwise, because it’s only two ingredients: sugar and almonds, at a ratio of 2:1.
Just place twice as many slivered almonds as sugar into the pan (Here I used 1/8 cup of sugar (2 tablespoons) to 1/4 cup of almonds), and set the burner to medium high.
Stir until the sugar melts and coats and toasts the almonds.
The aroma is incredible! Turn them out onto a cool plate to harden, and then break them apart.
So good! You may want to make a lot of these.You will certainly need them for tomorrow's recipe!

Candied Pecans and Vanilla Walnuts are also worth trying.


This post is linked to:

This post contains affiliate links.

Thursday, July 5, 2018

Oven Chicken Kiev


It was only on the most special of occasions that my mother made Chicken Kiev. When she did, it took her the entire day, so she would make a lot of them. Generally, she would make them for a fancy dinner that she and my dad would serve to their friends. Because she knew I loved it so much, she would make three extras to serve us for dinner the day before. Dad and I never minded having the same thing two nights in a row when it was something we loved. 

She would de-bone her own chicken breasts (back then it wasn’t all that easy to find chicken breasts without bones), flatten them, fill them with parsley, scallions, and butter, roll them up as tightly as she could, and then roll them in a crumb coating. Then, of course, they had to be deep-fried. I remember that I always got the job of doing dishes, and I hated cleaning that deep fryer. As much as I loved it when she would drag it out because I knew that something good was to be had, I hated emptying that oil (that I usually poured all over the counter and had a devil of a time getting up), and then trying to scrub that thing clean while keeping the plug end out of the hot soapy water.

So, when this recipe fell into mother‘s lap, the deep fryer was put away for good. No, this oven version is not as good as the deep-fried version, but it goes together quickly, is tasty and satisfying, and is company worthy, and it’s tough to beat all of that. Because you all seemed to enjoy my
Chicken Piccata recipe so much, I thought I would share this one with you as well. It’s a keeper!

(As I always tell you, and it is so important here, marinate your chicken in buttermilk overnight for the juiciest most succulent results.)
Oven Chicken Kiev
(My momma’s recipe)

2 whole, boneless, skinless chicken breasts
2/3 cup butter
3/4 cup Italian breadcrumbs
2 tablespoons Parmesan cheese
1 teaspoon dried basil
1 teaspoon dried oregano
1/2 teaspoon garlic salt
1/2 teaspoon onion powder
1/4 teaspoon salt
1/8 teaspoon freshly ground black pepper

1/4 cup dry white wine
1/4 cup chopped scallions
1/4 cup minced parsley

4 pats of butter

Preheat oven to 375° F. Spray a baking dish with Pam; set aside.

Butterfly and halve chicken breasts (you learned how to do that
here). Melt butter in a metal or glass pie pan. In another metal or glass pie pan combine breadcrumbs, cheese, basil, oregano, garlic salt, onion powder, salt, and pepper. Dredge each chicken breast half, first in butter, then in the crumb mixture, coating well. Place chicken breasts into prepared baking dish. Bake, uncovered, for 50 to 60 minutes until juices run clear.

While chicken is baking, stir together wine, scallions, and parsley. During the last 10 minutes of baking, pour this mixture on top of the chicken, top each with a pat of butter, and return it to the oven.


Another easy, company-worthy chicken dish is this Asparagus and Mushroom-Stuffed Chicken. So good, and makes such a beautiful presentation.


This post is linked to:

This post contains affiliate links.