Tuesday, April 11, 2017

Chocolate-Bourbon Pecan Pie (or something vaguely similar)


Those of you who follow me on my personal Facebook page, are well aware that I am a bit of a reluctant baker, and often end up with disastrous results. It's probably because, as I've said so many times, I don't like to bake, but I do like to make people happy. So when I go out to have lunch with my dad, I like to take him something special. And by special, I mean good. And by good, I mean edible.

Pretty much these days, if I make a dessert, I'm happy enough if it's edible. I just don't like doing it. This morning when I got up I decided I was going to take my dad a pie. I'm always going through dessert recipes, I print out a lot of them, and set them aside for making later. This morning, while rifling through my stack, I saw a recipe for something I thought dad would like. It was called Chocolate-Bourbon Pecan Pie. Chocolate. Bourbon. Pecan pie. What's not to like there? Pecan Pie is one of my dad's favorites, so I thought I would give this recipe a try.
I started off making the piecrust. I had it in the pan, the edges not fluted as expertly as they could have been, and headed for the freezer to get out some pecans to toast. It was then that I realized that I didn't have any pecans. I had three brand-new bags of walnuts, but no pecans. So, I thought to myself, does it really make that much difference? I mean, nuts are nuts, right?
So I used the original recipe and just substituted walnuts for the pecans. That done, I reached into the pantry for semisweet chocolate chips to pour into the crust along with the pecans, err, walnuts. It was then that I realized that I didn't have chocolate chips either. Well, I had chocolate chips, just not semisweet chocolate chips. 

I have entire shelf in my pantry full of baking chips. I have cinnamon chips, pumpkin chips, white chocolate chips, salted caramel chips, Butterfinger chips (Yes, they make those, but I haven't tried them yet, I'll report.), mini M&Ms, Bits of Brickle (both with chocolate coating and without), and I also happened to have a few remnants of mini chocolate chips, and milk chocolate chips. So, in place of the 1 cup of semisweet chocolate chips that the recipe called for, I emptied the bag of mini chocolate chips into a measuring cup (it came up about 1/4 of the way), then I emptied the rest of the milk chocolate chips into that same measuring cup (bringing the measurement to 1/2 cup), and then I reached for the Bits of Brickle (those covered in milk chocolate), and dumped enough in to fill up the cup. Huzzah! I sprinkled this creative mixture on top of the toasted walnuts, and then continued on with the recipe as written.


 As it turned out the pie was pretty darn good. Dad was more than happy with it, but that in itself is no recommendation, because he is a guy who eats a lot of Marie Calender and Aunt Jemima frozen meals. At any rate, the original recipe, a product of Southern Living, is below. The reason I shared this story is so that you won't be held hostage by recipes for which you may not have the exact ingredients. Feel free to use my example, or make some substitutions of your own. As long as the ingredients for the custard are there, you really can get a little creative in a pinch, as long as you substitute cup for cup.
Chocolate-Bourbon Pecan Pie
As seen in Southern Living  

1/2 (14.1-ounce) package refrigerated piecrusts (or make your own, please make your own)
 1 1/2 cups chopped toasted pecans
1 cup (6 ounces) semisweet chocolate morsels
1 cup dark corn syrup
1/2 cup granulated sugar
1/2 cup firmly packed light brown sugar
1/4 cup bourbon or water
4 large eggs
1/4 cup butter, melted
2 teaspoons plain white cornmeal
2 teaspoons vanilla extract
1/2 teaspoon table salt

Preheat oven to 325°F. Fit piecrust into a 9-inch deep-dish pie plate according to package directions; fold edges under, and crimp. Sprinkle pecans and chocolate evenly onto bottom of piecrust.
Stir together corn syrup and next 3 ingredients in a large saucepan, and bring to a boil over medium heat. Cook, stirring constantly, 3 minutes. Remove from heat.

Whisk together eggs and next 4 ingredients. Gradually whisk one-fourth of hot corn syrup mixture into egg mixture; add to remaining hot corn syrup mixture, whisking constantly. Pour filling into prepared piecrust.

Bake at 325° for 55 minutes or until set; cool pie completely on a wire rack (about one hour).

This post is linked to:

Saturday, April 8, 2017

Coconut Bunny Cakes


I don't know what it is about Nordic Ware pans, but we just don't get along. Having seen little bunny cakes on other blogs, I caved and bought this Nordic Ware bunny pan. Because I'm taking lunch to my dad tomorrow, and because he loves coconut cake, I decided to make coconut pound cake bunnies. Well, it didn't work out exactly as I'd planned. With the exception of one or two, most of my bunnies looked like war victims. I did everything I possibly could have to keep them from sticking. I melted Crisco, I brushed it into the pan not once, not twice, but three times, then filled each cavity with sifted flour covering every nook and cranny, and tapping it out. I just knew these bunnies were going to pop out like beautiful little animals. No! I had to tap the pan on the counter, I had to tap it on the side, I inverted it, I "re-verted" it. I used a knife to encourage the bunnies out of the pan. Nothing. I tried to get some out while warm (that seemed to work better), then remembered reading somewhere that said allowing them to cool makes them come out easier. No! At any rate, you may have better luck than I did (as so many other people have), and end up with darling cakes. Me? Next year I'm going for the big bunny pan like this one.

On a positive note, the coconut cake was phenomenal! The best coconut cake I think I have ever eaten. In fact, it
is the best pound cake I've ever eaten, coconut or otherwise. I tinkered with a couple of recipes to come up with this one, and, instead of icing mine, because I'm not a huge fan of super sweet icing, I made up a glaze and drizzled it over the warm cakes. It gave them a nice sheen, and an extra good taste. Then, I lightly dusted them with sifted powdered sugar. I cannot recommend this cake enough. If you decide to make mini cakes, like I did, you'll be baking them between 10 and 15 minutes less than you would if you were making an entire cake. Just watch them, when the edges turn light brown, and the cake springs back when lightly touched it's done.
Best Ever Coconut Pound Cake

3 sticks (1½ cups) butter
2 cups sugar
4 eggs
½ cup sour cream
½ cup vanilla Greek yogurt
½ teaspoon baking powder
1 teaspoon coconut extract
½ teaspoon vanilla extract
½ teaspoon almond extract
1¾ cups flour
2 cups flaked coconut

Coconut Glaze:
1 cup sugar
¼ cup water
2 tablespoons butter
1 teaspoon coconut extract

Preheat oven to 325°F. Generously (And I am talking GENEROUSLY!) grease and flour a Bundt or cakelet pan.
In a medium bowl, mix flour and flaked coconut; set aside.

In the bowl of an electric mixer, cream together butter and sugar. Add eggs, and at a time, and mix until light and fluffy. Add sour cream, yogurt, baking powder, and extracts. Mix well.

Add half of the flour mixture to creamed mixture and mix well; add remaining flour mixture and mix until combined.

Let cake batter rest for 5 minutes.

Pour into prepared pan. Bake for 60 - 70 minutes or until a toothpick comes out clean. Cool 25 minutes. Invert onto serving plate; coat with coconut glaze.

For the glaze: Mix ingredients together in a medium saucepan. Cook and stir over low heat until sugar is melted. Pour on top of cake and let the glaze soak into the cake. Allow glaze to dry and then dust cakes with powdered sugar.

This post is linked to:

This post contains affiliate links.

Friday, April 7, 2017

Happy National Beer Day!

Happy National Beer Day! I am not much of a beer drinker, well, truth be told, I don’t drink it at all. But I do love to cook with it, finding it can greatly enhance the flavor of any dish, be it sweet or savory. Here are some of my favorite recipes using beer, ale, and stout. Click on the name of the dish beneath the photo,  and you’ll be taken right to the post with the recipe. Cheers!

River City Casino Beer Cheese Soup

Black Magic Cake with Irish Mocha Frosting

Irish Cheddar and Leek Strata

Kräftig Beer Cheese Soup

Beer Steamed Potatoes

Chocolate Stout Cake


This post is linked to:


Wednesday, April 5, 2017

Cabbage Bunny Tablescape


Earlier this week on Facebook, someone posted a link to an article entitled, “Your Kids Don’t Want Their Grandparents’ Stuff.” A lot of people took issue with this, saying that they would be thrilled to have things passed down to them from their grandparents. I'm not sure how many people feel this way. I do, but I'm a different generation than the current one. I am from a generation that followed one that was made up of people who didn't have much, and who didn't save much. These days people have so many things, leaving behind a colossal amount for their bereaved descendants to have to deal with.
I came face-to-face with this when Mr. O-P passed away, and I was left thousands and thousands of books, along with hoards of other things. This taught me a bit of a lesson in that, people who are grieving have enough to deal with, without the added burden of dispersing someone else's stuff. Now this is not to say that a lot of people wouldn't be thrilled to have things left behind by their parents and grandparents. My boys have already told me things of mine that they would cherish having. That pleases me. But I've also told them to discard my things with reckless abandon should they not want it. Donate! Gift! Consign! Sell! Don’t be sentimental about it. Don't feel guilty about it. Pass it along to someone who will love it as much as I did. I want them to have what they want, and nothing more. What I love, may not be what they love, and they shouldn't be stuck with it.
Why am I mentioning this? Because as I sat at this table today, I was thinking about the various components of this table setting, and the meaning that they have for me.
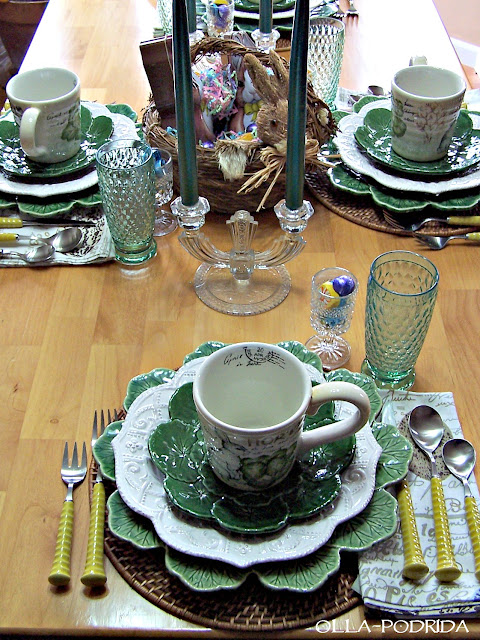
The candlesticks Jim gave to me early in our marriage. I’d spotted them in an antique store when we were out shopping one day, and immediately fell in love. I'm not sure why, because generally they're not my style, but I was crazy about them, and crazier still when they became mine.
The little juice glasses on this table have a bit of a provenance. They came to me from my mother, but they came to her from her childhood best friend, Shirley, who was also Maid of Honor at her and dad’s wedding. They are a set of six, and match a little darling little pressed glass carafe. Shirley long knew that she wouldn't be using them, so decades ago gave them to my mother. I don't think mother ever used them either, so she gave them to me. Naturally, I adore them. So not only is Jim at this table with me, but so is my mother, and her friend, Shirley.
Joining this group is tablescape blogger friend Marigene Purcell, who gifted me with the green charger plates. Isn't it fabulous how one table can have so much meaning? It's things like this that make the table feel special.
The flatware belonged to my mother as well. She gave it to me after she’d given me some yellow chalices that she’d bought at the same time. After she gave me the chalices, she was sorry that she did, because she saw all of the ways in which I used them and figured she could've done the same. So, she decided I might as well have the flatware to match. It gives me a smile every time I pull either of these things out. 

The white plates and bunny mugs are new additions this year; the cabbage plates I've had for decades. The green glassware is also new.
This is the first of two Easter tables that I'll be doing this year. Be sure to come back for the next table, that has equal the history as this one.
Wicker placemats - Pier 1 (You can get them here)
Green chargers - gift
White plates – Amelia Blanc by Versailles (You can get them
here)
Green leaf salad plates - Williams-Sonoma
Green glassware - Villeroy & Boch
Yellow flatware - Noritake
Bunny mugs – Maxcera (Similar ones are available here)
Bunny Basket - Pier 1
Napkins – Pottery Barn

This post contains affiliate links

This post is linked to:

Tuesday, April 4, 2017

Coca-Cola Short Ribs


I am not a soda drinker, but Mr. O-P loved it. So much so, that, when he passed away, I was left with a refrigerator full of cans of soda of various varieties. Because I don't drink it, and hesitate to offer it to the frequent young people I have visiting, I decided the best way to use it was to cook with it.

It's surprising how many different varieties of sodas are used in cooking. In the past I've made Root Beer Pulled Pork, 7-Up Biscuits, Coca-Cola Meatloaf, Coca-Cola Cake, and today I made the most flavorful and tender short ribs on the planet using, once again, a can of Coke.

This recipe could not be simpler. Essentially, 1 to 2 pounds of short ribs are put into the bottom of a crockpot, a bag of dry onion soup mix is sprinkled on top, and then you pour a can of Coca-Cola over it. That's it, just let it hang out on low all day long, enjoy the aroma as it wafts through the house, and wait until dinner.

During the last hour of cooking, because I wanted my entire meal in the crockpot, I threw in a handful of
Melissa's Baby Dutch Yellow Potatoes, mushrooms, quartered onions, and baby carrots. That's all I did, and I had an excellent meal.

If you need a printable recipe, I'll do my best to provide you with one below. Really, though, this is one that can just be committed to memory.

Coca-Cola Short Ribs

1 to 2 pounds boneless short ribs
1 packet Lipton Dry Onion Soup Mix
1 12-oz. can Coca-Cola (NOT diet)
Various Vegetables to your liking

  Place short ribs into the bottom of the slow cooker. Sprinkle onion soup mix on top, and cover all with the Coca-Cola. Set crockpot to “low,” and cook until tender, 6 to 7 hours. During the last hour of cooking, add vegetables (potatoes, carrots, onions, mushrooms, or anything to your liking). When vegetables are fork tender, serve.


Sunday, April 2, 2017

Beer Pimiento Cheese Soup


It's “Sip Some Soup Sunday,” and have I got a soup for you! No matter the season, soup is always a nice meal, or nice accompaniment to a meal. This soup is one of my new favorites -- no surprise here because it's a pimiento cheese variety. You all know my love for pimiento cheese, so I was very excited to try this recipe from the No Spoon Needed blog. What makes it extra good is the inclusion of beer. Keep in mind, as always, the better your ingredients, the better your finished product. I have been using Corner Kick Coffee Stout from local brewery, Six Mile Bridge, located in a suburb of St. Louis, MO called Maryland Heights. I'm not a beer drinker, but love it for cooking because of the richness, the depth of taste, and complex flavor. It does amazing things to this soup! If you're not a local, be sure you get a nice, rich stout if you plan to try this recipe.

Earlier in the week when I made
Red Pepper and Herb Spread, I told you that it could be used in a variety of ways. In my last post I showed it to you as a component in a Veggie Sandwich. Today I'm telling you that it makes a superb topper for this soup. The flavors, the richness, the herbs, all melted into the soup enhance it, making it out of this world! Make the spread, make the soup, and you will delight anyone who consumes it, even if it's only you.
Beer Pimiento Cheese Soup
Slighted adapted from No Spoon Needed

2 tablespoons unsalted butter
1 medium yellow onion, finely diced
2 medium cloves garlic, minced
1/2 cup all-purpose flour
2 cups homemade chicken stock
12 oz. Corner Kick Coffee Stout (or your favorite stout or dark ale)
1- 1/4 cups heavy cream
1 tablespoon Dijon mustard
1/2 tablespoon Worcestershire sauce
1/2 teaspoon hot sauce
2 cups sharp cheddar cheese, shredded
1 cup pepper jack cheese, shredded
1 whole pepper from a 7 oz. jar of
Melissa’s Fire Roasted Sweet Red Bell Peppers, finely diced
Salt and pepper to taste

In a large stock pot melt butter over medium heat. Add the onion, and salt and pepper to taste, and cook, stirring occasionally, until the onion is translucent, about 4 minutes. Stir in the garlic and cook until fragrant, about 30 seconds. Stir in the flour, and cook, stirring constantly, until well combined, about 2 minutes.

Slowly stir in the stock and stout. Increase heat to medium-high, and, whisking constantly, bring to a rapid simmer. Cook until thickened, about eight minutes, stirring constantly. Stir in the cream, Dijon, Worcestershire, and hot sauce. Bring to a simmer, and then reduce heat to medium low. Cook, whisking occasionally, until creamy, about five minutes.

Stir in the cheeses, a cup at a time, whisking after each addition. Continue whisking until smooth. Stir in the chopped red peppers, taste and season with additional salt and pepper, if needed.


This post is linked to:

Saturday, April 1, 2017

How to Make a Delicious Veggie Sandwich

My mother had a lot of pithy sayings when I was growing up. One of them that I distinctly remember was, "For better, or for worse, but not for lunch!" Occasionally, my dad would come home for lunch during the workweek, much to my mother's dismay. She always said that she didn't mind making breakfast, and she didn't mind making dinner, but she hated making lunch. Lunch, she said, was always a difficult meal to come up with. She wasn't wrong. I don't particularly like making lunch either. Generally, soup, a small salad, or a sandwich makes a nice lunch, but which ones do you choose?

I like a good sandwich, and the late Mr. O-P was an excellent sandwich maker. I have been trying to make sandwiches as good as his since he passed away, and I’m seldom able do it.

The most difficult thing about making a sandwich is coming up with an idea. Once I had that idea in my head, I set to work, the sandwich was made, and boy, was it delicious!
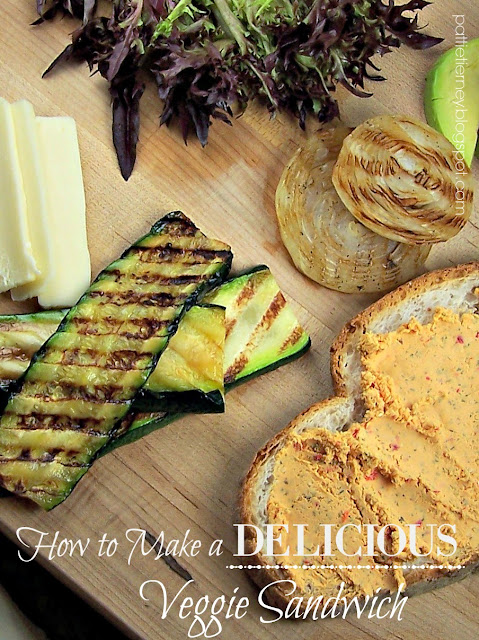
I decided to make a vegetable sandwich, so raided the vegetable bin. As you know from my earlier post, I had prepared a red pepper and herb spread (that is absolutely yummy). Using that as a base on one giant slice of Italian bread that I got at Aldi. (Isn't this gorgeous? One slice, halved, makes a huge sandwich.) I got out my Griddler, and placed slices of zucchini and onion on top while I sliced a bit of cheese and cleaned some lettuce. Once these were suitably grilled, I added a few slice of avocado to the mix and I had one heck of a sandwich. This sandwich was a big meal, but it was delicious, unique, and intensely flavorful, not to mention reasonably healthy and Lenten suitable.
Let this post be your guide to creating an interesting sandwich for you and your family. 
Consider making this for dinner and serving it with a nice cup of tomato bisque. Doesn't that sound good?


This post is linked to:

This post contains affiliate  links.